基于10X Genomics 3’ cDNA的单细胞转录组测序实验指南:使用SQK-LSK114与EXP-PCA001 (SST_9198_v114_revP_06Oct2025)
PromethION: Protocol
基于10X Genomics 3’ cDNA的单细胞转录组测序实验指南:使用SQK-LSK114与EXP-PCA001 V SST_9198_v114_revP_06Oct2025
使用本单细胞转录组测序方法:
- 需预备由10X Genomics GEM-X 单细胞3'试剂盒(V4)或Next GEM 单细胞3'试剂盒(V3.1)制备的 cDNA 扩增子
- 文库制备时间约为210分钟
- 可获得高产出
- 实验过程涉及PCR扩增
仅供研究使用
FOR RESEARCH USE ONLY
概览
使用本单细胞转录组测序方法:
- 需预备由10X Genomics GEM-X 单细胞3'试剂盒(V4)或Next GEM 单细胞3'试剂盒(V3.1)制备的 cDNA 扩增子
- 文库制备时间约为210分钟
- 可获得高产出
- 实验过程涉及PCR扩增
仅供研究使用
1. 实验方案概览
单细胞3’转录组实验指南简介
本方法可对基于 3' 端的全长 cDNA 转录本进行测序,全面解析单个细胞中表达的转录本异构体,并识别可变剪接及融合转录本。此外,该流程还可用于检测转录本中的单核苷酸多态性(SNPs),并根据异构体的表达水平对细胞群体中的不同亚型进行分类。
本指南描述了如何使用连接测序试剂盒 V14(SQK-LSK114)及PCR扩展包(EXP-PCA001)进行单细胞cDNA测序的操作流程及常见问题的解决方法。您需要使用10X Genomics GEM-X 单细胞 3' 试剂盒(V4)或 Next GEM 单细胞 3' 试剂盒(V3.1)将单细胞 mRNA 逆转录为 cDNA,然后对 cDNA 进行生物素标记,再使用定制的寡核苷酸引物进行 PCR 扩增。扩增后的生物素标记 cDNA 将通过链霉亲和素磁珠进行富集(pull-down),随后利用 PCR 引物 (PRM) 进行二次扩增。最后,使用标准的连接测序试剂盒 V14 对 cDNA末端进行修复,以便在 PromethION 设备上测序。
本实验指南在 Lebrigand, K., Magnone, V., Barbry, P. 等,High throughput error corrected Nanopore single cell transcriptome sequencing, Nature Communications 11, 4025 (2020) 报道的方法基础上进行优化,旨在实现全长转录本测序,同时有效去除 cDNA 合成过程中的伪影(artifacts),并校正链偏倚。
请注意: 本实验指南兼容10X Genomics GEM-X 单细胞 3' 试剂盒(V4)或 Next-GEM 单细胞 3' 试剂盒(V3.1)。
如您使用10X Genomics GEM-X 单细胞 5' 试剂盒(V3)或 Next-GEM 单细胞 5' 试剂盒(V2),请参阅实验指南:连接法建库测序 V14 - 使用10X Genomics制备5'端cDNA,在PromethION上进行单细胞转录组测序 (SQK-LSK114) 。
如使用Visium空间基因表达试剂盒(V1)或 Visium HD 3 试剂盒,请参阅实验指南:基于10X Genomics 3’ cDNA的空间转录组测序实验指南:使用SQK-LSK114与EXP-PCA001。
测序工作流程:
实验准备
您将需要:
- 使用10X Genomics GEM-X 单细胞 3'试剂盒(V4)或 Next-GEM 单细胞 3'试剂盒(V3.1),提前制备好带有条形码的单细胞cDNA。 质量评估步骤对确保实验成功至关重要。
- 确保您已准备好测序试剂盒、正确的仪器以及第三方试剂。
- 下载用于数据收集和分析的MinKNOW软件。
- 进行测序芯片质检,确保芯片上具有足够的活性纳米孔,以支持测序顺利进行。
文库制备
| 实验步骤 | 流程 | 时间 | 中止节点 |
|---|---|---|---|
| 富集(pulldown)后PCR | 使用生物素标记cDNA并通过PCR扩增 | 60 分钟 | - |
| 富集(pull-down) | 拉下链霉亲和素磁珠上富集的扩增子 | 40 分钟 | - |
| 富集(pull-down)后PCR | 利用 PCR 引物 (PRM) 进行扩增 | 50 分钟 | - |
| 末端修复 | 对cDNA进行末端修复以便与接头连接 | 30 分钟 | 4°C 过夜 |
| 接头连接及纯化 | 将测序接头连接到cDNA末端 | 20 分钟 | 若为短期保存或重复使用(例如在清洗芯片后再次上样),建议4℃保存 若为长期储存,建议-80℃保存 |
| 测序芯片的预处理及上样 | 对测序芯片进行预处理,然后将制备好的文库加至芯片中进行测序 | 10 分钟 |
测序和分析
您将需要:
- 使用 MinKNOW 软件运行测序,该软件将收集由测序仪产出的原始数据并将其识别为碱基序列。
- 使用EPI2ME软件中的 wf-single-cell工作流程分析数据。
实验方案适用性
本实验方案只适用于与以下产品搭配使用:
- 连接测序试剂盒 V14 (SQK-LSK114)
- PCR 扩展包(EXP-PCA001)
- R10.4.1 PromethION 测序芯片 (FLO-PRO114M)
- 测序芯片清洗剂盒(EXP-WSH004)
- PromethION 测序设备 - PromethION IT 配置要求文件
2. 实验器材及耗材
材料
- 使用10X Genomics GEM-X 单细胞 3' 试剂盒(V4)或 Next GEM 单细胞 3' 试剂盒(V3.1) 制备的10 ng cDNA扩增子
- 10μM 定制的寡核苷酸序列:[Btn]Fwd_3580_partial_read1_defined_for_3'_cDNA (后文提供序列)
- 10μM 定制的寡核苷酸序列:Rev_PR2_partial_TSO_defined_for_3'_cDNA(后文提供序列)
- 连接测序试剂盒V14(SQK-LSK114)
- PCR 扩展包(EXP-PCA001)
耗材
- PromethION 测序芯片(FLO-PRO114M)
- LongAmp 热启动 Taq 酶 2X 预混液(NEB, M0533)
- NEBNext® Ultra II 末端修复/ dA尾添加模块(NEB,E7546)
- 耐盐T4 DNA连接酶(NEB, M0467)
- Qubit™ 1x dsDNA HS Assay(双链DNA高灵敏度检测)试剂盒(ThermoFisher,Q33230)
- Agilent Technologies DNA 12000 试剂盒
- 10 μg/μl M280 链霉素亲和素(Invitrogen, 11205D)
- Agencourt AMPure XP 磁珠(Beckman Coulter™, A63881)
- 1 M Tris-HCl, pH 7.5
- 5 M NaCl (Sigma, 71386)
- 0.5 M EDTA,pH 8(Thermo Scientific, R1021)
- 新制备的 80% 乙醇(用无核酸酶水配制)
- 无核酸酶水(如ThermoFisher,AM9937)
- 15 ml Falcon离心管
- 1.5 ml Eppendorf DNA LoBind 离心管
- 0.2 ml 薄壁PCR管
- Qubit™ 分析管(Invitrogen, Q32856)
仪器
- PromethION 测序芯片遮光片
- PromethION 测序设备
- Agilent 生物分析仪(或等效仪器)
- Hula混匀仪(低速旋转式混匀仪)
- 磁力架(如 DynaMag™-2 磁力架,12321D)
- 迷你离心机
- 涡旋混匀仪
- 热循环仪
- P1000 移液枪和枪头
- P200 移液枪和枪头
- P100 移液枪和枪头
- P20 移液枪和枪头
- P10 移液枪和枪头
- P2 移液枪和枪头
- 盛有冰的冰桶
- 计时器
- Qubit™ 荧光计(或用于质控检测的等效仪器)
根据本实验指南,您需使用10X Genomics GEM-X 单细胞 3'试剂盒(V4)或 Next-GEM 单细胞 3'试剂盒(V3.1)提前制备好10 ng cDNA 扩增产物。
10X Genomics 试剂盒
请注意: 本实验指南兼容10X Genomics GEM-X 单细胞 3' 试剂盒(V4)或 Next-GEM 单细胞 3' 试剂盒(V3.1)。
如您使用10X Genomics GEM-X 单细胞 5' 试剂盒(V3)或 Next-GEM 单细胞 5' 试剂盒(V2),请参阅实验指南:连接法建库测序 V14 - 使用10X Genomics制备5'端cDNA,在PromethION上进行单细胞转录组测序 (SQK-LSK114) 。
如使用Visium空间基因表达试剂盒(V1)或 Visium HD 3 试剂盒,请参阅实验指南:基于10X Genomics 3’ cDNA的空间转录组测序实验指南:使用SQK-LSK114与EXP-PCA001。
定制的寡核苷酸序列
订购以下经 HPLC 纯化的寡核苷酸(100μM),并使用 TE 缓冲液稀释至 10μM,用于建库流程中的 “富集前”(Pre-pull-down)步骤。
| 名称 | 序列 |
|---|---|
| [Btn]Fwd_3580_partial_read1_defined_for_3'_cDNA | 5'-/5Biosg/CAGCACTTGCCTGT CGCTCTATCTTCCTACA CGACGCTCTTCCGATCT-3' |
| Rev_PR2_partial_TSO_defined_for_3'_cDNA | 5'-CAGCTTTCTGTTGGTGCTGA TATTGCAAGCAGTGGTA TCAACGCAGAG-3' |
AMPure XP磁珠
在文库构建前的 cDNA 扩增产物处理阶段,您需额外准备 AMPure XP 磁珠;自末端修复步骤起,您可使用连接测序试剂盒 V14(SQK-LSK114)中提供的 AMPure XP 磁珠(AXP)。
起始DNA
DNA质控
选择符合质量和浓度要求的起始DNA至关重要。使用过少或过多的DNA,或者质量较差的DNA(如,高度碎片化、含有RNA或化学污染物的DNA)都会影响文库制备。
有关如何对DNA样品进行质控,请参考起始DNA/RNA质控实验指南。
化学污染物
从原始样本中提取DNA的方法不同,可能会导致经纯化的DNA中所残留的化学污染物不同。这会影响文库的制备效率和测序质量。请参阅牛津纳米孔社区的污染物 页面了解更多信息。
第三方试剂
Oxford Nanopore Technologies 推荐您使用本实验指南中列出的所有第三方试剂,并已对其进行验证。我们尚未对其它替代试剂进行测试。
我们建议您按制造商说明准备待用的第三方试剂。
测序芯片质检
我们强烈建议您在开始测序实验前,对测序芯片的活性纳米孔数进行质检。质检需在您收到PremethION 测序芯片12周内进行。
Oxford Nanopore Technologies会对活性孔数量少于以下标准的芯片进行替换*:请您按照测序芯片质检文档中的说明进行芯片质检。
| 测序芯片 | 芯片上的活性孔数确保不少于 |
|---|---|
| PromethION 测序芯片 | 5000 |
*(请注意:自收到之日起,芯片须一直贮存于Oxford Nanopore Technologies推荐的条件下。且质检结果须在质检后的两天内递交给我们。)
PCR 扩展包(EXP-PCA001)内容物
请注意: 本方案仅需使用 PCR 引物(PRM)。
连接测序试剂盒 V14 (SQK-LSK114)内容物
请注意: 本产品包含由贝克曼库尔特公司(Beckman Coulter, Inc)生产的 AMPure XP 试剂,并可与试剂盒一起于-20°C 下储存(试剂稳定性将不受损害)。
请注意: DNA 参照(DCS)是一段可比对至 Lambda 基因组 3' 端、且长度为 3.6 kb 的标准扩增子。
3. 富集(pull-down)前PCR
材料
- 使用10X Genomics GEM-X 单细胞 3' 试剂盒(V4)或 Next GEM 单细胞 3' 试剂盒(V3.1) 制备的10 ng cDNA扩增子
- 10μM 定制的寡核苷酸序列:[Btn]Fwd_3580_partial_read1_defined(序列请参见上文“仪器及耗材”一节)
- 10μM 定制的寡核苷酸序列:Rev_PR2_partial_TSO_defined(序列请参见上文“仪器及耗材”一节)
耗材
- LongAmp 热启动 Taq 酶 2X 预混液(NEB, M0533)
- Agencourt AMPure XP 磁珠(Beckman Coulter™,A63881)
- 新制备的 80% 乙醇(用无核酸酶水配制)
- 无核酸酶水(如ThermoFisher,AM9937)
- 1.5 ml Eppendorf DNA LoBind 离心管
- 0.2 ml 薄壁PCR管
仪器
- 热循环仪
- 迷你离心机
- Hula混匀仪(低速旋转式混匀仪)
- 磁力架(如 DynaMag™-2 磁力架,12321D)
- 盛有冰的冰桶
- P1000 移液枪和枪头
- P200 移液枪和枪头
- P100 移液枪和枪头
- P20 移液枪和枪头
- P2 移液枪和枪头
测序芯片质检
我们建议您在开始文库制备之前,对测序芯片的活性纳米孔数量进行质检,以确保其足够支持实验的顺利进行。
详情请参阅 MinKNOW 实验指南中的测序芯片质检说明 。
准备溶于无核酸水中的cDNA扩增子:
- 将10 ng cDNA扩增子转移至一支0.2 ml的薄壁PCR管中。
- 如不足21 μl,请加入无核酸酶水补足。
- 为避免不必要的打断,请轻弹试管以充分混匀。
- 使用迷你离心机瞬时离心。
在同一支0.2 ml 薄壁PCR 管中,混匀以下生物素标记反应试剂:
| 试剂 | 储备液浓度 | 终浓度 | 体积 |
|---|---|---|---|
| cDNA 模板 | 0.48 ng/μl | 0.2 ng/μl | 21 μl |
| [Btn]Fwd_3580_partial_read1_defined_for_3'_cDNA | 10 μM | 0.4 μM | 2 μl |
| Rev_PR2_partial_TSO_defined_for_3'_cDNA | 10 μM | 0.4 μM | 2 μl |
| LongAmp 热启动 Taq酶 2X 预混液 | 2X | 1X | 25 μl |
| Total | - | - | 50 μl |
吹打混匀,并瞬时离心。
按下表条件进行扩增:
| 步骤 | 温度 | 升/降温速率 | 时间 | 循环数 |
|---|---|---|---|---|
| 预变性 | 94°C | 最大速率 | 3 分钟 | 1 |
| 变性 退火降温 退火 延伸 | 94°C 66°C 降至 58°C 58°C 65°C | 最大速率 0.2°C/s 最大速率 最大速率 | 30 秒 40 秒 50 秒 6 分钟 | 4 |
| 最后延伸 | 65°C | 最大速率 | 10 分钟 | 1 |
| 温度保持 | 4°C | - | ∞ | - |
下图为循环条件的示意图: 
将样品转至干净的1.5 ml Eppendorf DNA LoBind离心管中。
涡旋振荡以重悬AMPure XP磁珠。
将40µl重悬的AMPure XP磁珠加入反应体系中,轻弹离心管以充分混合。
将离心管置于Hula混匀仪(低速旋转式混匀仪)上室温孵育5分钟。
准备500μl新制备的80%乙醇(用无核酸酶水配制)。
将样品瞬时离心后置于磁力架上,待磁珠与液相分离,且液相澄清无色。保持离心管在磁力架上不动,用移液枪吸去清液。
保持试管在磁力架上不动,以200µl新鲜制备的80%乙醇(用无核酸酶水配制)洗涤磁珠。小心不要扰动磁珠。用移液枪将乙醇吸走并弃掉。
重复上述步骤。
将离心管瞬时离心后置于磁力架上。用移液枪吸走残留的乙醇。将磁珠在空气中干燥约 30 秒,避免干至表面开裂。
将离心管从磁力架上移开。将磁珠重悬于10 µl 无核酸酶水中。瞬时离心,然后在室温下孵育两分钟。
将离心管置于磁力架上,直到磁珠和液相分离,且洗脱液澄清无色。此时,DNA文库溶解于洗脱液中。
将10µl洗脱液转移至一支新的1.5ml Eppendorf DNA LoBind管中。
取 10 µl 生物素标记的 cDNA,用于后续的富集(pull-down)步骤。
4. 富集(pull-down)
材料
- 10 μl 生物素标记的 cDNA
耗材
- 1 M Tris-HCl, pH 7.5
- 5 M NaCl (Sigma, 71386)
- 0.5 M EDTA,pH 8(Thermo Scientific, R1021)
- 10 μg/μl M280 链霉素亲和素(Invitrogen, 11205D)
- 无核酸酶水(如ThermoFisher,AM9937)
- 15 ml Falcon离心管
- 1.5 ml Eppendorf DNA LoBind 离心管
- 0.2 ml 薄壁PCR管
仪器
- 涡旋混匀仪
- 迷你离心机
- Hula混匀仪(低速旋转式混匀仪)
- 磁力架(如 DynaMag™-2 磁力架,12321D)
- 盛有冰的冰桶
- P1000 移液枪和枪头
- P200 移液枪和枪头
- P100 移液枪和枪头
- P20 移液枪和枪头
- P2 移液枪和枪头
配制 200 µl 10 mM Tris-HCl 缓冲液(pH 7.5),备用。
准备 4 mL 的 2X 洗涤/结合缓冲液(含 10 mM Tris-HCl(pH 7.5)、2 M NaCl 和 1 mM EDTA)。
| 试剂 | 储备液浓度 | 终浓度 | 体积 |
|---|---|---|---|
| Tris-HCl pH 7.5 | 1 M | 10 mM | 40 μl |
| NaCl | 5 M | 2 M | 1600 μl |
| EDTA | 0.5 M | 1 mM | 8 μl |
| 无核酸酶水 | - | - | 2352 μl |
| 总体积 | - | - | 4000 μl |
向一支新的15 ml Falcon 离心管中加入3.5ml 2X 洗涤/结合缓冲液(10 mM Tris-HCl pH 7.5、2 M NaCl、1 mM EDTA)。
向同一支15 ml Falcon 离心管中加入3.5ml 无核酸酶水,制成7ml 1X 洗涤/结合缓冲液。
涡旋振荡,重悬M280 链霉亲和素磁珠(10 μg/μl)。
将5μl M280 链霉亲和素磁珠转至一支洁净的1.5 ml Eppendorf DNA LoBind 离心管中。
加入1 ml 的1X 洗涤/结合缓冲液,将含磁珠的缓冲液涡旋振荡5秒。
将离心管瞬时离心后置于磁力架上,静置两分钟待磁珠聚集成团,再用移液枪吸出上清液。
重复步骤 7 和 8 共两次,即总共进行三次洗涤。
请务必在下一步操作中使用2X缓冲液。使用1X缓冲液会导致结合效率低下。
将磁珠重悬于 10 μl 的 2X 洗涤/结合缓冲液中,使磁珠的终浓度达到 5 μg/μl。
将上述制备的 10 μL 磁珠悬液(浓度为 5 μg/μL,磁珠总量 50 μg)加入至含有 10 μL 生物素标记 cDNA 的离心管中。
将离心管置于Hula混匀仪(低速旋转式混匀仪)上室温孵育20 分钟。
在后续步骤中,请务必按照规定时间确保磁珠在磁力架上充分聚集成团,以免因不易观察而残留于上清液中。
加入1 ml 的1X 洗涤/结合缓冲液,将含有 cDNA 和磁珠的缓冲液涡旋振荡 5 秒。
将离心管瞬时离心后置于磁力架上,静置三分钟待磁珠聚集成团,再用移液枪吸出上清液。请小心不要吸到磁珠。
重复步骤 13 和 14 共两次,即总共进行三次洗涤。
加入200μl 10mM Tris-HCl (pH7.5),涡旋振荡磁珠5 秒。
将离心瞬时离心后置于磁力架上三分钟。用移液枪吸去上清液。
将离心管从磁力架上移开。将磁珠重悬于20μl 的无核酸酶水中。
涡旋振荡5 秒后,瞬时离心,收集扩增子-磁珠结合物。
取 20 µl 扩增子-磁珠复合物用于富集(pull-down)后的 PCR 扩增步骤。
5. 富集(pull-down)后PCR
材料
- 20 μl 扩增子-磁珠复合物
- PCR 引物(PRM)
耗材
- LongAmp 热启动 Taq 酶 2X 预混液(NEB, M0533)
- Agencourt AMPure XP 磁珠(Beckman Coulter™,A63881)
- Qubit™ 1x dsDNA HS Assay(双链DNA高灵敏度检测)试剂盒(ThermoFisher,Q33230)
- Agilent Technologies DNA 12000 试剂盒
- 新制备的 80% 乙醇(用无核酸酶水配制)
- 无核酸酶水(如ThermoFisher,AM9937)
- 0.2 ml 薄壁PCR管
- 1.5 ml Eppendorf DNA LoBind 离心管
- Qubit™ 分析管(Invitrogen, Q32856)
仪器
- 热循环仪
- 涡旋混匀仪
- Hula混匀仪(低速旋转式混匀仪)
- 磁力架(如 DynaMag™-2 磁力架,12321D)
- 迷你离心机
- 盛有冰的冰桶
- P1000 移液枪和枪头
- P200 移液枪和枪头
- P100 移液枪和枪头
- P20 移液枪和枪头
- P10 移液枪和枪头
- P2 移液枪和枪头
- Qubit™ 荧光计(或用于质控检测的等效仪器)
可选仪器
- Agilent 生物分析仪(或等效仪器)
将PCR引物(PRM)于室温下解冻,瞬时离心后置于冰上。
在 0.2 ml 的薄壁 PCR 管中,按下表配制 PCR 反应:
| 试剂 | 储备液浓度 | 终浓度 | 体积 |
|---|---|---|---|
| PCR 引物(PRM) | 10 μM | 0.2 μM | 1 μl |
| 无核酸酶水 | - | - | 4 μl |
| LongAmp 热启动 Taq酶 2X 预混液 | 2X | 1X | 25 μl |
| 总体积 | - | - | 30 μl |
吹打混匀。
用移液枪重悬扩增子-磁珠复合物,然后将20μl 的结合物转移至含有PCR 反应体系的0.2 ml薄壁PCR管中。吹打混匀。
在转入热循环仪前,请务必防止扩增子-磁珠复合物发生沉淀或聚集。
转入热循环仪前,请避免扩增子-磁珠复合物静置时间过长。
切勿 对扩增子-磁珠复合物进行瞬时离心或离心操作。
请勿对PCR管进行瞬时离心,应立即将其置于热循环仪中,并按照下述循环条件进行扩增:
| 步骤 | 温度 | 时间 | 循环数 |
|---|---|---|---|
| 预变性 | 94°C | 3 分钟 | 1 |
| 变性 退火 延伸 | 94°C 56°C 65°C | 15 秒 15 秒 6 分钟 | 4 |
| 最后延伸 | 65°C | 10 分钟 | 1 |
| 温度保持 | 4°C | ∞ | - |
涡旋振荡以重悬AMPure XP磁珠。
将样品转至干净的1.5 ml Eppendorf DNA LoBind离心管中。
将40µl重悬的AMPure XP磁珠加入反应体系中,轻弹离心管以充分混合。
将离心管置于Hula混匀仪(低速旋转式混匀仪)上室温孵育5分钟。
准备500μl新制备的80%乙醇(用无核酸酶水配制)。
将样品瞬时离心后置于磁力架上,待磁珠与液相分离,且液相澄清无色。保持离心管在磁力架上不动,用移液枪吸去清液。
保持试管在磁力架上不动,以200µl新鲜制备的80%乙醇(用无核酸酶水配制)洗涤磁珠。小心不要扰动磁珠。用移液枪将乙醇吸走并弃掉。
重复上述步骤。
将离心管瞬时离心后置于磁力架上,待磁珠和液相分离。用移液枪吸走残留的乙醇。将磁珠在空气中干燥约 30 秒,避免干至表面开裂。
将离心管从磁力架上移开。将磁珠重悬于15 µl 无核酸酶水中。
将离心管置于磁力架上,直到磁珠和液相分离,且洗脱液澄清无色。
将15µl洗脱液转移至一支新的1.5ml Eppendorf DNA LoBind管中。
将磁珠丢弃。
取1μl 洗脱样品,用Qubit 定量——目标回收浓度为100 ng 以上。
使用 Agilent生物分析仪检测片段平均长度,并据此定量 200 fmol 的 cDNA。
您也可假设片段的平均长度为 1 kbp。
图示: 扩增子片段长度分布示例:以 PBMCs(外周血单个核细胞)为起始材料,使用 10x Genomics 3' 基因表达试剂盒(v3.1)制备三个独立的(生物学重复) 3' cDNA样本,并按照 Oxford Nanopore Technologies 提供的 3' 10x cDNA 指南进行建库。使用 Agilent 生物分析仪 2100 联合 DNA 12000 试剂盒对扩增产物进行片段长度分析。
取 200 fmol 的 cDNA 用于末端修复步骤。
6. 末端修复
材料
- 200 fmol cDNA 扩增子
- AMPure XP 磁珠(AXP)
耗材
- NEBNext® Ultra II 末端修复模块(NEB, E7546)中提供的 NEBNext Ultra II末端修复酶混合物(End Prep Enzyme Mix )
- NEBNext® Ultra II 末端修复模块(NEB, E7546)中提供的 NEBNext Ultra II末端修复反应缓冲液(Prep Reaction Buffer)
- Qubit dsDNA HS Assay(双链DNA高灵敏度检测)试剂盒(Invitrogen, Q32851)
- 无核酸酶水(如ThermoFisher,AM9937)
- 新制备的 80% 乙醇(用无核酸酶水配制)
- 0.2 ml 薄壁PCR管
- 1.5 ml Eppendorf DNA LoBind 离心管
- Qubit™ 分析管(Invitrogen, Q32856)
仪器
- P1000 移液枪和枪头
- P100 移液枪和枪头
- P10 移液枪和枪头
- 热循环仪
- 迷你离心机
- Hula混匀仪(低速旋转式混匀仪)
- 磁力架
- 盛有冰的冰桶
- Qubit™ 荧光计(或用于质控检测的等效仪器)
根据生产厂家说明制备NEBNext Ultra II末端修复/ dA尾添加模块,并置于冰上。
为获得最优表现,NEB建议如下:
1.于冰上解冻所有试剂。
2.确保各试剂充分混匀。
注意: 请勿涡旋振荡 Ultra II末端修复酶混合物。
3.每日首次打开一管试剂前,请务必先瞬时离心。
4.Ultra II 末端修复反应缓冲液中可能会包含白色沉淀。如发现沉淀,请待液体回复至室温后,使用移液枪上下吹打数次,打散沉淀;然后快速涡旋振荡混匀。
取 200 fmol 的 cDNA 扩增产物至一洁净的 0.2 ml 薄壁 PCR 管中,并用无核酸酶水补足至 50 µl。
在同一支0.2ml的薄壁PCR管中,混合以下试剂:
每添加一样试剂后,请吹打混匀10-20次,再添加下一样试剂。
| 试剂 | 体积 |
|---|---|
| cDNA 扩增子 | 50 µl |
| Ultra II 末端修复反应缓冲液 | 7 µl |
| Ultra II 末端修复酶混合物 | 3 µl |
| 总体积 | 60 µl |
轻轻吹打以充分混匀,并瞬时离心。
使用热循环仪,依次在 20°C 孵育 5 分钟、65°C 孵育 5 分钟,最后在 4°C 维持。
将DNA样本转至干净的1.5 ml Eppendorf DNA LoBind离心管中。
涡旋振荡以重悬AMPure XP磁珠(AXP)。
将60µl重悬的AMPure XP磁珠(AXP)加入DNA末端修复反应体系中,轻弹试管以充分混合。
将离心管置于Hula混匀仪(低速旋转式混匀仪)上室温孵育5分钟。
准备500μl新制备的80%乙醇(用无核酸酶水配制)。
将样品瞬时离心后置于磁力架上,待磁珠与液相分离,且液相澄清无色。保持离心管在磁力架上不动,用移液枪吸去清液。
保持试管在磁力架上不动,以200µl新鲜制备的80%乙醇洗涤磁珠。小心不要扰动磁珠。用移液枪将乙醇吸走并弃掉。
重复上述步骤。
将离心管瞬时离心后置于磁力架上。用移液枪吸走残留的乙醇。让磁珠在空气中干燥约30秒,但不要干至表面开裂。
从磁力架上取下离心管,轻弹管壁或用移液枪轻轻吹打,将磁珠重悬于 61 µl 无核酸酶水中。在室温下孵育两分钟。
将离心管静置于磁力架上至少1分钟,直到磁珠和液相分离,且洗脱液澄清无色。
将61µl洗脱液转移至一支新的1.5ml Eppendorf DNA LoBind管中。
取1µl洗脱样品,用Qubit定量。
经过末端修复的DNA可用于稍后的接头连接。如需要,您也可以此时将样品置于4°C储存过夜。
7. 接头连接及纯化
材料
- 连接接头(LA)
- 连接测序试剂盒内的连接缓冲液(LNB)
- 短片段缓冲液(SFB)
- AMPure XP 磁珠(AXP)
- 洗脱缓冲液(EB)
耗材
- Qubit dsDNA HS Assay(双链DNA高灵敏度检测)试剂盒(Invitrogen, Q32851)
- 耐盐T4 DNA连接酶(NEB, M0467)
- 1.5 ml Eppendorf DNA LoBind 离心管
- Qubit™ 分析管(Invitrogen, Q32856)
仪器
- 磁力架
- Hula混匀仪(低速旋转式混匀仪)
- 迷你离心机
- 涡旋混匀仪
- P1000 移液枪和枪头
- P100 移液枪和枪头
- P20 移液枪和枪头
- P10 移液枪和枪头
- Qubit™ 荧光计(或用于质控检测的等效仪器)
我们推荐您使用耐盐 T4® DNA连接酶(NEB, M0467)。
耐盐 T4® DNA 连接酶(NEB,M0467)可单独购买,也包含在用于 Oxford Nanopore Technologies® 连接测序的 NEBNext® 配套模块 v2(货号 E7672S 或 E7672L)中。
尽管用户仍可使用早期版本 NEBNext® 模块(NEB,E7180S 或 E7180L)中提供的快速 T4 DNA 连接酶(NEB,E6057),但我们推荐的新试剂在连接效率和连接效果方面表现更优。
虽然第三方连接酶产品可能附带缓冲液,但连接测序试剂盒中提供的连接缓冲液(LNB)在连接接头(LA)时效率更高。
瞬时离心连接接头(LA)和耐盐 T4® DNA连接酶,置于冰上。
于室温下解冻连接缓冲液(LNB),解冻后瞬时离心,并用移液枪吹打混匀。该缓冲液的黏度较高,涡旋振荡会很难混匀。解冻并混匀后,立即置于冰上。
将洗脱缓冲液(EB)于室温下解冻,涡旋振荡混匀后,再瞬时离心,置于冰上。
于室温下解冻一管短片段缓冲液(SFB),涡旋振荡混匀,瞬时离心后置于冰上。
在一支1.5ml Eppendorf DNA LoBind离心管内,将所有试剂按以下顺序混合:
| 试剂 | 体积 |
|---|---|
| 前一步骤所得DNA样品 | 60 µl |
| 连接接头(LA) | 5 µl |
| 连接缓冲液(LNB) | 25 µl |
| 耐盐 T4® DNA连接酶 | 10 µl |
| 总体积 | 100 µl |
轻轻吹打以充分混匀,并瞬时离心。
室温下孵育10分钟。
涡旋振荡以重悬AMPure XP磁珠(AXP)。
将40µl重悬的AMPure XP(AXP)磁珠加入反应体系中,轻弹离心管以充分混合。
将离心管置于Hula混匀仪(低速旋转式混匀仪)上室温孵育5分钟。
将样品瞬时离心后置于磁力架上,待磁珠与液相完全分离,且液相澄清无色。保持离心管在磁力架上不动,用移液枪吸去清液。
加入250 μl短片段缓冲液(SFB)洗涤磁珠。轻弹离心管将磁珠混匀后,将离心管瞬时离心,再放回磁力架,静置待磁珠和液相分离。保持试管在磁力架上不动,用移液枪吸去清液。
请注意: 吸取上清液时请谨慎操作,由于缓冲液黏度较高,可能会将磁珠一同吸出。
重复上述步骤。
将离心管瞬时离心后置于磁力架上。用移液枪吸走残留的上清液。让磁珠在空气中干燥约30秒,但不要干至表面开裂。
将离心管从磁力架上移开。将磁珠重悬于34 µl洗脱缓冲液中(EB)。
瞬时离心,然后在室温下孵育10分钟。
将离心管静置于磁力架上至少1分钟,直到磁珠和液相分离,且洗脱液澄清无色。
将此34 µl洗脱液转移至一支新的1.5ml Eppendorf DNA LoBind管中。
取1µl洗脱样品,用Qubit定量。
取 50–100 fmol 的 DNA 文库,使用洗脱缓冲液(EB)稀释至终体积为 32 µl。
您也可以假设文库的平均片段长度为 1 kb,并直接取约 33 ng 的 DNA 文库用于后续操作。
请注意: 如您的 DNA 文库浓度低于要求,请将全部 32 µl 洗脱产物用于测序。
警告: 如回收量极低,可能提示文库构建失败。
您可按需使用质量与摩尔数转换计算器,如 NEB 计算器。
我们建议使用50–100 fmol 此最终制备好的文库为 R10.4.1 测序芯片上样。
按照推荐浓度将文库上样至测序芯片,可确保最佳孔利用率,从而获得较高的测序产出。如有需要,可用洗脱缓冲液(EB)稀释文库。
构建好的文库即可用于测序芯片上样。在上样前,请将文库置于冰上或4℃条件下保存。
文库保存建议
若为 短期 保存或重复使用(例如在清洗芯片后再次上样),我们建议将文库置于Eppendorf LoBind 离心管中 4℃ 保存。 若为一次性使用且储存时长 超过3个月 ,我们建议将文库置于Eppendorf LoBind 离心管中 -80℃ 保存。
8. PromethION测序芯片的预处理及上样
材料
- 测序缓冲液(SB)
- 文库颗粒(LIB)
- 文库溶液(LIS)
- 测序芯片系绳(FCT)
- 测序芯片冲洗液(FCF)
耗材
- PromethION 测序芯片
- 1.5 ml Eppendorf DNA LoBind 离心管
仪器
- PromethION 测序设备
- PromethION 测序芯片遮光片
- P1000 移液枪和枪头
- P200 移液枪和枪头
- P20 移液枪和枪头
本试剂盒仅兼容R10.4.1测序芯片(FLO-PRO114M)。
将芯片从冰箱中取出后,请将其置于室温环境孵育20分钟再插入 PromethION 测序仪。潮湿环境下的测序芯片上可能会形成冷凝水。因此,请检查测序芯片顶部和底部的金色连接器引脚处是否有水凝结。如有,请使用无绒布擦干。请确保测序芯片的底部有热垫(黑色)覆盖。
于室温下解冻测序缓冲液(SB)、文库颗粒(LIB)或文库溶液(LIS)、测序芯片系绳(FCT)和测序芯片冲洗液(FCF)。完全解冻后,涡旋振荡混匀。然后瞬时离心,置于冰上。
按下文制备测序芯片的预处理液,室温下涡旋振荡混匀。
请根据待上样测序芯片的数量,另拿一支适当体积的离心管,按下表制备测序芯片预处理液。
| 试剂 | 体积(每张芯片) |
|---|---|
| 测序芯片冲洗液 (FCF) | 1,170 µl |
| 测序芯片系绳(FCT) | 30 µl |
| 总体积 | 1,200 µl |
将测序芯片插入 PromethION 24/48 相应卡槽的对接端口:
1.将测序芯片与连接器横竖对齐,以便顺利卡入。
2.用力下压芯片至卡槽,并确认卡夹位置归位。


如插入配置测试芯片的角度出现偏差,可能会损坏PromethION上的引脚并影响测序结果。如您发现 PromethION测序仪芯片位置上的引脚损坏,请通过电子邮件(support@nanoporetech.com)联系我们的技术支持团队。

为文库上样前,完成测序芯片质检,查看可用孔数目。
如此前已对测序芯片进行过质检,则此步骤可省略。
详情请参阅 MinKNOW 实验指南中的测序芯片质检说明 。
顺时针滑动加液孔孔盖,将其打开。

小心地从测序芯片中反旋吸出缓冲液。请勿吸出超过20-30 µl的缓冲液,并确保芯片上的纳米孔阵列一直有缓冲液覆盖。将气泡引入阵列会对纳米孔造成不可逆转地损害。
在加液孔打开的状态下,按下述步骤吸取少量液体,同时避免引入气泡:
- 将P1000移液枪转至200µl刻度。
- 将枪头垂直插入加液孔中。
- 反向转动移液枪量程调节转纽,直至移液枪刻度在220-230 µl之间,或直至您看到有少量缓冲液进入移液枪枪头。

向芯片的加液孔中加入500 µl芯片预处理溶液。加入过程中,请避免引入气泡。等待5分钟,与此同时,您可按以下步骤准备上样文库。

将含有文库颗粒的LIB管用移液枪吹打混匀。
LIB管内的文库颗粒分散于悬浮液中。由于颗粒沉降速度非常快,因此请在混匀颗粒后立即使用。
对于大多数测序实验,我们建议您使用文库颗粒(LIB)。但如文库较为粘稠,您可考虑使用文库溶液(LIS)。
在一支新的1.5ml Eppendorf DNA LoBind离心管内,将所有试剂按以下顺序混合:
| 试剂 | 每张测序芯片的上样体积 |
|---|---|
| 测序缓冲液(SB) | 100 µl |
| 文库颗粒 (LIB),使用前充分混匀;或文库溶液 (LIS) | 68 µl |
| DNA 文库 | 32 µl |
| 总体积 | 200 µl |
请注意: 此处增大了文库的上样量,以增强纳米孔阵列的覆盖度。
缓慢向芯片的加液口中加入500 µl预处理液,完成芯片的预处理。

临上样前,用移液枪轻轻吹打混匀制备好的文库。
使用 P1000 移液枪向加液孔中加入 200 µl 文库。

合上加液孔孔盖。

为获得最佳测序产出,在文库样本上样后,请立即在测序芯片上安装遮光片。
我们建议在清洗芯片并重新上样时,将遮光片保留在测序芯片上。一旦文库从测序芯片中吸出,即可取下遮光片。
如遮光片不在测序芯片上,请您按照以下步骤安装:
- 将遮光片的中空部分(空槽)与测序芯片的加液孔孔盖对齐。确保遮光片的前沿位于测序芯片ID的上方。
- 用力下压遮光片的卡垫部分,遮光片空槽边缘会随卡垫卡入加液孔孔盖下方。


准备就绪后,合上PromethION设备上盖。
请在为PromethION芯片上样后,等待10分钟再启动实验,以提高芯片产出。
9. 数据采集与碱基识别
我们不建议您在同一设备上同时执行测序与数据分析操作。
为确保设备具备充足的计算资源以支持测序或分析流程,我们强烈建议避免同时进行测序及数据分析。 。
在开始数据分析前,请确保测序已完全结束;数据分析应在测序完成后进行。
同样,如设备正在执行数据分析,建议暂缓启动新的测序流程。
请确保使用最新版本的 MinKNOW 软件。
我们强烈建议您在开始测序前,将设备上的 MinKNOW 更新至最新版本。
有关 MinKNOW 更新的更多信息,请参阅我们的 MinKNOW 实验指南。
如何开始测序
MinKNOW 软件负责仪器控制和数据采集,请确保您的计算机或设备上已安装 MinKNOW。有关设置和使用 MinKNOW 的详细信息,请参阅 MinKNOW 实验指南。
我们建议您按照以下推荐配置设置测序实验,其余参数可保持默认值。
MinKNOW 设置
MinKNOW 设置建议如下:
位置
测序芯片位置 :[用户定义]
实验名称 :[用户定义]
测序芯片类型 :FLO-PRO114M
样本编号: [用户定义]
试剂盒
试剂盒选择: 连接测序试剂盒(SQK-LSK114)
运行配置
测序及分析
碱基识别 :开
修饰碱基 :关 [默认]
模型 :高精准碱基识别工具(HAC)
条码拆分 :关 [默认]
比对 :关 [默认]
适应性采样 :关 [默认]
进阶选项
孔扫描间隔时间 :1.5 [默认]
预留孔 :开 [默认]
数据目标
运行限制条件 :当测序时长达到 72 小时时,停止实验
输出
输出文件的格式
.BAM :关
.FASTQ :关
原始序列 :开 [默认]
.POD5 :开 [默认]
过滤 :开 [默认]
质量值 :8 [默认]
最短读长 :200 b
测序后数据分析
当于MinKNOW上完成测序后,您可按照 测序芯片的重复利用及回收 一节中的说明重复使用或返还测序芯片。
完成测序和碱基识别后,即可进行数据分析。有关碱基识别和后续分析选项的详细信息,请参阅 下游分析一节。
在下游分析部分,我们将概述更多用于数据分析的选项。
10. 测序芯片的重复利用及回收
材料
- 测序芯片清洗剂盒(EXP-WSH004)
完成测序实验后,如您希望再次使用测序芯片,请按照“测序芯片清洗试剂盒实验指南”进行操作,并将清洗后的芯片置于+2至+8℃保存。
您可在纳米孔社区获取 测序芯片清洗试剂盒实验指南。
或者,请按照回收程序将测序芯片返还至Oxford Nanopore。
您可在 此处找到回收测序芯片的说明。
如果您遇到问题或对测序实验有疑问,请参阅本实验指南在线版本中的“疑难解答指南”一节。
11. 下游分析
3' cDNA 单细胞转录组测序的下游分析
测序输出文件(.fastq 或 .bam)可通过 wf-single-cell 工作流程进行分析。该流程由 Oxford Nanopore Technologies 开发,基于 Nextflow 构建,是 EPI2ME 分析平台中提供的标准流程之一。wf-single-cell 支持命令行运行,也可通过 EPI2ME desktop app.使用,源代码托管于 GitHub。
运行 wf-single-cell
命令行运行流程如下:
nextflow run epi2me-labs/wf-single-cell \
   --expected_cells <CELL NUMBER> \
   --fastq <READS> \
   --kit <KIT> \
   --ref_genome_dir <REFERENCE> \
   -profile standard
参数说明:
- expected_cells:10x Chromium 实验中预期捕获的细胞数;
- fastq(或 bam):碱基识别后的测序数据文件路径;
- kit:所使用的 10x Genomics 试剂盒及其版本(如 3prime:v4);
- ref_genome_dir:参考基因组及注释文件所在目录,需符合 10x 官方格式(详见 10x 下载中心)。
请确保在运行该工作流程前,系统已安装Nextflow 及Docker 或 Singularity 。更多关于命令行运行的说明,请参考 EPI2ME 快速入门指南 。
输出文件
wf-single-cell 工作流程将生成交互式 HTML 报告,内容包括:
- 基础质控指标:如测序质量评分、读长分布等;
- 实验概况:包括检测到的细胞数及每个细胞的平均序列片段数;
- 诊断图表:如膝点图及饱和度图;
- UMAP 降维图:用于展示细胞聚类。
此外,流程还会输出基因与转录本表达矩阵,格式兼容主流下游分析工具。
12. DNA提取和文库制备过程中可能出现的问题
以下表格列出了提取和文库制备过程中的常见问题,以及可能的原因和解决方法。
我们还在 Nanopore 社区的Support板块提供了常见问题解答(FAQ)。
如果以下方案仍无法解决您的问题,请通过电邮(support@nanoporetech.com)或 纳米孔社区的在线支持(LiveChat)联系我们。
低质量样本
经AMPure磁珠纯化后的DNA回收率低
| 现象 | 可能原因 | 措施及备注 |
|---|---|---|
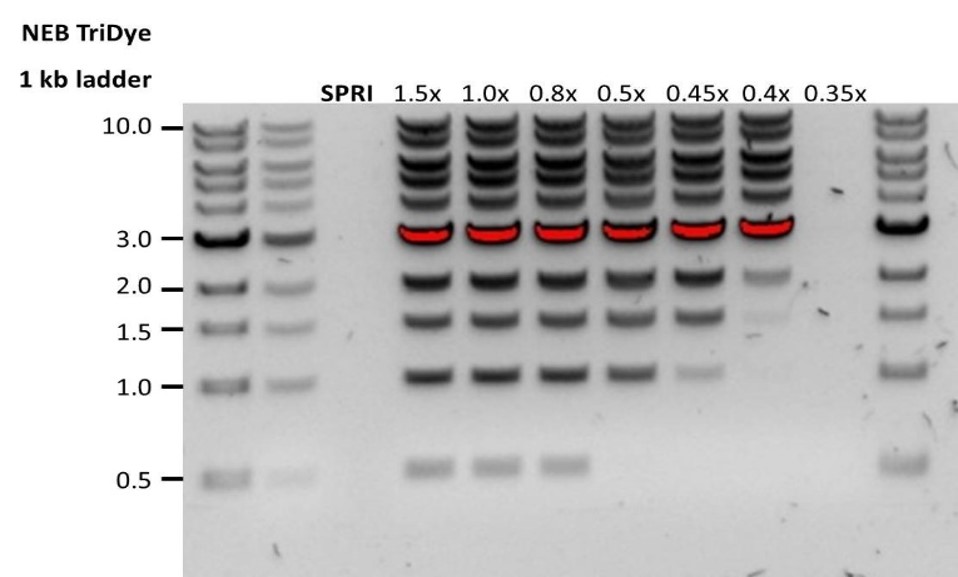
| 低回收率 | AMPure磁珠量与样品量的比例低于预期,导致DNA因未被捕获而丢失 | 1.AMPure 磁珠沉降速度较快,因此在将磁珠加入样品前,请务必充分重悬混匀。 2.当AMPure磁珠量与样品量的比值低于0.4:1时,所有的DNA片段都会在纯化过程中丢失。 |
| 低回收率 | DNA片段短于预期 | AMPure磁珠量与样品量的比值越低,针对短片段的筛选就越严格。每次实验时,请先使用琼脂糖凝胶(或其他凝胶电泳方法)确定起始DNA的长度,据此计算出合适的AMPure磁珠用量。 |
| 末端修复后的DNA回收率低 | 清洗步骤所用乙醇的浓度低于70% | 当乙醇浓度低于70%时,DNA会从磁珠上洗脱下来。请确保使用正确浓度的乙醇。请确保使用正确浓度的乙醇。 |
13. 测序过程中可能出现的问题
以下表格列出了在DNA/RNA提取和文库制备过程中的常见问题,以及可能的原因和解决方法。
我们还在 Nanopore 社区的Support板块提供了常见问题解答(FAQ)。
如果以下方案仍无法解决您的问题,请通过电邮(support@nanoporetech.com)或 纳米孔社区的在线支持(LiveChat)联系我们。
MinKNOW Mux 扫描在测序起始时报告的活性孔数少于芯片质检时报告的活性孔数
| 现象 | 可能原因 | 措施及备注 |
|---|---|---|
| MinKNOW Mux 扫描在测序起始时报告的活性孔数少于芯片质检时报告的活性孔数 | 纳米孔阵列中引入了气泡 | 在对通过质控的芯片进行预处理之前,请务必排出预处理孔附近的气泡。否则,气泡会进入纳米孔阵列对其造成不可逆转地损害。视频中演示了避免引入气泡的最佳操作方法。 |
| MinKNOW Mux 扫描在测序起始时报告的活性孔数少于芯片质检时报告的活性孔数 | 测序芯片没有正确插入测序仪 | 停止测序,将芯片从测序仪中取出,再重新插入测序仪内。请确保测序芯片牢固嵌入测序仪中,并已到达目标温度。如用户使用的是GridION/PromethION测序仪,也可尝试将芯片插入仪器的其它芯片槽进行测序。 |
| MinKNOW Mux 扫描在测序起始时报告的活性孔数少于芯片质检时报告的活性孔数 | 文库中残留的污染物对纳米孔造成损害或堵塞 | 在测序芯片质检阶段,我们用芯片储存缓冲液中的质控DNA分子来评估活性纳米孔的数量。而在测序开始时,我们使用DNA文库本身来评估活性纳米孔的数量。因此,活性纳米孔的数量在这两次评估中会有约10%的浮动。如测序开始时报告的孔数明显降低,则可能是由于文库中的污染物对膜结构造成了损坏或将纳米孔堵塞。用户可能需要使用其它的DNA/RNA提取或纯化方法,以提高起始核酸的纯度。您可在 污染物专题技术文档中查看污染物对测序实验的影响。请尝试其它不会导致污染物残留的 提取方法。 |
MinKNOW脚本失败
| 现象 | 可能原因 | 措施及备注 |
|---|---|---|
| MinKNOW显示 "Script failed”(脚本失败) | 重启计算机及MinKNOW。如问题仍未得到解决,请收集 MinKNOW日志文件并联系我们的技术支持。如您没有其他可用的测序设备,我们建议您先将装有文库的测序芯片置于4°C 储存,并联系我们的技术支持团队获取进一步储存上的建议。 |
纳米孔利用率低于40%
| 现象 | 可能原因 | 措施及备注 |
|---|---|---|
| 纳米孔利用率<40% | 测序芯片中的文库量不够 | 请确保您按照相应实验指南,向测序芯片中加入正确浓度和体积的测序文库。请在上样前对文库进行定量,并使用 Promega Biomath Calculator 等工具中的“dsDNA:µg to pmol”功能来计算DNA分子的摩尔量。 |
| 纳米孔利用率接近0 | 使用连接测序试剂盒,但接头并未与DNA成功连接 | 请确保您在“测序接头连接”步骤中使用的是NEBNext快速连接模块(E6056),以及SQK-LSK114试剂盒中的连接缓冲液(LNB)。同时,请确保每种试剂的用量正确。您可通过制备Lambda对照文库来检验第三方试剂的可用性。 |
| 纳米孔利用率接近0 | 使用连接测序试剂盒;但在接头连接后的纯化步骤中并未使用LFB 或SFB洗涤,而是使用了酒精 | 酒精可导致测序接头上的马达蛋白变性。请确保在测序接头连接后使用洗涤缓冲液(LFB或SFB)。 |
| 纳米孔利用率接近0 | 测序芯片中无系绳 | 系绳(FLT或FCT)随预处理液加至芯片。请确保在制备预处理液时,根据需求将 FLT 或 FCT 添加到相应的冲洗缓冲液 (FB) 或 测序芯片冲洗液 (FCF) 中。 |
读长短于预期
| 现象 | 可能原因 | 措施及备注 |
|---|---|---|
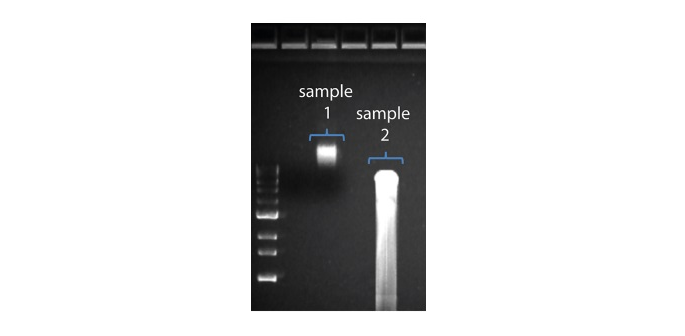
| 读长短于预期 | DNA样本降解 | 读长反映了起始DNA片段的长度。起始DNA在提取和文库制备过程中均有可能被打断。 1.请查阅纳米孔社区中的 提取方法 以获得最佳DNA提取方案。 2.在进行文库制备之前,请先跑电泳,查看起始DNA片段的长度分布。  在上图中,样本1为高分子量DNA,而样本2为降解样本。 在上图中,样本1为高分子量DNA,而样本2为降解样本。3.在制备文库的过程中,请避免使用吹打或/和涡旋振荡的方式来混合试剂。轻弹或上下颠倒离心管即可。 |
大量纳米孔处于不可用状态
| 现象 | 可能原因 | 措施及备注 |
|---|---|---|
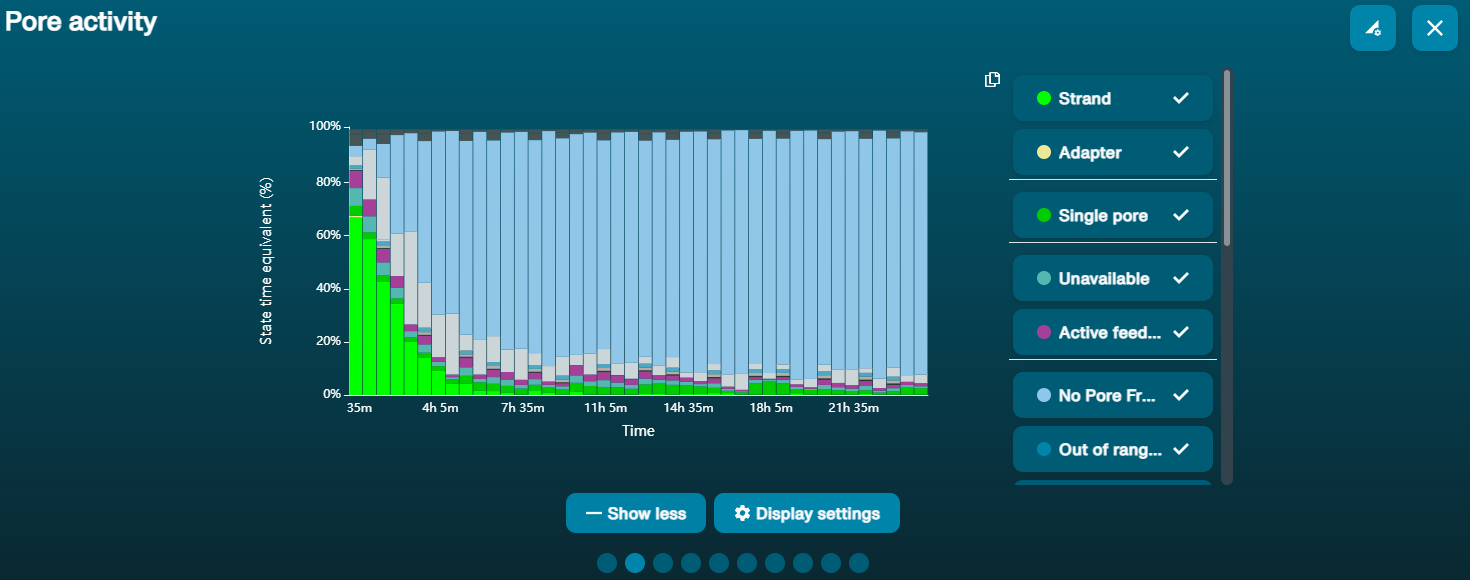
大量纳米孔处于不可用状态 (在通道面板和纳米孔活动状态图上以蓝色表示)  上方的纳米孔活动状态图显示:状态为不可用的纳米孔的比例随着测序进程而不断增加。 上方的纳米孔活动状态图显示:状态为不可用的纳米孔的比例随着测序进程而不断增加。 | 样本中含有污染物 | 使用MinKNOW中的“Unblocking”(疏通)功能,可对一些污染物进行清除。 如疏通成功,纳米孔的状态会变为"测序孔"(sequencing pore)。若疏通后,状态为不可用的纳米孔的比例仍然很高甚至增加: 1.用户可使用 测序芯片冲洗试剂盒 (EXP-WSH004)进行核酸酶冲洗 操作,或 2.使用PCR扩增目标片段,以稀释可能导致问题的污染物。 |
大量纳米孔处于“失活”(Inactive)状态
| 现象 | 可能原因 | 措施及备注 |
|---|---|---|
| 大量纳米孔处于失活状态(在通道面板和纳米孔活动状态图上以浅蓝色表示。膜结构或纳米孔遭受不可逆转地损伤 | 测序芯片中引入了气泡 | 芯片预处理和文库上样过程中引入的气泡会对纳米孔带来不可逆转地损害。请观看 测序芯片的预处理及上样 视频了解最佳操作方法。 |
| 大量纳米孔处于失活/不可用状态 | 样本中含有污染物 | 您可在 污染物专题技术文档 中查看污染物对测序实验的影响。请尝试其它不会导致污染物残留的提取方法。 |
温度波动
| 现象 | 可能原因 | 措施及备注 |
|---|---|---|
| 温度波动 | 测序芯片和仪器接触不良 | 检查芯片背面的金属板是否有热垫覆盖。重新插入测序芯片,用力向下按压,以确保芯片的连接器引脚与测序仪牢固接触。如问题仍未得到解决,请联系我们的技术支持。 |
未能达到目标温度
| 现象 | 可能原因 | 措施及备注 |
|---|---|---|
| MinKNOW显示“未能达到目标温度” | 测序仪所处环境低于标准室温,或通风不良(以致芯片过热) | MinKNOW会限定测序芯片达到目标温度的时间。当超过限定时间后,系统会显示出错信息,但测序实验仍会继续。值得注意的是,在错误温度下测序可能会导致通量和数据质量(Q值)的降低。请调整测序仪的摆放位置,确保将其置于室温下、通风良好的环境中,再在MinKNOW中重启进程。有关 MinION 温度控制的更多信息,请点击 此链接查看。 |


