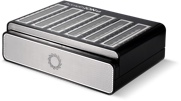
Manual de usuario PromethION 24/48 (PIC_1013_v1_revAH_15Dec2025)
PromethION: Protocol
Manual de usuario PromethION 24/48 V PIC_1013_v1_revAH_15Dec2025
Esta guía le ayudará a instalar y configurar un PromethION 24, PromethION 48 o PromethION 24/48 Serie A.
La sección de preguntas frequentes sobre el dispositivo PromethION 24/48 se encuentra aquí.
Para uso exclusivo en investigación.
*Este documento es una traducción del protocolo inglés, versión AA, actualizado el 22 de enero de 2025.
FOR RESEARCH USE ONLY
Contents
Descripción general
Instalación
- 2. Contenido de la caja
- 3. Instalar y encender el dispositivo
- 4. Configuración y conexión a la red
- 5. Cambiar la contraseña y el nombre del servidor predeterminados
- 6. (Avanzado) Actualizar la zona horaria y establecer un servidor local NTP
- 7. Examinar el equipo
Comprobaciones previas y ejecución de la secuenciación
Tras completar un experimento de secuenciación
- 10. Gestión de datos
- 11. Apagar el dispositivo
- 12. Detener un experimento de secuenciación y apagar el dispositivo
Actualizar el programa
- 13. Actualizar el programa a través de la interfaz de usuario
- 14. (Avanzado) Actualizar el programa a través del Terminal
Actualización del sistema operativo
- 15. (Avanzado) Descargar la imagen ISO y grabarla en una unidad USB
- 16. Cómo arrancar el dispositivo desde una memoria USB
Resolución de problemas
Descripción general
Esta guía le ayudará a instalar y configurar un PromethION 24, PromethION 48 o PromethION 24/48 Serie A.
La sección de preguntas frequentes sobre el dispositivo PromethION 24/48 se encuentra aquí.
Para uso exclusivo en investigación.
*Este documento es una traducción del protocolo inglés, versión AA, actualizado el 22 de enero de 2025.
1. Información sobre el dispositivo
PromethION 24 y 48
El PromethION es un dispositivo de sobremesa compacto, diseñado para secuenciar hasta 24 celdas de flujo (P24) o 48 celdas de flujo (P48). Cada celda de flujo funciona de manera independiente, por lo que los experimentos se pueden realizar simultánea o individualmente. La computación integrada en el PromethION permite transmitir y analizar datos en tiempo real.

Ficha técnica
| Parámetros | Características técnicas |
|---|---|
| Tamaño y peso | Unidad de secuenciación PromethION 24: 190 (alto) x 590 (ancho) x 430 (largo) mm Peso 23 kg Unidad de secuenciación PromethION 48: 190 (alto) x 590 (ancho) x 430 (largo) mm Peso 30 kg Unidad de adquisición de datos: 470 (alto) x 178 (ancho) x 440 (largo) mm Peso 26 kg |
| Potencia | Unidad de adquisición de datos 2 Cables C13 (incluidos con el dispositivo) Tensión de red: 200-240 V CA (50/60 Hz) Consumo máximo de energía: 2 450 W Unidad de secuenciación 1 Cable C13 (incluido con el dispositivo) Tensión de red: 100-240 V CA (50/60 Hz) Consumo máximo de energía: 1 200 W |
| Características del sistema | PromethION 24: 30 TB de almacenamiento SSD, 384 GB de RAM PromethION 48: 60 TB de almacenamiento SSD, 384 GB de RAM PromethION 24/48 Serie A: 60 TB de almacenamiento SSD, 512 GB de RAM, 4 GPU Serie Ampere Características comunes: CPU Intel para Ubuntu e identificación de bases con el acelerador PromethION |
| Programas preinstalados | Sistema operativo Ubuntu, Sistema operativo PromethION, MinKNOW |
| Condiciones ambientales | Diseñado para secuenciar a entre 18 °C y 22 °C* |
- El intervalo de funcionamiento de aparatos electrónicos es de 5 °C a 40 °C
Información sobre el PromethION
Preguntas frecuentes
La sección de Preguntas frecuentes del dispositivo se encuentra aquí.
2. Contenido de la caja
Embalaje del PromethION 24/PromethION 48
PromethION 24/48 Serie A
El dispositivo se envía a la mayoría de países del mundo y se hace en dos cajas separadas: una con la Unidad de adquisición de datos y otra con la Unidad de secuenciación. Los dispositivos se almacenan y envían a temperatura ambiente (15 °C–25 °C).
PromethION 24 Combined
Este dispositivo se envía a algunos países seleccionados. La Unidad de adquisición de datos y la Unidad de secuenciación, que forman el PromethION 24 Combined se envían en una sola caja. El dispositivo se almacena y envía a temperatura ambiente (15 °C–25 °C). Un técnico especializado en Oxford Nanopore Technologies debe desempaquetar e instalar el PromethION 24 Combined.
Contenido de la caja - PromethION 24
- Unidad de secuenciación PromethION 24
- Unidad de adquisición de datos PromethION
- 3 cables C13, adecuados para el país de destino
- 24 Celdas de prueba de configuration (CTC)
- 2 cables PCle
- 2 cables USB-A a Mini USB
- 1 cable USB-A a USB B
- 1 cable MiniDP (Display port)
- 1 memoria USB-A (imagen ISO de restablecimiento)
- 1 adaptador USB-C a USB-A
Contenido de la caja - PromethION 48
- Unidad de secuenciación PromethION 48
- Unidad de adquisición de datos PromethION 48
- 3 cables C13, adecuados para el país de destino
- 48 Celdas de prueba de configuration (CTC)
- 3 cables PCle
- 3 cables USB-A a Mini USB
- 1 cable USB-A a USB B
- 1 cable MiniDP (Display port)
- 1 memoria USB-A (imagen ISO de restablecimiento)
- 1 adaptador USB-C a USB-A
Indicadores LED
Las luces LED proporcionan información acerca del estado de cada posición de celda de flujo. Las luces siguen los siguientes patrones:
- Sin luz: no hay celda de flujo
- Azul: celda de flujo lista
- Verde: script en ejecución
- Blanco: script completado. La luz no se verá blanca hasta que haya finalizado la calibración.
- Rojo: error en el microprograma (firmware) o error de comunicación entre la Unidad de secuenciación y la Unidad de adquisición de datos.
3. Instalar y encender el dispositivo
Si ha adquirido un PromethION 24 Combined, el despositivo debe desembalarlo e instalarlo un técnico acreditado por Oxford Nanopore Technologies.
Preparación previa a la instalación
Antes de instalar el dispositivo, se debería disponer de lo siguiente:
- Módulos SFP+ y 2 cables de fibra óptica de 10 Gb/s o 2 cables de cobre de 10 Gb/s (Ethenet - Cat6a o superior)
- Un cable de cobre individual para examinar el equipo
- Puertos para fibra óptica o cobre que proporcionen: Una dirección IP a través del protocolo DHCP - Una dirección IP a través del protocolo DHCP - Acceso a internet solo de salida a través de los puertos 80 y 443
- 1 monitor compatible con VGA (Video Graphics Array) para la unidad de adquisición de datos del PromethION 24/48 estándar
- 1 monitor compatible con VGA/DisplayPort para la nueva unidad de adquisición de datos del PromethION Serie A
- 1 cable VGA
- 1 teclado conectado por USB
- 1 ratón conectado por USB
- 3 fuentes de alimentación/enchufes de pared para la unidad de secuenciación y la unidad de adquisición de datos del PromethION - 1 fuente de alimentación/enchufe de pared para el monitor
- Opcional: Sistema SAI con cables C14
Ubicación recomendada en el laboratorio
- Colocar el dispositivo en una superficie firme y limpia. Si ha adquirido un PromethION 24 Combined, la Unidad de secuenciación y la Unidad de adquisición de datos el dispositivo deben instalarse una junto a la otra. El espacio necesario para instalar un PromethION es 167 cm x 75 cm
- Intentar que los cables de alimentación, Ethernet y/o fibra óptica estén cerca
- Procurar que la toma de corriente sea fácilmente accesible, por si es necesario desconectar el dispositivo con urgencia.
- La secuenciación debería llevarse a cabo a una temperatura de entre 18 °C y 22 °C, con la tapa del dispositivo cerrada.
- Dejar un espacio de 30 cm en la parte trasera y a los lados del dispositivo. No cubrir las rejillas de ventilación
- AVISO - La parte trasera del dispositivo se calentará durante el funcionamiento
Desembalar el dispositivo y colocarlo en el lugar escogido.
Colocar la unidad de secuenciación en la mesa donde va a utilizarse y la unidad de adquisición de datos a menos de dos metros de distancia.
Si utiliza un PromethION 24 combined, un técnico acreditado por Oxford Nanopore Technologies debería desembalarlo e instalarlo. Una vez el dispositivo se ha instalado correctamente, continúe desde el paso 9.
Unidad de adquisición de datos y unidad de secuenciación PromethION 24

Unidad de adquisición de datos y unidad de secuenciación PromethION 48

Conectar el cableado de datos en el puerto correspondiente (con conexión de cobre o fibra óptica).
Como parte de la configuración, se debe conectar un cable de conexión a la red, de acuerdo con la sección 4 de este documento, titulada Configuración de la red. Esta conexión es fundamental para:
- Descargar las actualizaciones del programa
- Realizar comprobaciones del equipo
Comprobar que la red esté activa y configurada correctamente antes de continuar con la configuración.
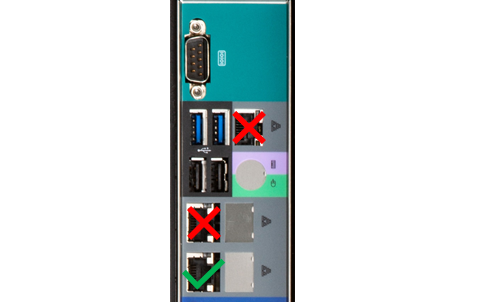
Inserción de módulos SFP
Si se utilizan cables de fibra óptica, se deben insertar los módulos SFP correspondientes en los puertos situados en la parte trasera de la Unidad de adquisición de datos.

Este es el primer paso de la conexión entre las unidades. Conectar los cables PCle entre la Unidad de secuenciación y la Unidad de adquisición de datos.
Conectar los cables PCle a las partes traseras de la Unidad de secuenciación y la Unidad de adquisición de datos.
Nótese, en el P48, los cables deben ser del mismo color que el puerto en el que se inserten, por ejemplo, el rojo se insertará en el rojo, el azul en el azul y el verde en el verde. Las Unidades de adquisición de datos anteriores usan un patrón diferente; siga el patrón indicado en su dispositivo.
PromethION 24

PromethION 48

Este es el segundo paso de la conexión entre unidades. Conectar los cables USB entre la unidad de adquisición de datos y la unidad de secuenciación.
PromethION 24 Conectar:
- 2 cables USB A a Mini USB
- 1 cable USB A a USB B
de la unidad de adquisición de datos a la unidad de secuenciación (véase el diagrama a continuación):

PromethION 48 Conectar:
- 3 cables USB A a Mini USB
- 1 cable USB A a USB B
de la unidad de adquisición de datos a la unidad de secuenciación (véase el diagrama a continuación):

Conectar los periféricos en los puertos correspondientes.
Conectar lo siguiente:
1a. Cable de monitor VGA (si se utiliza la unidad de adquisición de datos estándar del PromethION 24/48) 1b. Cable de monitor VGA/Mini DisplayPort (si se utiliza la unidad de adquisición de datos estándar del PromethION 24/48) 2. Teclado con conexión USB 3. Ratón USB, en el puerto USB A restante.
* Utilizar el puerto Mini DisplayPort o el puerto VGA. No es posible utilizar las dos a la vez.

Dos cables de alimentación C13 conectarán la unidad de adquisición de datos y un cable C13 conectará la unidad de secuenciación.
Insertar dos de los cables C13 suministrados en la parte superior de la unidad de adquisición de datos y el tercero en la unidad de secuenciación. Conectar todo a la corriente eléctrica.
Nota: recibirá al menos tres cables C13, con enchufes adecuados a su país de residencia.
Conectar el dispositivo a la red eléctrica. Encender las unidades del PromethION en el siguiente orden:
- Encender la unidad de secuenciación

- Esperar 3 minutos
- Encender la unidad de adquisición de datos

En la pantalla de inicio, se le pedirá que introduzca la contraseña del dispositivo. La contraseña por defecto es "prom" (también disponible en la Guía de inicio rápido). Acto seguido, se le pedirá que la actualice. Establezca la nueva contraseña siguiendo los siguientes criterios:
- 8 caracteres como mínimo
- Debe contener una mayúscula y una minúscula
- Debe contener un número o carácter especial
- No puede ser un palíndromo (por ejemplo, anilina)
- Debe diferir de cualquier contraseña anterior en almenos 2 caracteres
Hacer doble clic en el icono de MinKNOW, ubicado en el escritorio.
![]()
Recomendamos a los usuarios que inicien sesión en MinKNOW con los datos de acceso de la comunidad Nanopore.
Para iniciar sesión, debe estar conectado a Internet.
En la pantalla inicial, es posible cambiar el idioma de la interfaz en la esquina inferior derecha.

El sistema le pedirá que introduzca su dirección de correo electrónico y contraseña de Nanopore:
Si tiene problemas para iniciar sesión, visite la página de ayuda de la comunidad Nanopore (https://community.nanoporetech.com/support) y elija la opción Continuar como invitado de forma temporal.
Seleccionar el dispositivo de secuenciación en el Gestor de conexiones.

Esta acción le llevará al Panel general de secuenciación, que muestra las celdas de flujo insertadas en el dispositivo elegido.

4. Configuración y conexión a la red
Cambios en la configuración de red
Los parámetros de red del PromethION 24 o PromethION 48 deben adaptarse a la red local.
AVISO Cambiar los parámetros de red en el PromethION puede dejar el dispositivo fuera de servicio.
Si no está seguro de qué parámetros utilizar para configurar la red del PromethION, póngase en contacto con su departamento de Informática.
Requisitos de red
Oxford Nanopore se compace en informar que a partir de Noble, es posible configurar los ajustes de red tanto desde la interfaz de usuario como desde la línea de comandos; resulta práctico establecer los ajustes básicos mediante la línea de comandos y afinar parámetros adicionales desde la interfaz gráfica.
Sin embargo, en Focal aún recomendamos utilizar la interfaz gráfica cuando se trata de una configuración de una red única y la línea de comandos en configuraciones enlazadas.
Es posible utilizar cables de cobre o fibra para conectar el PromethION a la infraestructura local. El tipo de puerto está marcado en la parte posterior del dispositivo, tal como se muestra en el diagrama a continuación:

Esta conexión se utilizará para:
- Enviar información de telemetría* a Oxford Nanopore Technologies.
- Recibir actualizaciones del programa y microprograma en el dispositivo.
- Transmitir datos de secuencia biológica a su infraestructura de almacenamiento local.
Poner en funcionamiento el PromethION en la infraestructura local (el cliente deberá proporcionar el cableado apropiado).
* La telemetría contiene metadatos sobre la configuración y las condiciones de los experimentos de secuenciación. No se incluye nada específico sobre el contenido genómico de lecturas individuales; solo se registra información genérica, como la longitud de la secuencia y el índice Q score.
Para la transferencia de datos, utilice bien conexiones de cobre o de fibra óptica, NO LAS DOS JUNTAS.
Oxford Nanopore solo proporciona asistencia y scripts compatibles con cobre o fibra, un equipo interno con especialistas en redes, tiene margen para emplear ambos cuando sea necesario.
Si cuenta con especialistas en redes, es viable combinar cobre y fibra y habilitar rutas diversas; sin embargo, Oxford Nanopore no podrá ayudar ni ofrecer asistencia en la configuración.
Es posible realizar la transferencia de datos mediante conexiones de cobre o de fibra óptica. No recomendamos ninguna en concreto, ya que dependerá de la red local qué tipo de conexión será la más adecuada.
Nota: conecte solo cables de cobre o solo cables de fibra. Utilizar ambos a la vez no es compatible con el dispositivo y creará problemas de conexión si no cuenta con la ayuda de un especialista.
El siguiente diagrama ofrece un resumen de las opciones de conexión. Consulte las instrucciones a continuación para comprobar que las conexiones de red del PromethION están configuradas correctamente.

Instrucciones para configurar una conexión con cables de cobre
Puerto de cobre individual con protocolo DHCP activo
- Abrir una ventana del terminal e introducir el siguiente comando:
ont-network-settings --dhcp --interfaces eno2 –overwrite
2. Apagar y encender el PromethION.
Conexiones: Utilizar solo el puerto RJ45 de abajo. 
Puerto de cobre doble con protocolo DHCP activo
- Abrir una ventana del terminal e introducir el siguiente comando:
ont-network-settings --dhcp --interfaces copper --bond failover --overwrite
2. Apagar y encender el PromethION.
Nota: si utiliza LACP/Cisco/802.3ad, entonces introduzca:
--bond lacp
Compruebe que el conmutador de red esté configurado correctamente. LACP requiere dos puertos asignados.
Conexiones: Utilizar los dos puertos RJ45. 
Puertos de cobre dobles con una dirección IP estática
- Abrir una ventana del terminal e introducir el siguiente comando:
ont-network-settings --address 1.1.1.1 --subnet 255.255.255.0 --gateway 1.1.1.254 --dns 1.1.1.2,1.1.1.3 --search mycompany.local --bond failover --interfaces copper --overwrite
2. Apagar y encender el PromethION.
Nota: deberá cambiar las direcciones IP de arriba, de acuerdo con la configuración de red de su centro.
Conexiones: En este caso, utilizar los dos puertos RJ45; sin embargo, la configuración también funcionará si tiene solo el puerto inferior ocupado. 
Instrucciones para configurar una conexión de fibra
Puerto de fibra individual con protocolo DHCP
- Abrir una ventana del terminal e introducir el siguiente comando:
ont-network-settings --dhcp --interfaces enp129s0f1 --overwrite
2. Apagar y encender el PromethION.
Conexiones: Utilizar el puerto de fibra de la derecha:

Puerto de fibra doble con protocolo DHCP
- Abrir una ventana del terminal e introducir el siguiente comando:
ont-network-settings --dhcp --interfaces fibre --bond failover --overwrite
2. Apagar y encender el PromethION.
Nota: si utiliza LACP/Cisco/802.3ad, entonces introduzca:
--bond lacp
Compruebe que el commutador de red esté configurado de forma adecuada. LACP requiere dos puertos asignados.
Conexiones: Utilizar los dos puertos de fibra. 
Puertos de fibra dobles con una dirección IP estática
- Abrir una ventana del terminal e introducir el siguiente comando:
ont-network-settings --address 1.1.1.1 --subnet 255.255.255.0 --gateway 1.1.1.254 --dns 1.1.1.2,1.1.1.3 --search mycompany.local --bond failover --interfaces fibre --overwrite
2. Apagar y encender el PromethION.
Nota: Deberá cambiar las direcciones IP de arriba, de acuerdo con la configuración de red de su centro.
Conexiones: En este caso, utilice los dos puertos de fibra; sin embargo, la configuración también funcionará si tiene solo el puerto derecho ocupado. 
Validar la dirección IP
Utilizar el comando "ifconfig" para comprobar que la dirección IP utilizada —dirección estática o DHCP— se haya configurado correctamente.
La información devuelta contendrá la dirección IP del enlace Ethernet, como se muestra a continuación:
prom@PRO00001:~$ ifconfig
docker0: flags=4099<UP,BROADCAST,MULTICAST>  mtu 1500
        inet 172.17.0.1  netmask 255.255.0.0  broadcast 172.17.255.255
        ether 02:42:35:39:60:40  txqueuelen 0  (Ethernet)
        RX packets 0  bytes 0 (0.0 B)
        RX errors 0  dropped 0  overruns 0  frame 0
        TX packets 0  bytes 0 (0.0 B)
        TX errors 0  dropped 0 overruns 0  carrier 0  collisions 0
eno1: flags=4163<UP,BROADCAST,RUNNING,MULTICAST>  mtu 1500
        inet 10.150.60.13  netmask 255.255.255.0  broadcast 10.150.60.255
        inet6 fe80::78cf:8a5c:26ec:4611  prefixlen 64  scopeid 0x20<link>
        ether 3c:7c:3f:be:02:81  txqueuelen 1000  (Ethernet)
Nota: la dirección que debe coincidir con la red es: inet 10.150.60.13 netmask 255.255.255.0 broadcast 10.150.60.255
5. Cambiar la contraseña y el nombre del servidor predeterminados
Ir a la configuración del servidor para acceder a la Configuración del dispositivo.
En el cuadro Sistema, hacer clic en Restablecer la contraseña.

En el cuadro de diálogo Cambiar la contraseña, introducir la contraseña actual, seguida de la nueva contraseña.

Pulsar en Restablecer contraseña.
(Avanzado) Cambiar la contraseña predeterminada a través del Terminal
Para garantizar la seguridad de su dispositivo, cambie la contraseña predeterminada lo antes posible.
Para ello, abra una ventana del Terminal y escriba: passwd
A continuación, pulse Aceptar
En el Terminal, aparecerán los siguientes argumentos; siga las instrucciones indicadas:
prom@PRO00001:~$ passwd
Changing password for prom.
(current) UNIX password: prom
Enter new UNIX password: XXXX
Retype new UNIX password: XXXX
passwd: password updated successfully
Nótese, la nueva contraseña del PromethION/UNIX debe seguir las directrices locales de su departamento de informática, relativas a la seguridad del dispositivo. Anote la nueva contraseña, ya que será necesaria para iniciar sesión en su dispositivo y para obtener privilegios de sudo, necesarios por ejemplo para las actualizaciones de programa de Oxford Nanopore Technologies.
(Avanzado) Cambiar el nombre del servidor predeterminado
- Para actualizar el nombre del servidor en el dispositivo, ejecutar el siguiente comando y reemplazar la parte
<new_hostname>por el nombre de servidor deseado (omitiendo los corchetes angulares<>):
sudo -S hostnamectl set-hostname <new_hostname>
- Apagar el dispositivo con el siguiente comando y, acto seguido, pulsar el botón de encendido:
sudo shutdown -h now
6. (Avanzado) Actualizar la zona horaria y establecer un servidor local NTP
Actualizar la zona horaria:
Primero hay que encontrar el nombre de la zona horaria deseada mediante el comando:
sudo timedatectl list-timezones
A continuación, cambiar la zona horaria utilizando los siguientes comandos:
sudo su -
Timezone="Europe/London"
timedatectl set-timezone $Timezone
systemctl restart systemd-timesyncd
Establecer un servidor local NTP:
Nota: si se utiliza un servidor horario externo de Internet, es necesario tener acceso a un protocolo NTP, puerto 123.
Introducir los siguientes comandos:
sudo su -
printf "[Time]\nNTP=ntp.ubuntu.com\nFallbackNTP=pool.ntp.org\n" | tee /etc/systemd/timesyncd.conf
timedatectl set-ntp false
timedatectl set-ntp true
systemctl restart systemd-timesyncd.service
hwclock --systohc
timedatectl set-local-rtc 0
Comprobar si el proceso ha funcionado escribiendo:
timedatectl status
Nota: tal vez tarde varios minutos en sincronizarse con el servidor NTP.
7. Examinar el equipo
Comprobación del equipo
La comprobación del equipo debe realizarse en todos los dispositivos nuevos y cada vez que se actualice el programa.
Cargar las CTC suministradas en las posiciones del dispositivo
Todas las hileras deben cargarse con celdas de prueba CTC.
Nota:
- El PromethION 24 tiene tres hileras que contienen un total de 24 posiciones.
- El PromethION 48 tiene seis hileras que contienen un total de 48 posiciones.

La interfaz de MinKNOW reconoce las CTC a medida que se cargan; la LED adyacente a la celda de flujo mostrará primero una luz azul (inicio), seguida de una luz verde (preparado).
Una vez las CTC estén cargadas, cerrar la tapa de la parte superior del dispositivo.
Inserción correcta de las CTC PromethION
Nótese que en la imagen se muestran celdas de flujo estándar, pero la recomendación también se extiende a las CTC.
Alinear la CTC con el conector (horizontal y verticalmente) e insertarla suavemente en su posición.

Presionar con firmeza la CTC en la bandeja y asegurarse de que el cierre encaje.

Insertar la CTC en el ángulo equivocado, puede dañar las clavijas del PromethION:

Ir a la página de inicio y pulsar en la opción "Examinar el equipo".

Seleccionar las CTC en la interfaz gráfica.
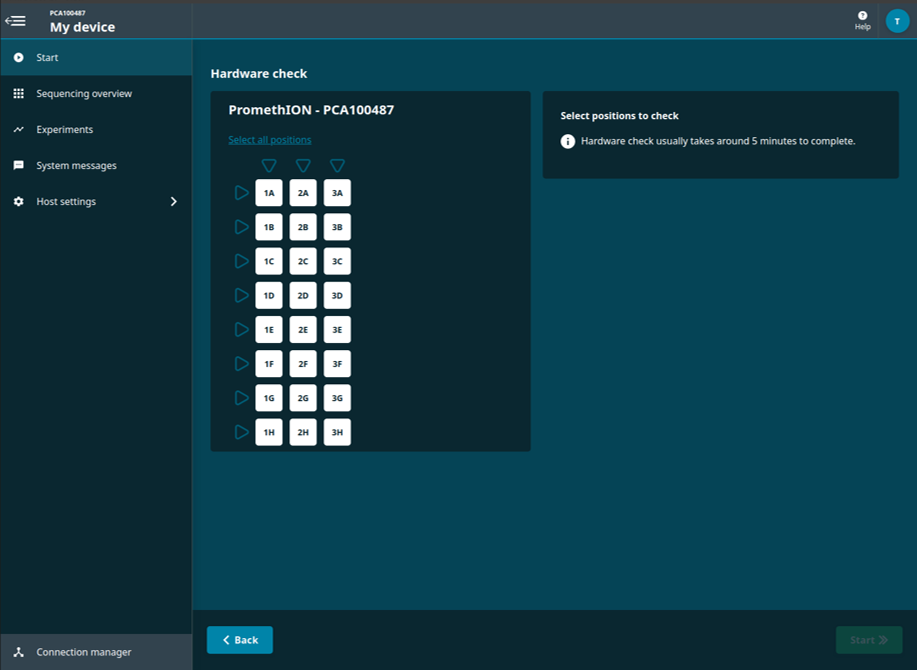
Pulsar "Inicio" en la esquina inferior derecha de la pantalla.
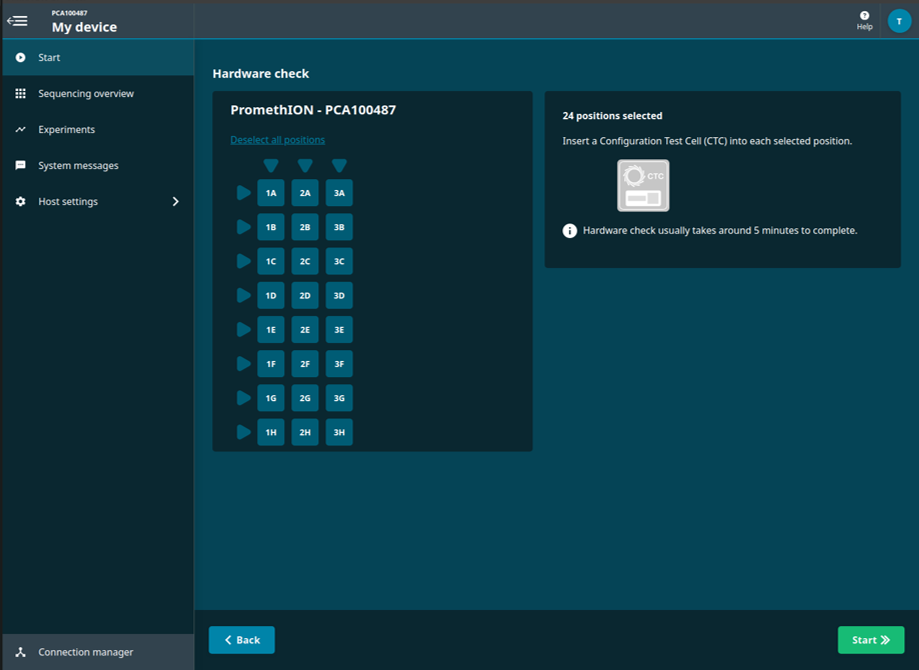
El estado de la comprobación se mostrará en pantalla.

Cuando acabe la comprobación, se le notificará si la(s) posición(es) seleccionada(s) ha(n) superado o no la comprobación.

El "Panel general de secuenciación" mostrará si el dispositivo superó la comprobación.
Comprobación del equipo superada:
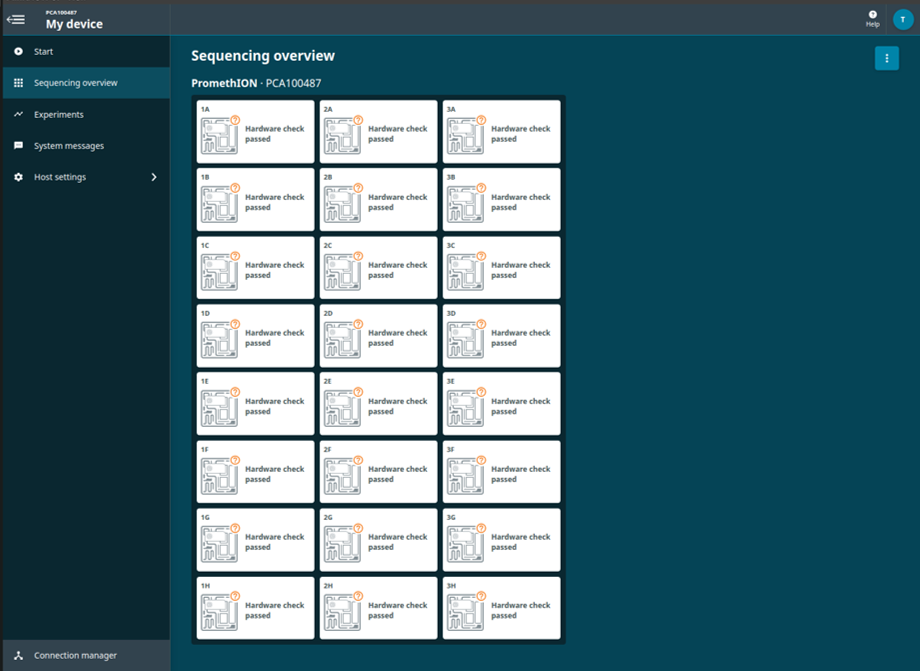
Si la comprobación del equipo falla, retire la CTC, vuelva a insertarla e inicie una nueva comprobación. Si falla por segunda vez, contacte con Atención al cliente por el chat Live Support.
Para ver el informe de la comprobación, ir a "Comprobación del equipo" y pulsar "Ver informes anteriores".

Seleccionar el/los informe(s) que se deseen exportar.
Al lado del informe(s) seleccionado aparecerá un icono de verificación verde. Pulsar "Exportar". 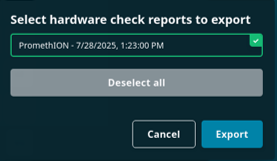
Informe de la comprobación del equipo
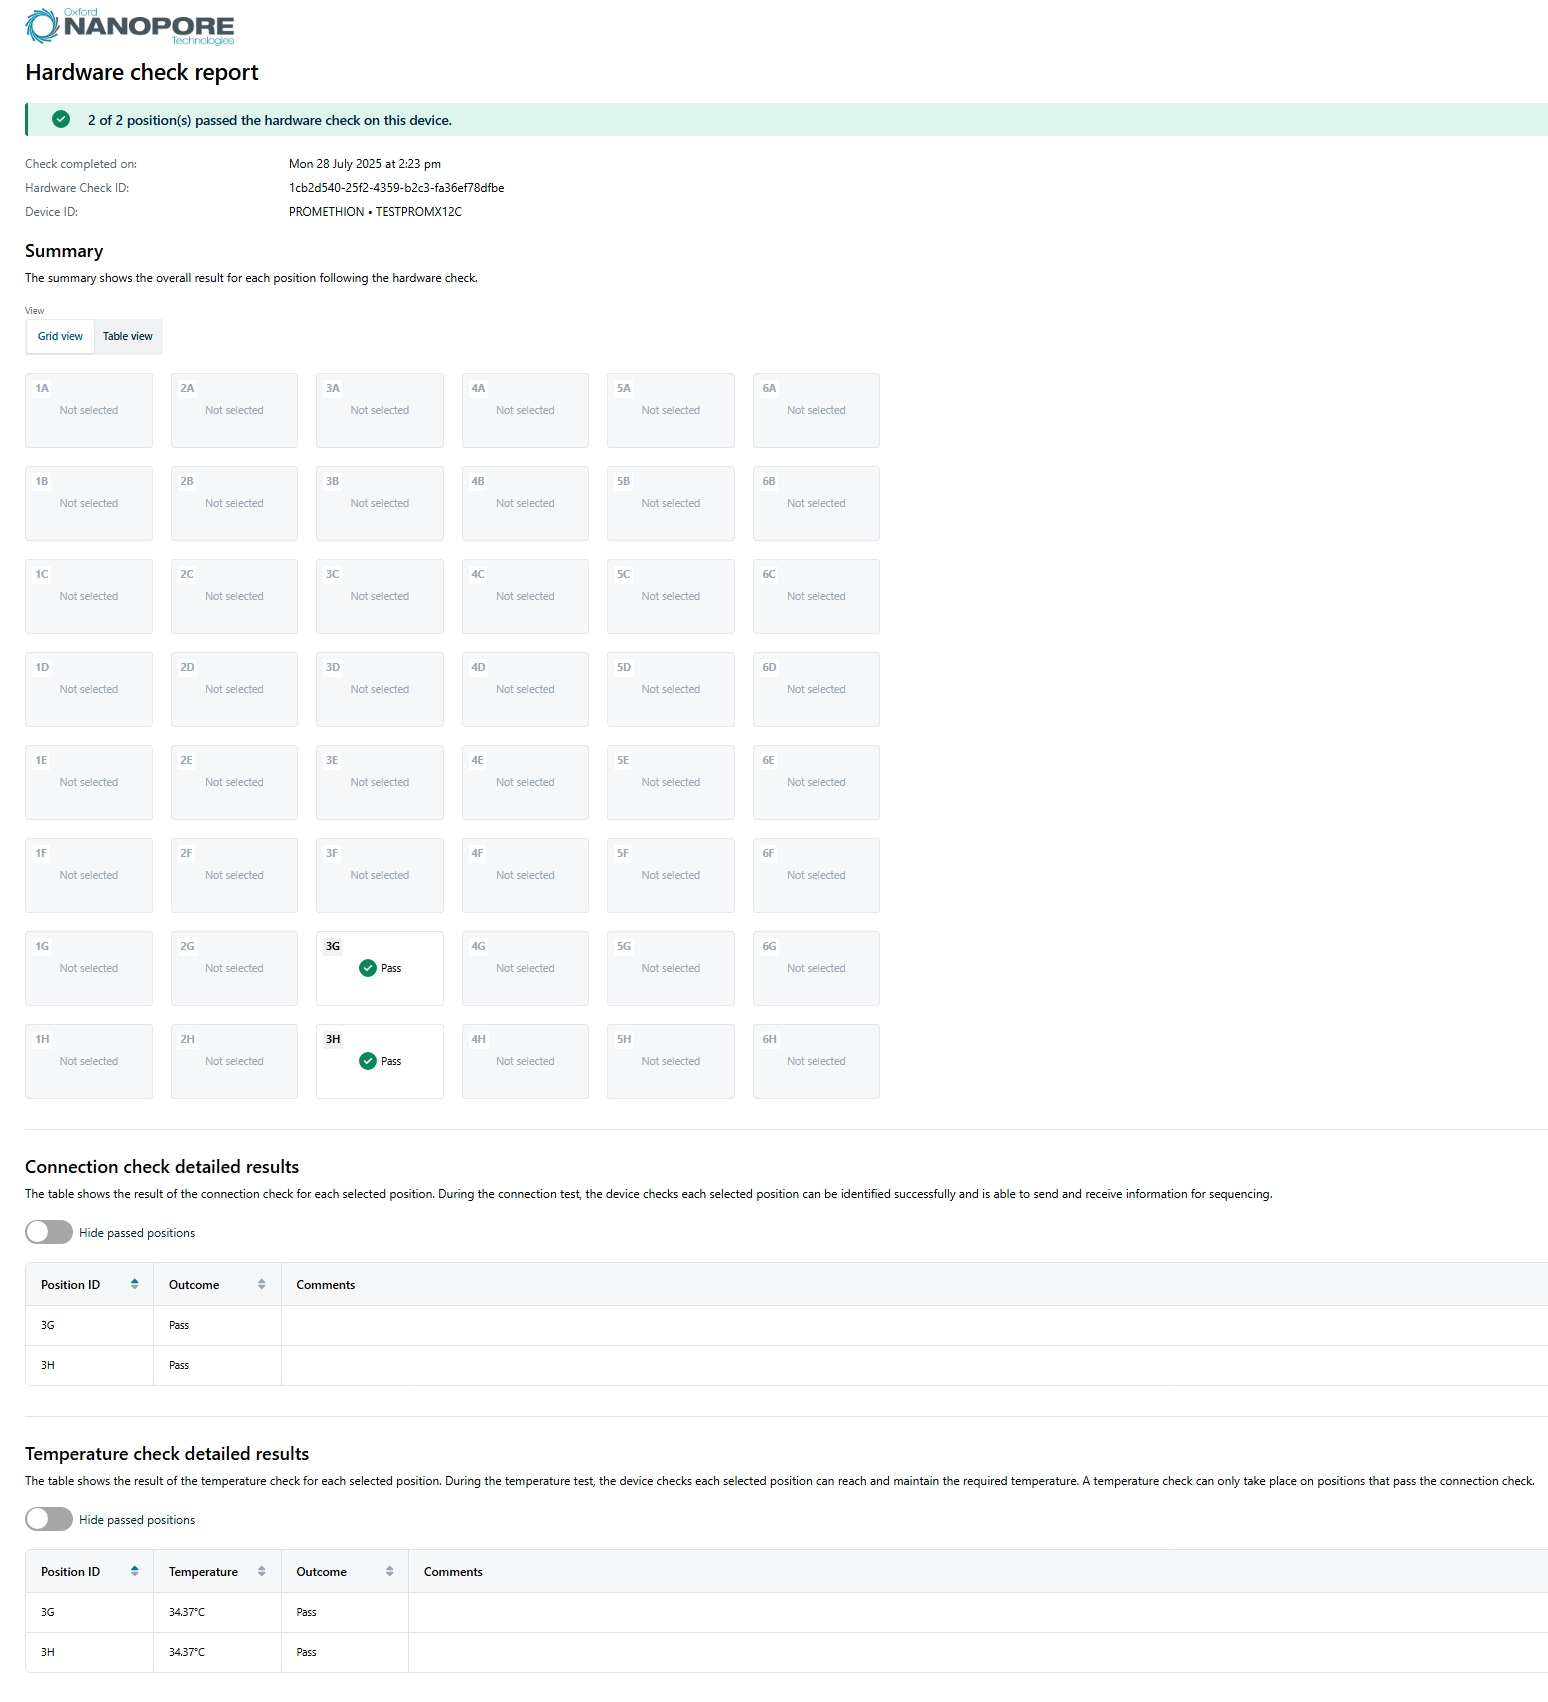
La comprobación del equipo generará un informe en formato HTML con la siguiente información:
- Número de posiciones que hayan superado o no la comprobación
- Fecha y hora de finalización
- Identificador de la comprobación
- Identificador del dispositivo
El resumen muestra el resultado general de cada posición tras la comprobación del equipo.
El resultado de la comprobación de la conexión indica si dicha comprobación se superó o no en la(s) posición(es) seleccionada(s) y da opción de esconder las posiciones aprobadas.
El resultado del control de temperatura indica si se superó o no dicha comprobación en la(s) posición(es) seleccionada(s) y da opción a esconder las posiciones aprobadas.
A continuación, hay un informe de ejemplo:
No dejar las CTC cargadas cuando el dispositivo no esté en uso.
Saque las CTC del dispositivo cuando lo apague y no las inserte hasta después de haberlo encendido, cuando vaya a examinar el equipo.
Guarde las CTC en un lugar seco, a temperatura ambiente.
8. Verificar la celda de flujo
Consumibles
- Celdas de flujo PromethION
Instrumental
- Dispositivo PromethION
Verificar la celda de flujo
Recomendamos examinar la celda de flujo y verificar el número de poros disponible, antes de cargar una biblioteca de ADN o ARN en ella.
Oxford Nanopore Technologies sustituirá cualquier celda de flujo con un número de poros activos inferior al indicado por la garantía —en un plazo de 12 semanas desde la compra— siempre y cuando el resultado se notifique dentro de los dos días siguientes a la verificación y se hayan seguido las instrucciones de almacenamiento.
| Celdas de flujo | Número mínimo de poros activos cubierto por la garantía |
|---|---|
| Flongle (FLO-FLG001) | 50 |
| MinION/GridION | 800 |
| PromethION | 5000 |
Una vez sacadas de la nevera, esperar 20 minutos antes de insertar las celdas de flujo en el dispositivo y así darles tiempo a que estén a temperatura ambiente. En entornos húmedos se puede formar condensación. Inspeccione las clavijas doradas del conector, situadas en la parte superior e inferior de la celda de flujo, en busca de condensación y si la hubiera, límpiela con una toallita sin pelusa. Procure que la almohadilla térmica (color gris oscuro) esté enganchada en la parte posterior.
Cargar las celdas de flujo que se vayan a utilizar en las posiciones del PromethION.
Insertar por completo el conector del chip en el puerto. Compruebe que el cierre que lo sujeta encaje bien.
Inserción correcta de celdas de flujo PromethION en un dispositivo PromethION 24/48
Alinear la celda de flujo con el conector (horizontal y verticalmente) e insertarla suavemente en la posición.

Presionar la celda de flujo con firmeza y asegurarse de que el cierre encaje.

Insertar la celda de flujo en el ángulo equivocado puede dañar las clavijas del PromethION y afectar los resultados de secuenciación. Si observa que las clavijas de las posiciones del dispositivo están dañadas, contacte con el servicio de asistencia en support@nanoporetech.com.

Ir a la página de inicio y pulsar en "Verificar celda de flujo".

Cuando aparezca el identificador de la celda de flujo, hacer clic en Iniciar.

Esta acción abrirá el Panel general de secuenciación.
Durante las comprobaciones, se mostrará una barra de estado debajo de cada celda de flujo.
Este ejemplo es de una CTC Flongle (la barra de estado está resaltada en rojo). 
Indicadores de estado de las celdas de flujo
La calidad de la celda de flujo se mostrará con uno de estos tres valores:
Signo de exclamación amarillo (celda de flujo Flongle - izquierda): El número de poros disponibles está por debajo del nivel cubierto por la garantía. Saque la celda de flujo del dispositivo, vuelva a insertarla e inicie el recuento de nuevo. Si el número sigue siendo inferior al número cubierto por la garantía, póngase en contacto con support@nanoporetech.com.
Marca de verificación verde (celdas de flujo MinION - centro): El número de poros disponibles está por encima de la cantidad cubierta por la garantía.
Signo de interrogación (celdas de flujo PromethION - derecha): Durante esta sesión en MinKNOW, la celda de flujo no se ha verificado.
![]()
Nota: El indicador de estado permanecerá visible solo durante la sesión en MinKNOW. Una vez cerrada, el estado de la celda de flujo desaparecerá.
9. Secuenciación y seguimiento del experimento
Las instrucciones sobre cómo configurar un experimento de secuenciación y supervisar el progreso del mismo se encuentran en el protocolo de MinKNOW, en la comunidad Nanopore.
Antes de realizar un experimento de secuenciación, es necesario purificar la muestra de ADN o ARN y preparar una biblioteca de secuenciación. Encontrará más información sobre la preparación de muestras, en la sección Prepare —en la pestaña Documentación— de la comunidad Nanopore.
Siga este enlace para acceder al protocolo de MinKNOW.
10. Gestión de datos
A partir de la versión 21.02 de MinKNOW en adelante, hemos añadido nuevas funciones que facilitan una transferencia de datos más fluida durante los experimentos de secuenciación. Las siguientes instrucciones son un método de ejemplo para montar un sistema de archivos de red NFS externo y transferir datos. Consulte con su departamento de Informática antes de introducir ningún código y asegúrese de que es compatible con la infraestructura local y dispone de los permisos adecuados.
Montar el sistema de archivos NFS local en el dispositivo (nótese que Linux monta el sistema de archivo remoto en un directorio local). A continuación hay un ejemplo de configuración utilizando el terminal:
prom@PCT0001:~$ sudo su -
prom@PCT0001:~$ apt install autofs
prom@PCT0001:~$ echo -en “+auto.master\n/nfs /etc/auto.ont\n” > /etc/auto.master prom@PCT0001:~$ echo -en "NETWORKSTORAGE -nfsvers=3,rw,bg,async,actimeo=300,soft,intr,noatime,tcp,nolock IPADDRESS:/PATH/TO/SHARE" > /etc/auto.ont prom@PCT0001:~$ ln -s /nfs/NETWORKSTORAGE /media/NETWORKSTORAGE prom@PCT0001:~$ ls -al /media/NETWORKSTORAGE/*
Instalar la última versión del programa MinKNOW:
`prom@PCT0001:~$ sudo apt update`
`prom@PCT0001:~$ sudo apt install ont-promethion-release`
Crear un directorio fuente en /data/, en el que se guardarán los experimentos, por ejemplo:
prom@PCT0001:~$ mkdir /data/data-offload
Crear un directorio de destino en el almacenamiento de red. Con ello se comprueba que el usuario del "prom" puede escribir en el almacenamiento de red.
prom@PCT0001:~$ mkdir /media/mounted_drive/destination_directory/
Como raíz, edite /etc/systemd/ont-platform-data-offload.conf y establezca las variables SOURCE_DIR y DESTINATION_DIR. SOURCE_DIR es el directorio en el que escribe el programa PromethION y DESTINATION_DIR está en su almacenamiento de red.
prom@PCT0001:~$ sudo vi /etc/systemd/ont-platform-data-offload.conf

Se creará un registro de las acciones realizadas por el script en /data/data-offload.log
Establecer la ubicación de salida en SOURCE_DIR, configurada anteriormente, y empezar la secuenciación en el MinKNOW UI.

Recomendamos gestionar el servicio manualmente, ya que la actividad de descarga de datos podría afectar los experimentos activos.
Empezar el servicio de descarga como raíz:
sudo systemctl start ont-platform-data-offload
Detener el servicio de descarga como raíz:
sudo systemctl stop ont-platform-data-offload
Si se desea comprobar que el sistema esté activo, ejecutar el siguiente comando:
sudo systemctl status ont-platform-data-offload
La velocidad de transferencia de datos depende de la infraestructura de red local. Oxford Nanopore recomienda que se use una conexión de 10 Gb/s (PromethION), ya que así se aumenta al máximo la velocidad de transferencia.
Al principio, los datos deben escribirse directamente en las unidades SSD internas. Actualmente, no es posible escribir en una unidad de red.
11. Apagar el dispositivo
Apagar el PromethION 24/48
La unidad de adquisición de datos PromethION debe apagarse de manera escalonada y procesada; de lo contrario, es posible que surjan problemas, por ejemplo, al detectar celdas de flujo.
Siga las instrucciones de esta sección para apagar correctamente el dispositivo y evitar que surjan problemas.
Quitar todas las celdas de flujo del dispositivo.
Ir a Configuración del dispositivo.

Seleccionar Apagar.
Pulsar Apagar en el menú desplegable.

No pulsar Reiniciar, ya que al iniciar un experimento se producirán errores en el reconocimiento de las celdas de flujo.
Apagar la unidad de secuenciación utilizando el interruptor de la parte trasera del dispositivo.

Si es posible, apagar el dispositivo en la toma de corriente.
Tras apagar el dispositivo, espere 2 minutos antes de volver a encenderlo. Si está realizando un ciclo de apagado y encendido, no utilice la opción "Reiniciar" cuando apague el dispositivo, ya que ello podría provocar que la Unidad de adquisición de datos no reconociera la Unidad de secuenciación.
12. Detener un experimento de secuenciación y apagar el dispositivo
Detener el experimento de secuenciación desde MinKNOW UI y esperar a que la secuenciación termine.
Si desea detener el experimento, vaya a la página Experimentos y pulse el botón rojo Stop en los controles de ejecución.
Este paso solo es necesario si se desea detener la ejecución antes de que finalice el tiempo establecido.
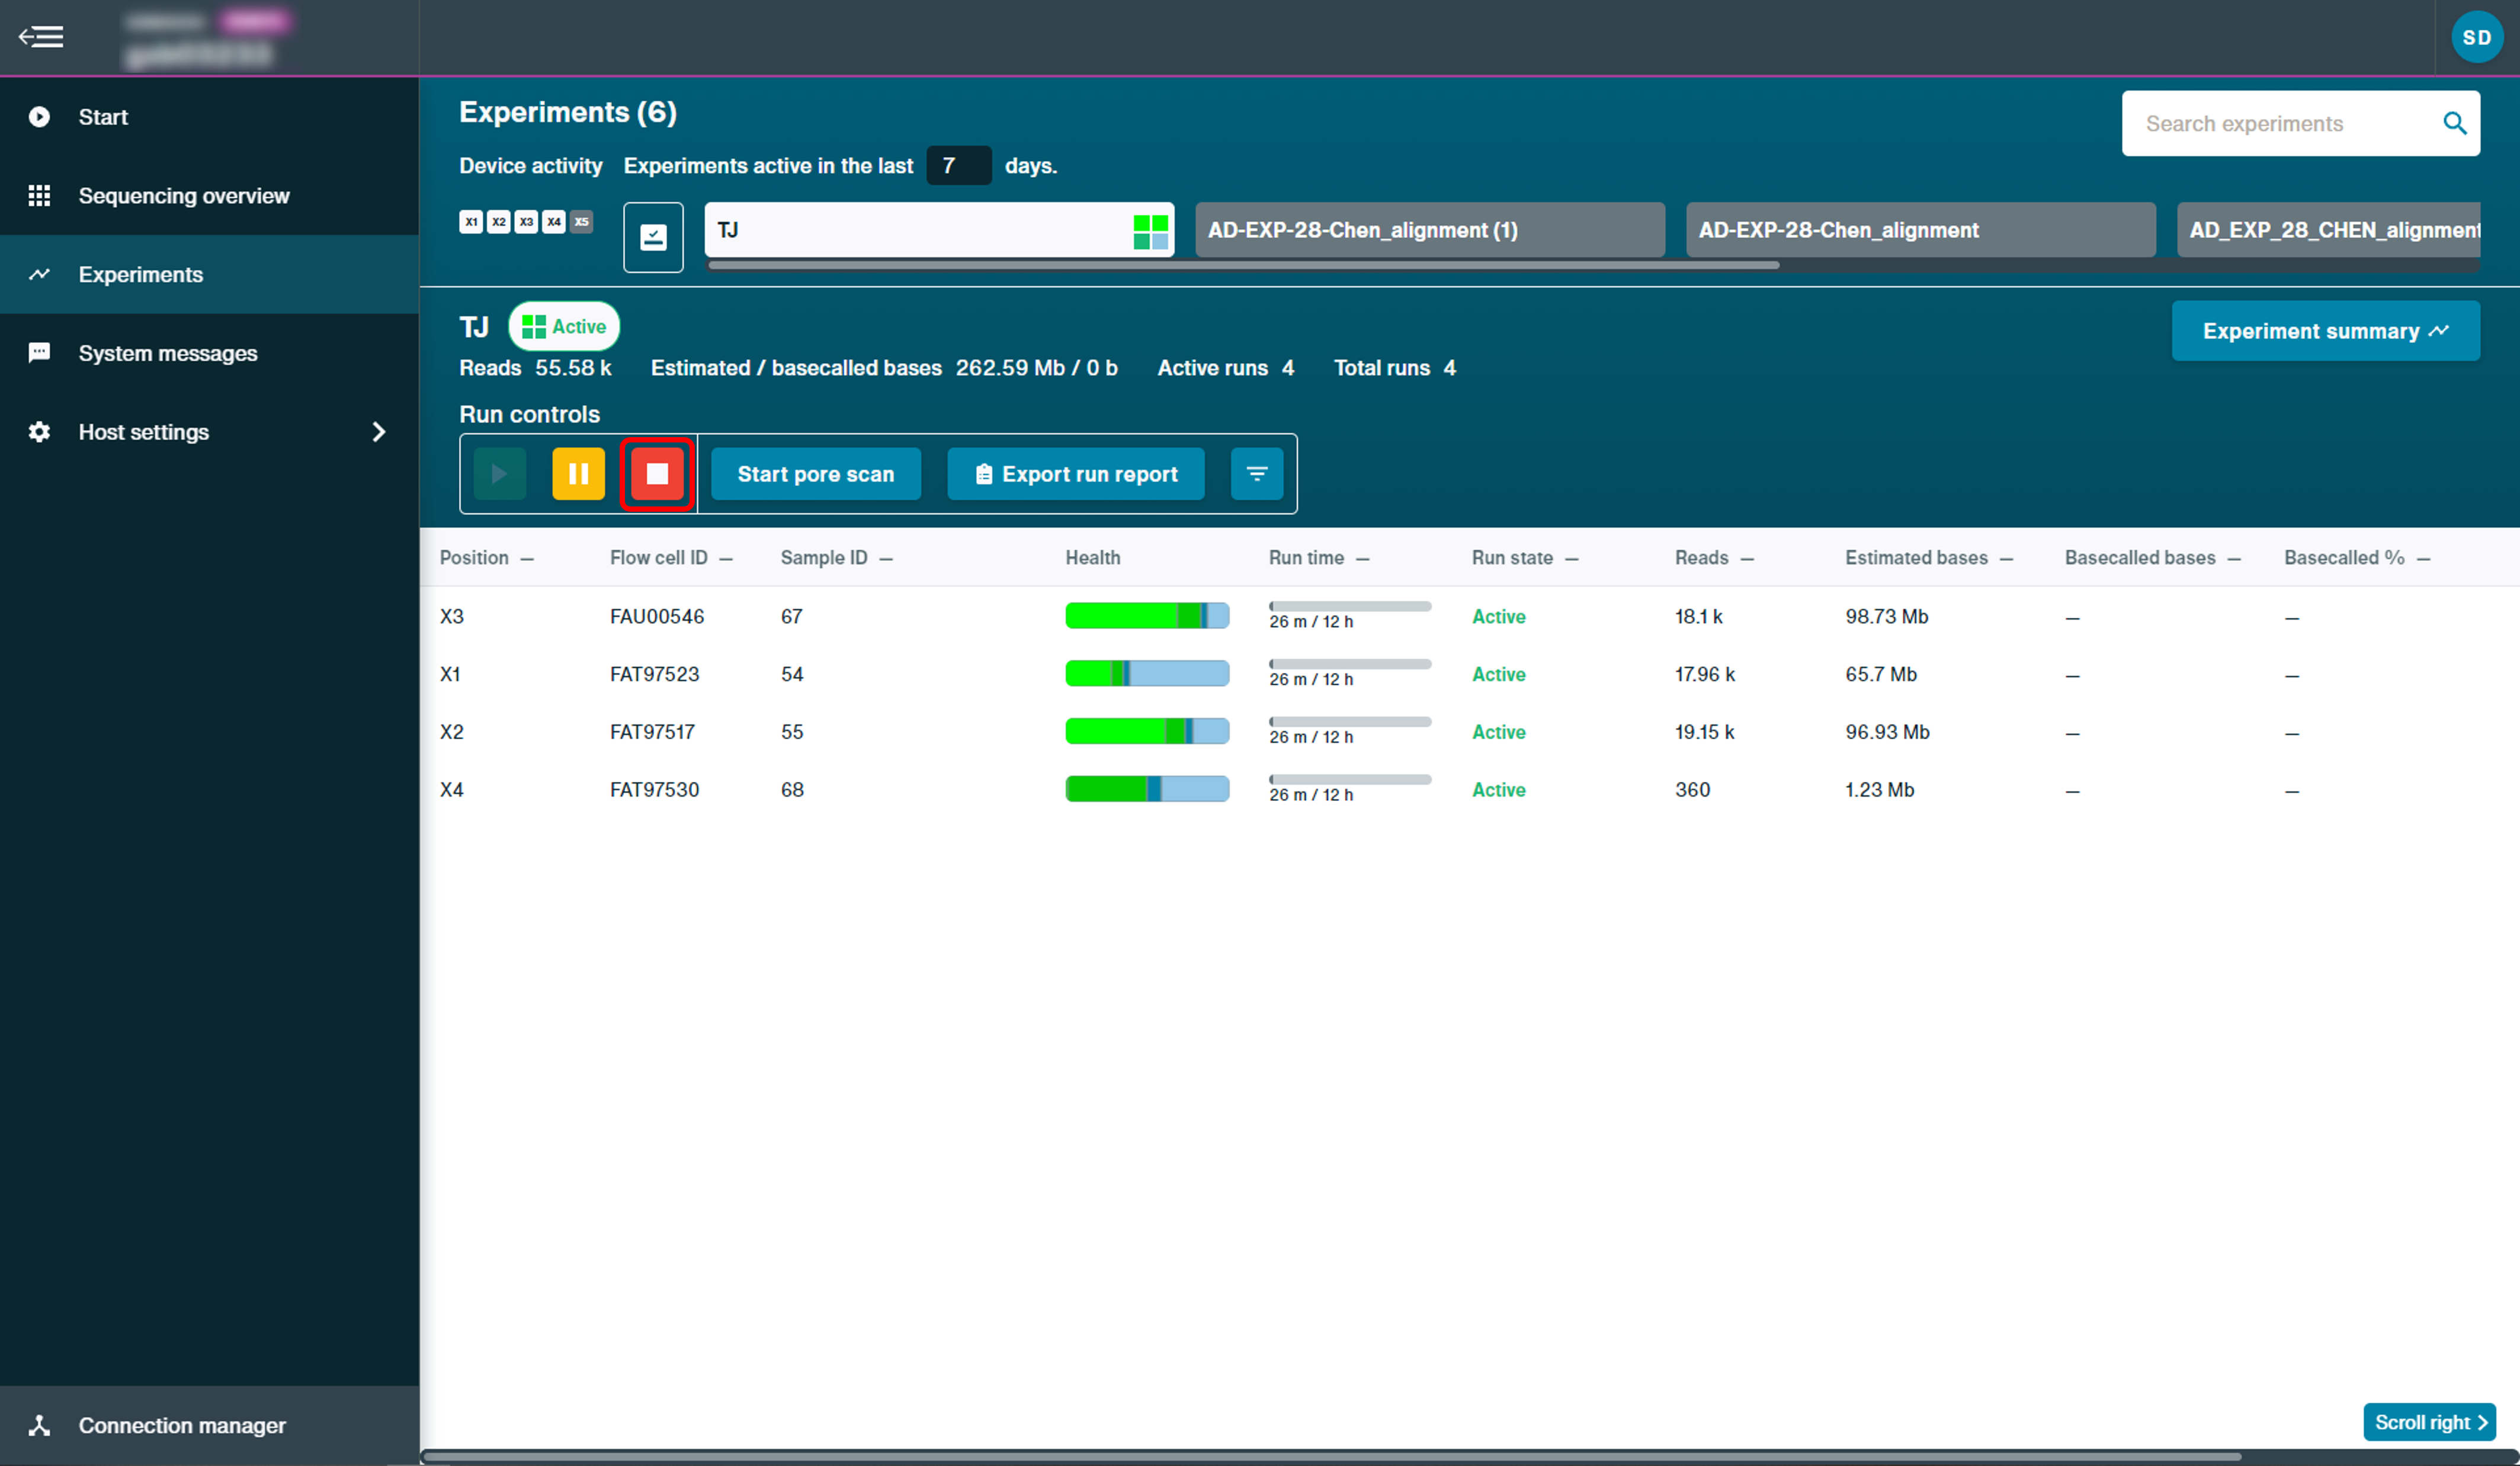
Confirme que desea parar la ejecución mediante una de las siguientes opciones:
- Stop sequencing lo que iniciará la recuperación de identificación de bases.
- Stop sequencing and basecalling lo que detendrá la secuenciación e identificación de bases al momento.

Cuando termine la secuenciación se generará un informe del experimento.
Los informes de los experimento, que incluyen información y gráficos de rendimiento, se generan automáticamente. Para generar un informe de forma manual, pulsar en Exportar informe de ejecución y seleccionar el/los experimento(s) que se deseen exportar.
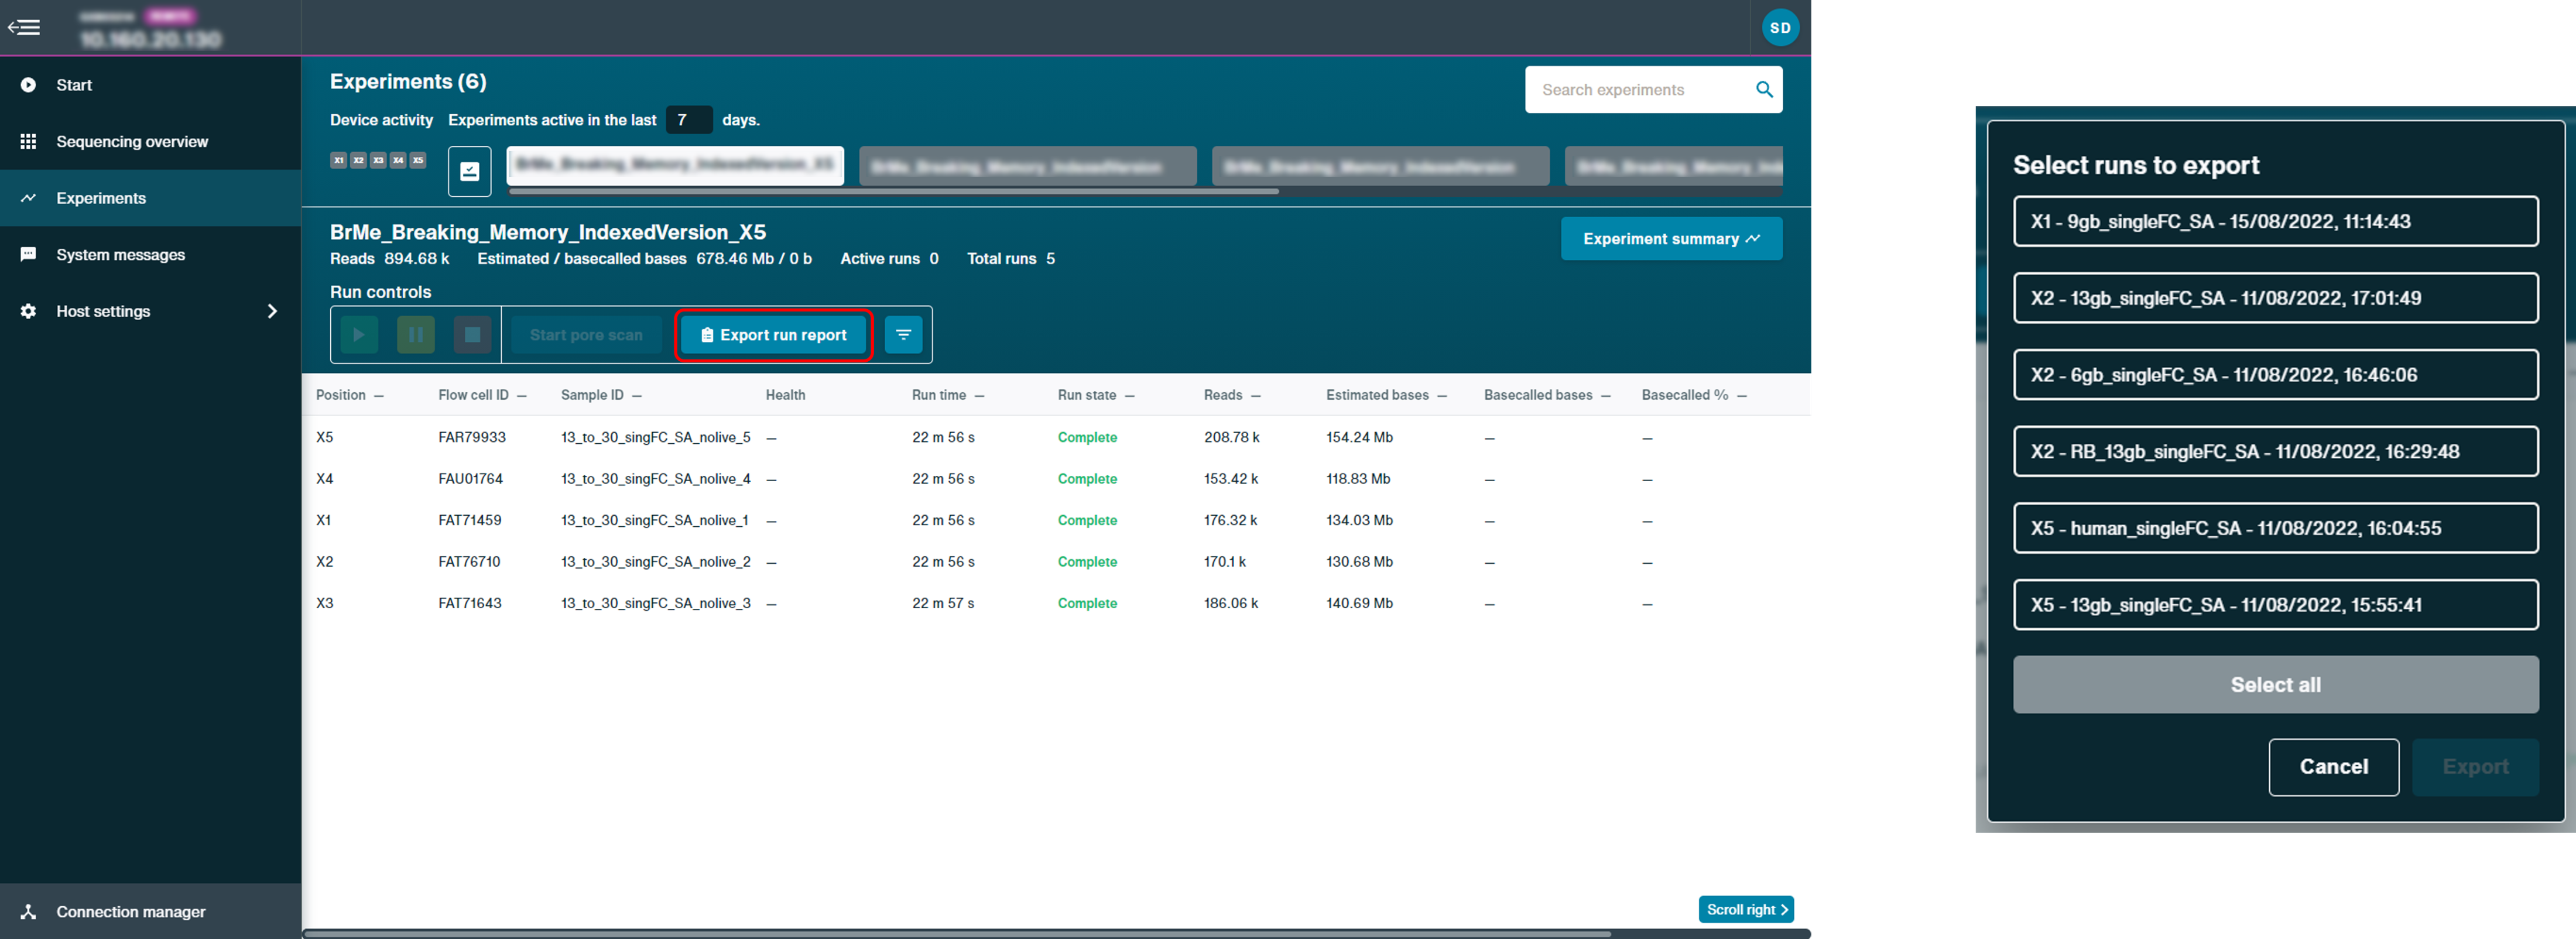
Encontrará más información en la sección Informe de ejecución de MinKNOW.
Antes de apagar el dispositivo, comprobar que no haya ninguna secuenciación, identificación de bases o análisis en curso.
Ir a "Configuración del dispositivo" y pulsar en "Apagar".
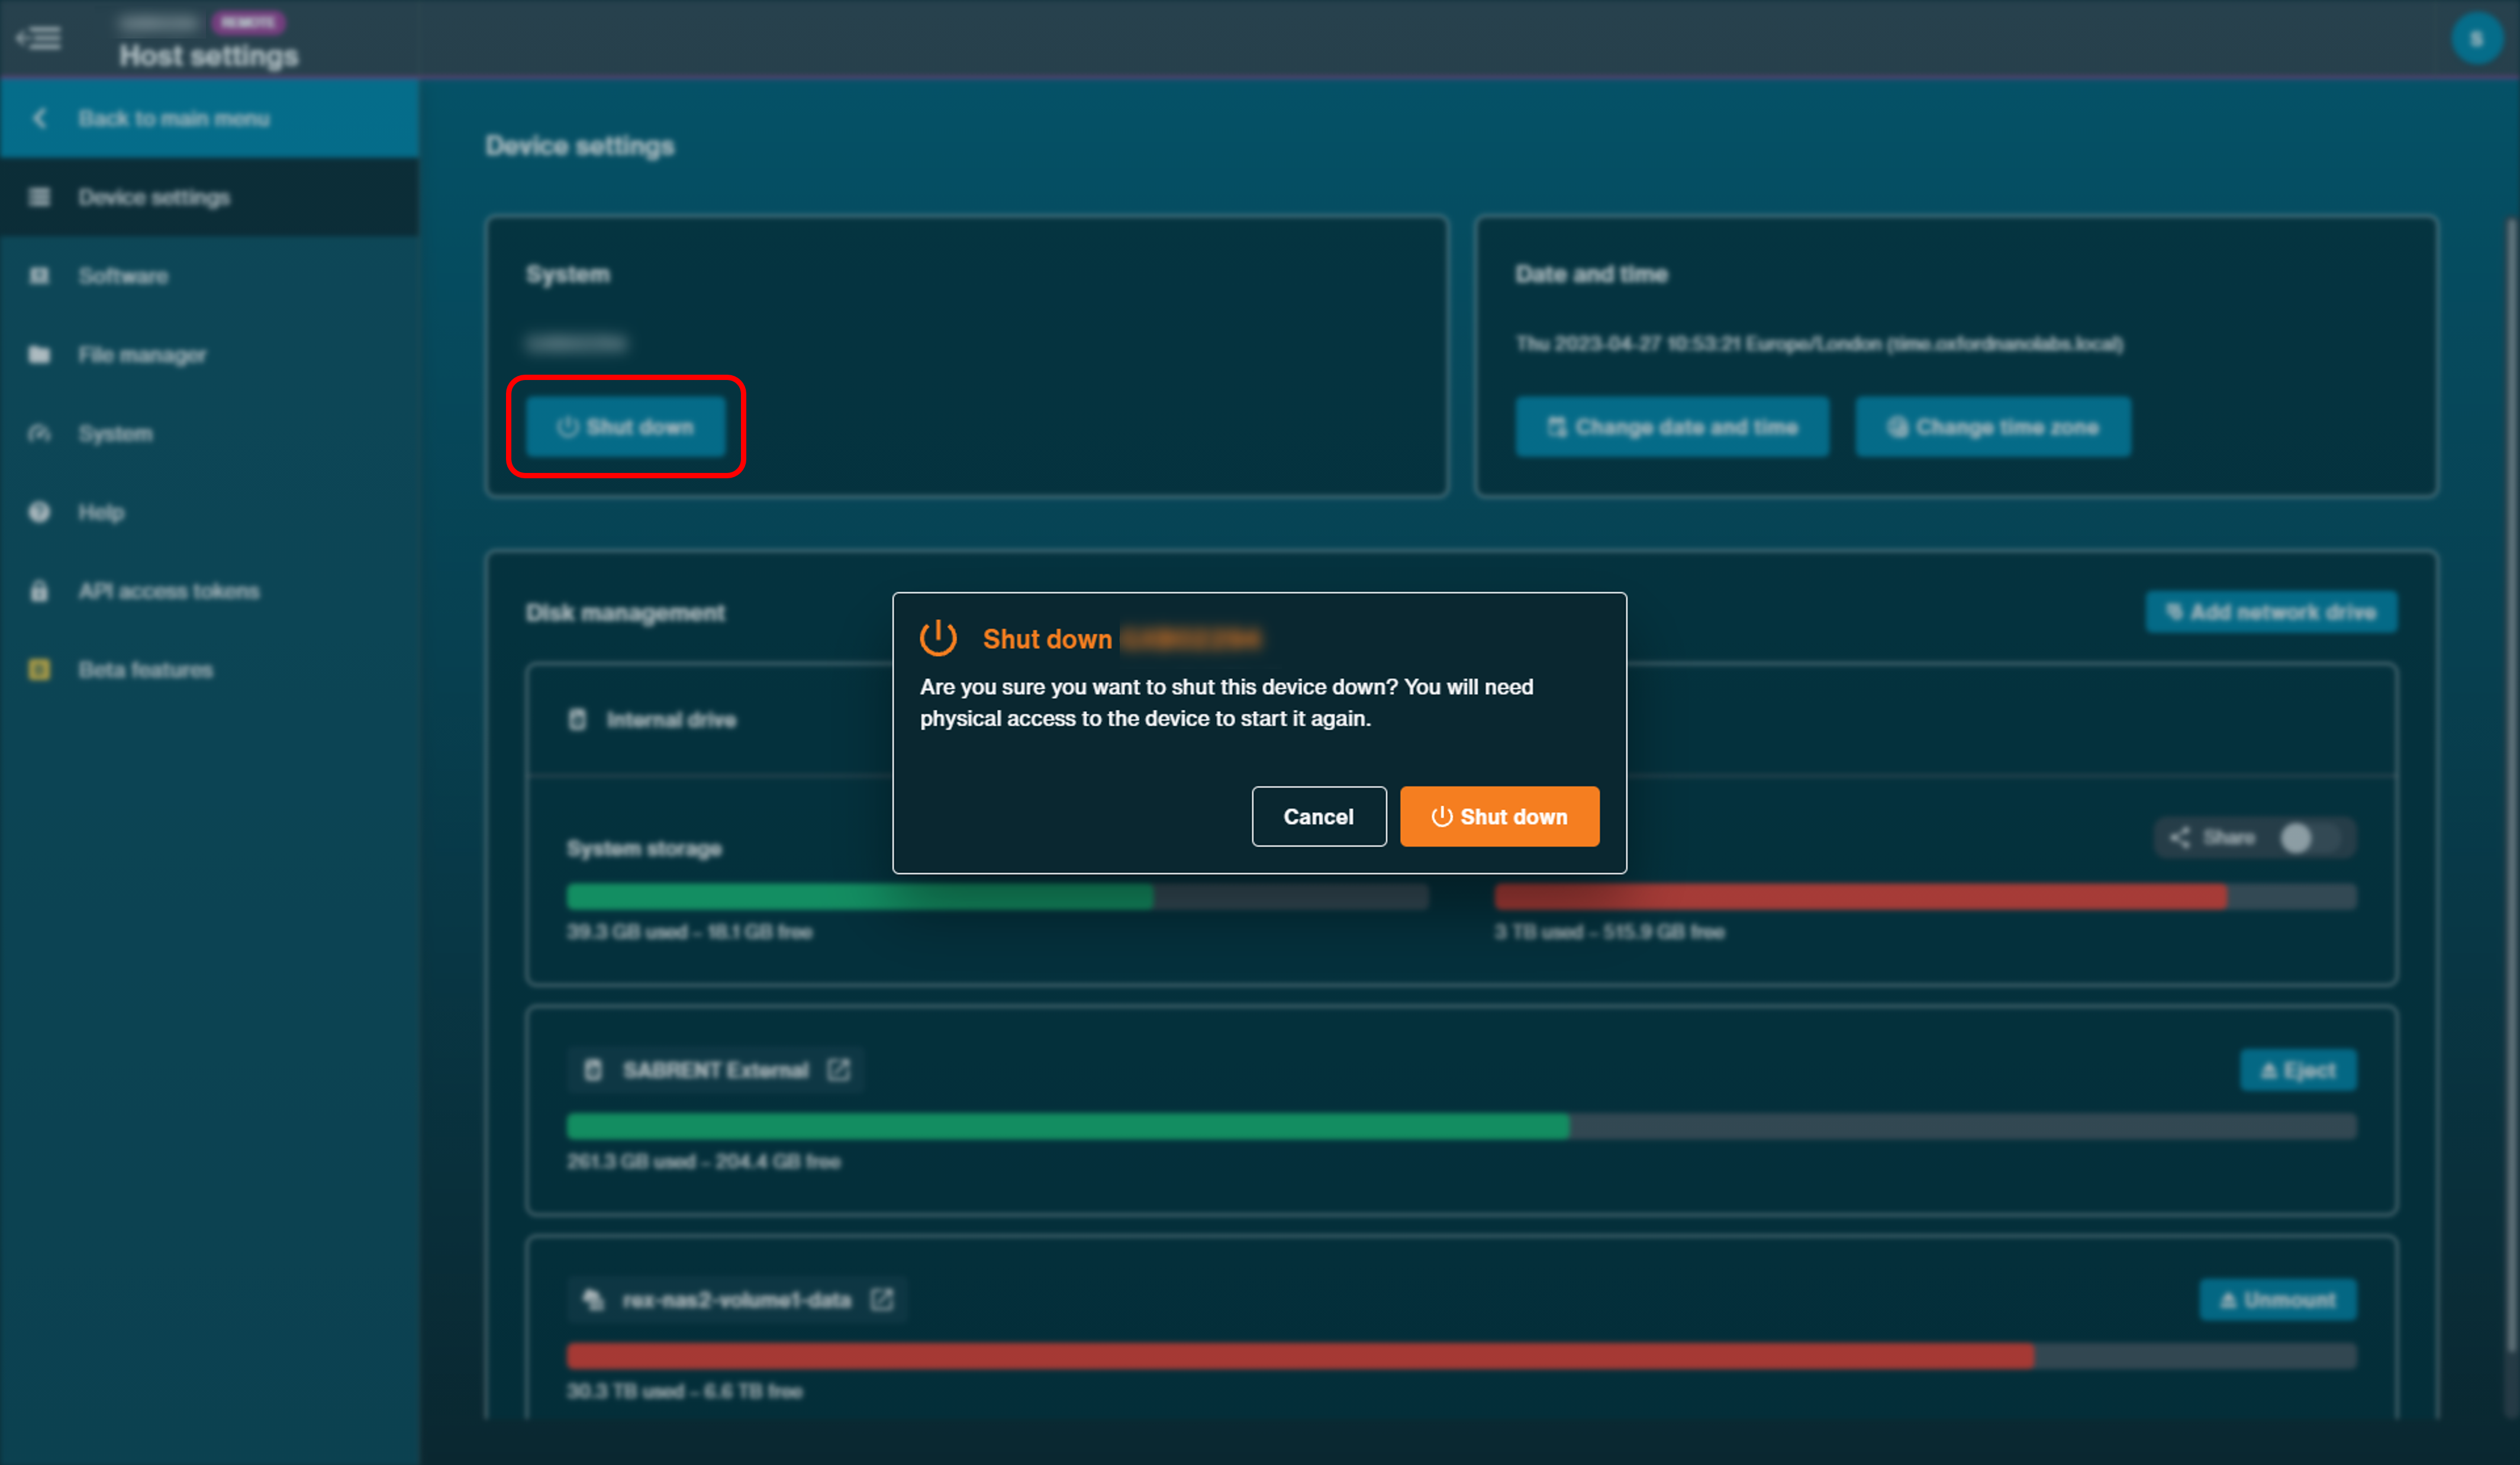
NO seleccione "Reiniciar", ya que al iniciar un experimento se producirán errores en el reconocimiento de celdas de flujo.
Apagar la Unidad de secuenciación mediante el interruptor de la parte trasera del dispositivo.

Apagar el dispositivo desde la toma de corriente.
Tras apagar el dispositivo, esperar 2 minutos antes de volver a encenderlo. Si está realizando un ciclo de alimentación, no utilice la opción "Reiniciar" al apagar el dispositivo, ya que ello podría provocar que la Unidad de adquisición de datos no reconociera la Unidad de secuenciación.
13. Actualizar el programa a través de la interfaz de usuario
Actualizar el programa
Oxford Nanopore Technologies publicará una nota de lanzamiento en la comunidad Nanopore cuando salgan nuevos programas o actualizaciones.
Se recomienda actualizar el programa, en cuanto haya una nueva versión disponible.
Nótese que los dispositivos no se pueden actualizar desde una conexión remota o mientras haya una ejecución en curso.
Al abrir MinKNOW desde el icono del escritorio, el programa comprobará automáticamente si hay actualizaciones disponibles.
Cuando haya una nueva actualización disponible, se abrirá un cuadro de diálogo.
Seleccionar Actualizar.
Las actualizaciones pueden omitirse. No obstante, es recomendable actualizar el dispositivo en cuanto haya actualizaciones disponibles. Algunas actualizaciones serán obligatorias y no podrán omitirse.

Nota: En el MinION Mk1B, al pulsar Actualizar se abrirá la página de descargas del programa donde el usuario podrá descargar la actualización de MinION que corresponda.
También es posible actualizar el dispositivo desde la página Programas informáticos de la Configuración del servidor.
Ir a la Configuración del servidor, seleccionar “Programas informáticos” y hacer clic en “Actualizar”.
El botón de actualización solo aparecerá cuando haya una nueva versión disponible.
Nota: En el caso de los dispositivos MinION Mk1B, al pulsar “Actualizar” se abrirá la página Software Downloads para que los usuarios seleccionen y descarguen la actualización pertinente.

En la ventana del instalador, hacer clic en Instalar actualización.
En el siguiente cuadro de diálogo, hay un registro de cambios disponible.

Esperar a que el programa se actualice; esta operación puede tardar varios minutos.

La ventana del instalador le avisará cuando la actualización haya finalizado.

Cuando la actualización haya finalizado, apagar y encender el dispositivo.
Reinstalar MinKNOW
En algunos casos (por ejemplo, si hay un problema con la versión de MinKNOW que se está utilizando), será necesario volver a instalar el programa. Para ello, primero hay que desinstalar por completo la versión actual. Para realizar esta operación, siga las instrucciones del artículo de la sección Support: Cómo desinstalar MinKNOW en el Mk1B y el P2 Solo
14. (Avanzado) Actualizar el programa a través del Terminal
Obtener las últimas actualizaciones
Después de examinar el equipo, se debe actualizar el programa. Para ello, introduzca los siguientes comandos en el terminal:
sudo apt clean
sudo apt update
sudo apt install ont-promethion-release
La contraseña de sudo predeterminada es __prom__; cámbiela para garantizar la seguridad del dispositivo. Una vez los comandos se hayan ejecutado sin dar errores, apague el dispositivo con el comando: ``` sudo poweroff ```
Encienda el dispositivo otra vez.
Actualizar el dispositivo en el futuro
Oxford Nanopore Technologies publicará una nota de lanzamiento en la comunidad Nanopore cuando salgan nuevos programas o actualizaciones del dispositivo.
Recomendamos a los usuarios que, cuando haya una nueva versión disponible, actualicen el programa lo antes posible.
Así mismo, es importante mantener el dispositivo al día con las actualizaciones de seguridad de Linux, de acuerdo con los consejos del departamento de Informática al que esté sujeto.
Nota: para habilitar las actualizaciones a través del cortafuegos, es necesario tener acceso a Internet solo de salida por el puerto 443.
15. (Avanzado) Descargar la imagen ISO y grabarla en una unidad USB
Descripción general
Las siguientes instrucciones le ayudarán a crear una unidad USB de arranque que sirva para reconstruir el sistema operativo en su dispositivo.
Estas instrucciones son para los usuarios que no recibieron una unidad USB con imagen ISO. Si ha recibido una unidad USB, pase al siguiente punto: Cómo arrancar el dispositivo desde una memoria USB.
Recomendamos transferir los datos a una copia de seguridad, incluso si se escoge una opción que conserve los datos. Esto se debe a que los archivos ISO pueden corromperse a mitad del proceso (por ejemplo, debido a una desconexión del USB, un corte de electricidad, etc.).
Para descargar la última imagen ISO, póngase en contacto con "support@nanoporetech.com".
Grabar la imagen ISO en una unidad USB
El programa adecuado para grabar la imagen ISO es:
- Rufus (Windows)
Nota: la otra herramienta de grabación ISO, balenaEtcher, no es compatible con nuestra imagen ISO. Necesitará acceso a un ordenador Windows y tal vez derechos de administrador para instalar el programa Rufus.

Al grabar el archivo ISO, utilizar los siguientes ajustes (se debe usar un arranque EFI/GPT):
- Esquema de partición: GPT
- Sistema de destino: UEFI
La unidad USB debe tener las siguientes características:
- Tener 64 GB o más
- USB 3.0 (recomendado)
- Utilizar la opción de arranque UEFI
Tras pulsar INICIO, tal vez aparezca la siguiente advertencia en una ventana emergente. Pulsar OK.
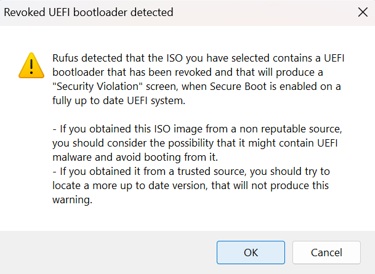
Nota: como medida de seguridad, recomendamos grabar una imagen de disco en dos unidades USB de distintos fabricantes. Con las USB habituales, es posible que se interrumpa la reinstalación de la imagen, sin motivo aparente.
16. Cómo arrancar el dispositivo desde una memoria USB
Apagar el PromethION 24/48.
Introducir el USB de arranque en el puerto USB azul (USB 3.0) en la parte posterior del dispositivo.
Antes de encender el dispositivo, prepárese para pulsar F11 en el teclado.
Encender el PromethION 24/48.
a. Pulse F11 repetidas veces hasta acceder al menú de arranque.

b. En la pantalla "Please select boot device"(seleccionar dispositivo de arranque), con ayuda de las flechas del teclado seleccione UEFI OS (nombre del USB) y pulse Intro.

En la pantalla "Platform Rescue & Recovery", escoger "Customer Factory Reset image XX.YY" (donde XX.YY indica la versión de la imagen) y pulsar "Intro".
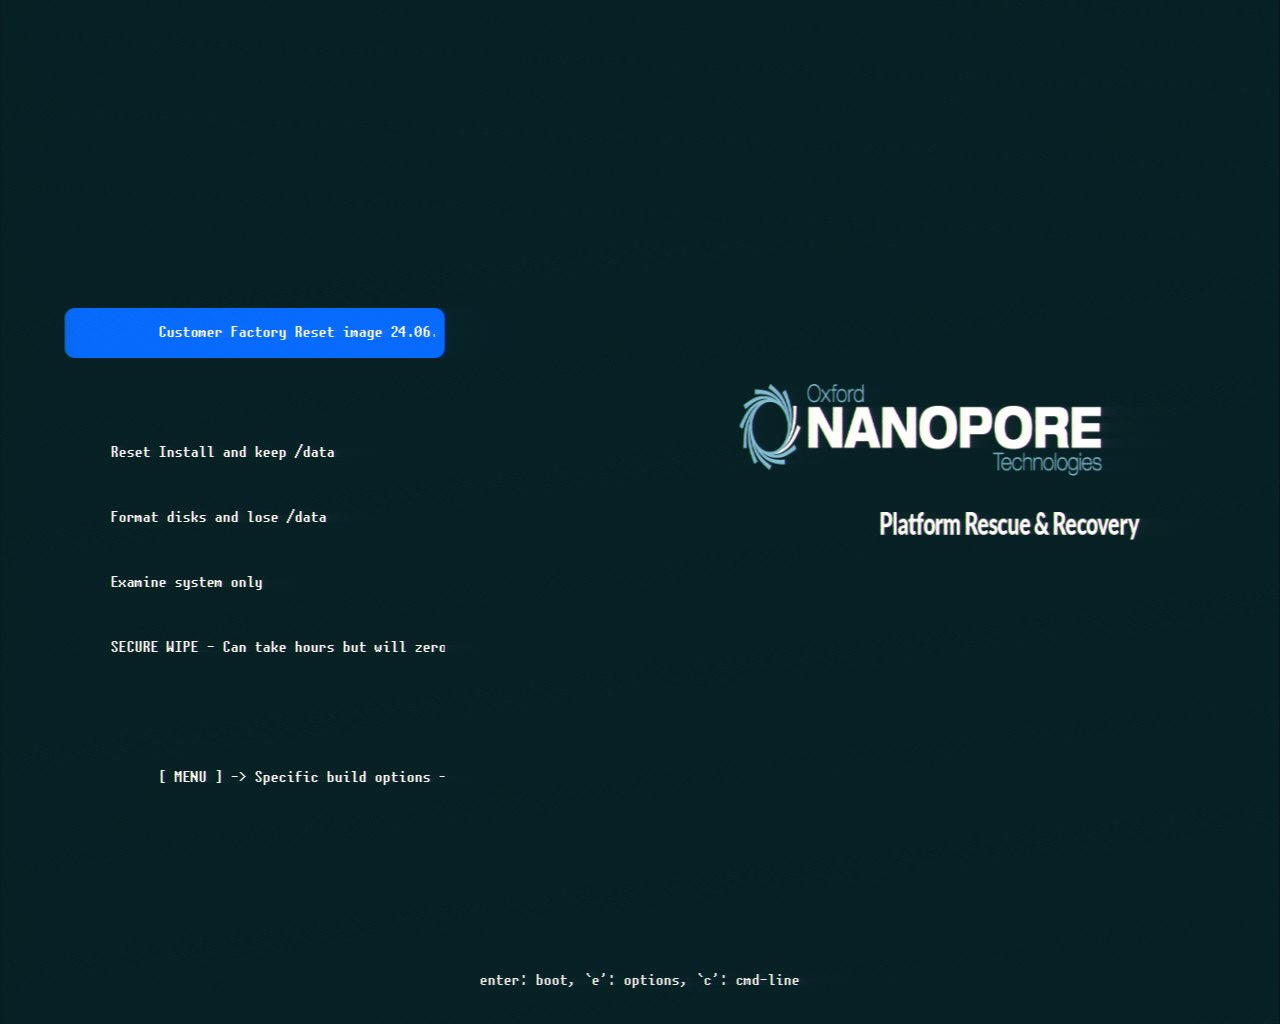
De este modo, se consigue lo siguiente:
- Se mantiene la configuración de red.
- Se mantiene el nombre del servidor.
- Se conservan los datos.
- No se borran los metadatos ni se formatean todos los discos.
Nota: la instalación estándar tal vez tarde varios minutos en cargarse. Pruebe con otras opciones solo si se lo indican los compañeros del departamento de Asistencia técnica de Oxford Nanopore.
Pulsar en "Instalación estándar".
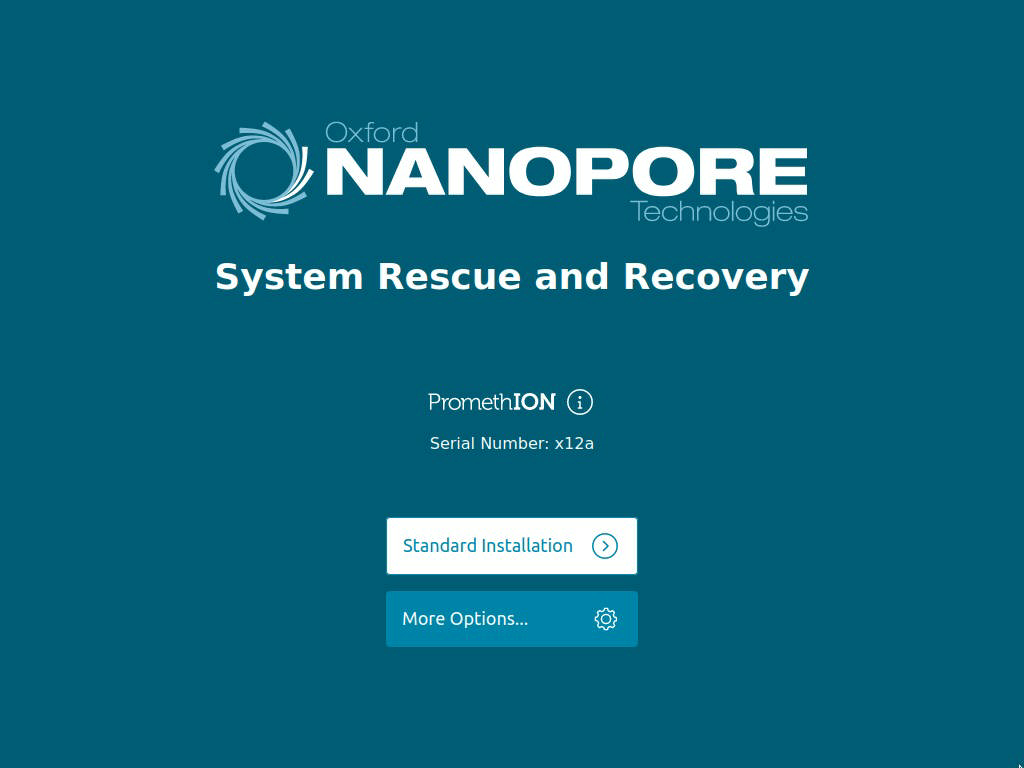 Nota: en algunos casos, tal vez aparezca la siguiente pantalla. Si esto ocurre, contacte con el servicio de asistencia técnica.

Aparecerá una pantalla de instalación con barras de progreso. El dispositivo se reiniciará varias veces durante la instalación y quizá se vean mensajes con errores de sistema, lo que forma parte del funcionamiento esperado. Deje que finalice la instalación. El proceso completo tardará aproximadamente 1 hora.

por ejemplo, primera pantalla de arranque:

segunda pantalla de arranque:

tercera pantalla de arranque:

Una vez finalizado el proceso, aparecerá la pantalla de inicio de sesión. Iniciar sesión con la contraseña "prom"

Apagar por completo y encender el dispositivo. Cuando esté apagado, esperar 60 s y extraer el USB.
Encender el dispositivo.
Iniciar sesión con la contraseña "prom"

Pulsar dos veces el icono de MinKNOW situado en el escritorio.

Iniciar sesión en MinKNOW con los datos de acceso de la comunidad.
Se le pedira que introduzca su dirección de correo y contraseña:
Comprobar que el dispositivo reconozca las posiciones de las celdas de flujo y que el número de serie del dispositivo sea correcto.
Introducir las celdas de prueba de configuración en el dispositivo y realizar una comprobación del equipo.
Consulte las instrucciones de comprobación del equipo para el P24/48.
La restauración desde la imagen ISO ha finalizado.
17. Resolución de problemas
Si surge algún problema relacionado con el dispositivo o la secuenciación, póngase en contacto con el Servicio técnico.
La sección de preguntas frecuentes sobre MinKNOW, FAQ, se encuentra aquí.
En la mayoría de casos, para identificar o resolver un problema recomendamos exportar los registros y enviarlos al Servicio de asistencia técnica.
Cómo exportar registros:
En los modelos PromethION 24/48, PromethION 2i, GridION y/o PromethION 2 Solo, conectados a un GridION:
- En la sección Exportar registros, pulsar Exportar.
Cuando se hayan exportado los registros, debajo del botón aparecerá indicado dónde se encuentran. Los registros se descargarán como archivos TGZ en el directorio de registros.
Es posible cambiar la ubicación de los registros utilizando el administrador de archivos, donde pueden recuperarse fácilmente sin necesidad de SSH:
- Hacer clic en el archivo situado junto a Registros, exportado al panel Exportar registros. Esta acción abrirá la ubicación de los registros en el Gestor de archivos de MinKNOW.
- Utilizar el panel de control en la esquina inferior derecha del Gestor de archivos para mover los archivos de registro.

Si el PromethION " 2 Solo está conectado a un ordenador
Los archivos de registro de cada experimento de secuenciación se pueden encontrar en:
Windows C:\data\logs
Mac OS X /private/var/log/MinKNOW
Linux /var/log/minKNOW
Eliminar registros y datos temporales:
En la pestaña "Ayuda", en la sección 'Eliminar archivos', pulsar Eliminar y confirmar en la ventana emergente.
Nota: los datos de ejecución no se eliminarán. Se eliminarán los registros y datos temporales.

Solucionar los problemas del dispositivo:
En la página "Ayuda", sección "Resolución de problemas", pulsar en "Reparar problemas" y confirmar en la ventana emergente. MinKNOW intentará reparar los siguientes problemas:
- Comprobar que los directorios requeridos en "/data" existan y tengan la propiedad y los permisos necesarios.
- Comprobar que los archivos necesarios en "/data" tengan la propiedad y los permisos necesarios.
- Comprobar que la GPU funcione al máximo rendimiento.
- Comprobar que el Bluetooth esté desactivado.

