基于适应性采样的药物基因组学(PGx)测序流程(适用于血液、细胞和唾液样本) (PGXA_9225_v114_revE_17Aug2026)


PromethION: Protocol
基于适应性采样的药物基因组学(PGx)测序流程(适用于血液、细胞和唾液样本) V PGXA_9225_v114_revE_17Aug2026
本实验指南介绍了在 Oxford Nanopore 平台上采用适应性采样技术开展药物基因组学(PGx)基因分析的完整流程。下游变异检测采用 EPI2ME™ 的 wf-pgx 工作流程,并确保每个样本在 PGx 相关基因区域的测序覆盖度不低于 40×。本流程涵盖基因组 DNA 提取、机械打断、免扩增条形码连接与混样、文库制备、测序及数据分析。每张 PromethION™ 测序芯片最多支持 4 个样本混样测序,适用于从人全血、培养细胞或唾液中提取的 DNA。
本实验指南具有以下特点:
- 使用从人全血、培养细胞或唾液中提取的基因组 DNA
- 需要对 DNA 进行片段化处理
- 使用免扩增条形码试剂盒-24 V14(SQK-NBD114.24)
- 适用于 R10.4.1 测序芯片
- 可在 EPI2ME 中使用 wf-pgx 工作流程进行数据分析
仅供研究使用
FOR RESEARCH USE ONLY.
Contents
实验方案简介
唾液样本制备
全血和培养细胞的样本制备
文库制备
测序及数据分析
疑难解答
概览
本实验指南介绍了在 Oxford Nanopore 平台上采用适应性采样技术开展药物基因组学(PGx)基因分析的完整流程。下游变异检测采用 EPI2ME™ 的 wf-pgx 工作流程,并确保每个样本在 PGx 相关基因区域的测序覆盖度不低于 40×。本流程涵盖基因组 DNA 提取、机械打断、免扩增条形码连接与混样、文库制备、测序及数据分析。每张 PromethION™ 测序芯片最多支持 4 个样本混样测序,适用于从人全血、培养细胞或唾液中提取的 DNA。
本实验指南具有以下特点:
- 使用从人全血、培养细胞或唾液中提取的基因组 DNA
- 需要对 DNA 进行片段化处理
- 使用免扩增条形码试剂盒-24 V14(SQK-NBD114.24)
- 适用于 R10.4.1 测序芯片
- 可在 EPI2ME 中使用 wf-pgx 工作流程进行数据分析
仅供研究使用
1. 实验方案概览
本早期试用仅对受邀者开放。
如需有关早期试用计划的更多信息,请参阅本文了解产品的不同发布阶段。
请确保您始终使用本方案的最新版本。
本实验指南介绍了在 Oxford Nanopore 平台上采用适应性采样技术开展药物基因组学(PGx)测序的完整流程。
测序将运行 72 小时,以确保目标区域获得足够的覆盖度。为维持测序性能和通量,首次上样后,分别在测序运行 24 小时和 48 小时时对测序芯片进行清洗并重新上样。因此,整个 72 小时的测序运行期间共进行 3 次上样。
工作流程:
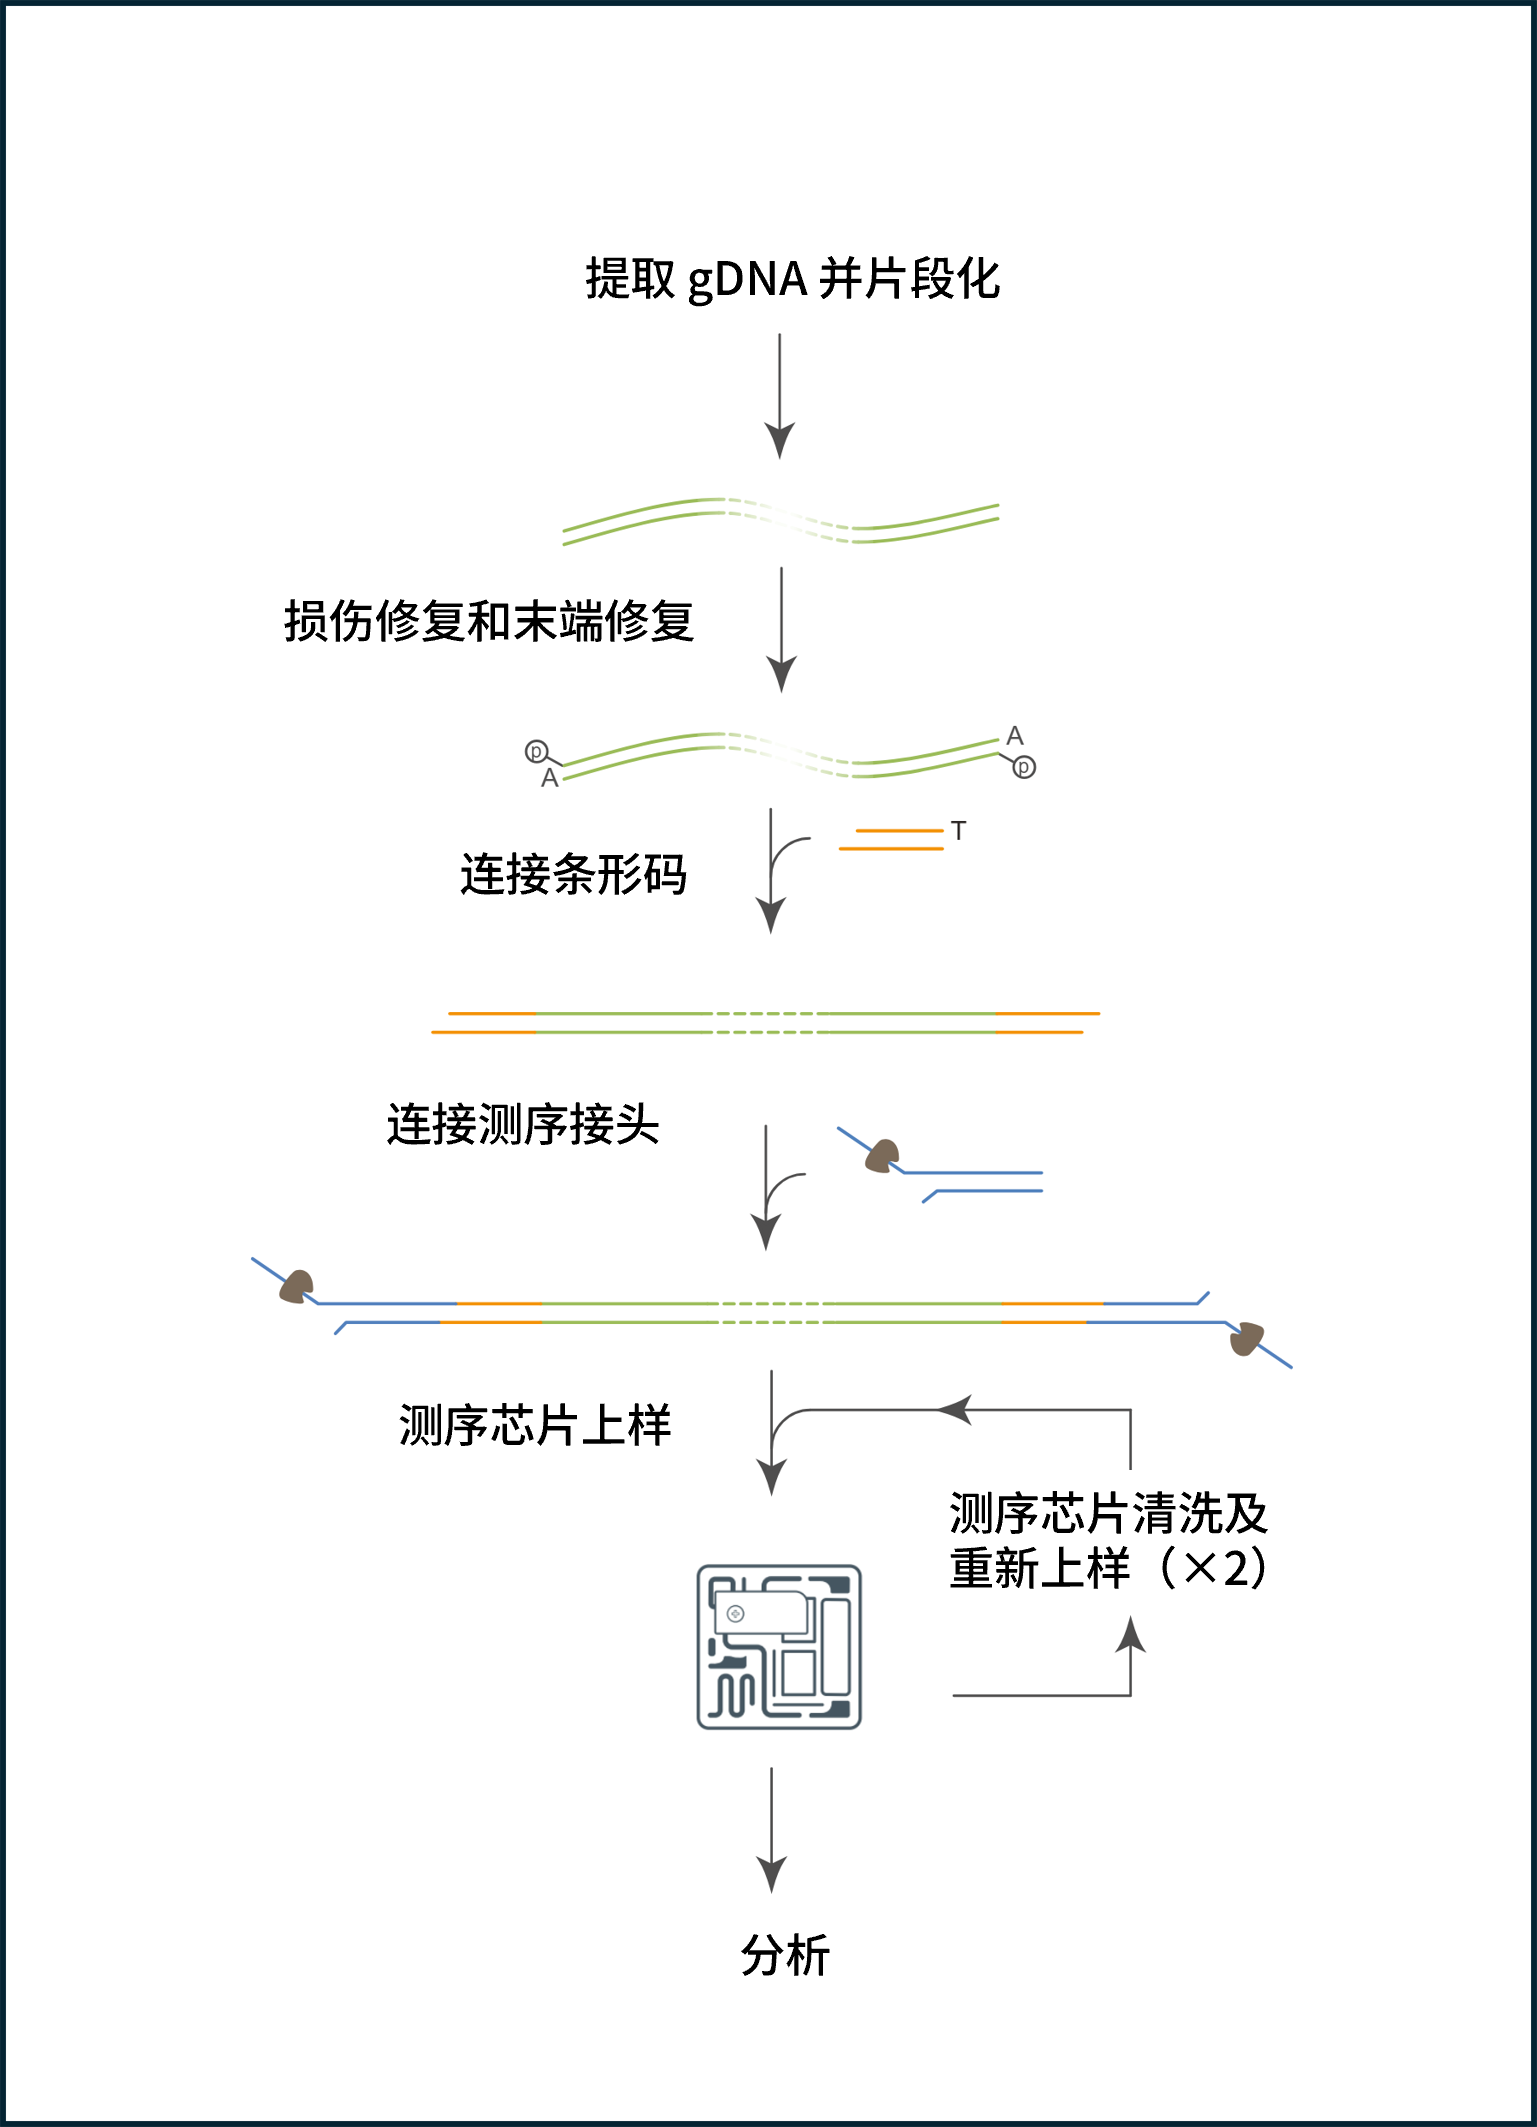
下表概述了该工作流程的各个步骤,包括处理 4 个样本所需的时间及可暂停的操作节点。
| 实验步骤 | 流程 | 时间 | 中止节点 |
|---|---|---|---|
| 样本制备 | 从样本中提取 gDNA 并定量。将 gDNA 片段化并定量。 | 约 3 到 4 小时 | 此时,可将提取的 gDNA 或片段化后的 gDNA 于 –20°C 保存,以备后续使用。 |
| 文库制备 | 修复片段化 DNA,并对 DNA 进行末端修复以便与条形码连接。 将免扩增条形码连接至 DNA 末端。 将测序接头连接至 DNA 末端。 | 35 分钟 60 分钟 50 分钟 | 4°C 过夜 4°C 过夜 若为短期保存或重复使用(例如在清洗芯片后再次上样),建议4℃保存; 若为长期储存,建议-80℃保存。我们强烈建议在连接测序接头后即对文库进行测序。 |
| 测序 | 对测序芯片进行预处理,然后将制备好的文库加至芯片中进行测序。 清洗测序芯片并再次上样(x2) 。 | 每张测序芯片约 10 分钟 60 分钟(x2) |
实验准备
您将需要:
- 备好 DNA 提取、片段化、片段大小筛选(适用于唾液样本)及测序所需的耗材、试剂盒和设备, 其中包括第三方试剂。
- 下载数据收集和分析软件。
- 检查您的测序芯片上有足够的活性纳米孔,以确保测序良好运行。
样本制备
您将需要:
- 按照推荐方案,从全血、培养细胞或唾液中提取基因组 DNA(gDNA),并进行片段化。按需进行基于磁珠的片段大小筛选。
本实验指南支持使用以下推荐试剂盒,从相应生物材料中提取 gDNA:
| 样本类型 | 提取试剂盒 |
|---|---|
| 全血 | Puregene Blood Kit(血液 DNA 提取试剂盒,Qiagen,158023) |
| 培养细胞 | Puregene Cell Kit( 细胞 DNA 提取试剂盒,Qiagen,158043) |
| 唾液 | GeneFix™ Saliva-Prep 2 DNA Isolation Kit(唾液 DNA 提取试剂盒,Isohelix,GSPN) |
- 检查提取所得 DNA 的浓度、纯度和长度。 样本制备过程中的质量评估步骤对确保实验成功至关重要。
文库制备
需使用免扩增条形码试剂盒-24 V14(SQK-NBD114.24),并按以下步骤操作:
- DNA 损伤及末端修复
- 连接免扩增条形码
- 接头连接及纯化
测序和分析
您将需要:
- 使用 MinKNOW™ 软件开始测序。该软件会通过测序仪收集原始数据,并将其识别成碱基序列。
- 使用 EPI2ME™ 提供的 wf-pgx 工作流程分析数据。
数据包和 wf-pgx 工作流程设置
完成注册后,您将收到一个数据包,其中包含启动测序实验及分析测序数据所需的文件。该数据包专为 wf-pgx 工作流程配置,可确保所有样本采用统一的运行设置,并与该工作流程兼容。有关在 EPI2ME 中安装 2ME 文件(包括使用演示数据进行测试)的方法,请参阅本指南的“数据分析”一节。
数据包包含:
- .2ME 文件——wf-pgx 工作流程定义文件,可配合 EPI2ME 应用程序使用。
- 参考基因组文件——以 FASTA 格式提供。
- 适应性采样 BED 文件——用于富集目标 PGx 相关区域。
- 示例样本列表——用于关联样本别名和对应的条形码。
实验方案适用性
本实验指南仅适用于搭配 Oxford Nanopore 提供的以下耗材和设备使用:
- 免扩增条形码试剂盒-24 V14(SQK-NBD114.24)
- PromethION R10.4.1 测序芯片(FLO-PRO114M)
- 测序芯片清洗试剂盒 (EXP-WSH004)
- 测序辅助扩展包 V14(EXP-AUX003)
- PromethION™ 24/48 - PromethION 24/48 A-系列 - 设备及 IT 配置规格
- PromethION™ 2 Solo - PromethION 2 Solo – 设备及 IT 配置规格
- PromethION™ 2 Integrated - PromethION 2 Integrated – 设备及 IT 配置规格
2. 仪器及耗材
材料
- 人唾液、全血或培养细胞
- 免扩增条形码测序试剂盒-24 V14(SQK-NBD114.24)
- 测序芯片清洗剂盒(EXP-WSH004)
- 测序辅助扩展包 V14(EXP-AUX003)
耗材
- 适用于 2 mL 唾液样本的 GeneFix™ 唾液采集管(用于 DNA/RNA 的采集与稳定保存;Isohelix,GFX-02)
- GeneFix™ Saliva-Prep 2 DNA Isolation Kit(唾液 DNA 提取试剂盒,Isohelix,GSPN)
- Puregene Blood Kit(血液 DNA 提取试剂盒,Qiagen,158023)
- Puregene Cell Kit( 细胞 DNA 提取试剂盒,Qiagen,158043)
- Qubit™ dsDNA Broad Range Quantitation Assay(双链DNA宽范围检测)试剂盒(ThermoFisher,Q32850)
- Qubit™ dsDNA High Sensitivity Quantitation Assay (双链 DNA 高灵敏度检测)试剂盒(ThermoFisher,Q32851)
- Qubit™ 分析管(ThermoFisher,Q32856)
- g-TUBE 管(Covaris,520079)
- NEBNext FFPE DNA 修复混合液(NEB,M6630)
- NEBNext® Ultra II 末端修复/ dA尾添加模块(NEB,E7546)
- NEB Blunt/TA 连接酶预混液(NEB,M0367)
- NEBNext®快速连接模块(NEB,E6056)
- PromethION 测序芯片 R10.4.1(Oxford Nanopore,FLO-PRO114M)
- 无水乙醇
- 异丙醇,100%(Fisher, 10723124)
- TE 缓冲液(10 mM Tris、1 mM EDTA,pH 8)(Fisher Scientific, 10224683)
- 磷酸盐缓冲液(PBS),pH 7.4(Thermo Fisher,10010023)
- 10 mM Tris HCl, pH 8
- 无核酸酶水(如 ThermoFisher,AM9937)
- 15 mL 离心管(例如 Falcon 管)
- 2 ml Eppendorf DNA LoBind 离心管
- 1.5 ml Eppendorf DNA LoBind 离心管
- 0.2 ml 薄壁PCR管
- 吸水材料(如吸水纸或纸巾)
仪器
- PromethION 测序设备
- PromethION 测序芯片遮光片
- HulaMixer™ 样本混匀仪(例如 Thermo Fisher,15920D)
- 适用于 1.5ml Eppendorf 离心管的磁性分离架
- Qubit™ Flex 荧光计(Thermo Fisher)
- 适用于 15 mL 离心管的离心机
- 适用于 0.2 mL、1.5 mL 和 2 mL 离心管的台式微量离心机
- 热循环仪
- 恒温加热仪
- 迷你离心机
- 涡旋混匀仪
- 培养箱或水浴锅
- 盛有冰的冰桶
- 计时器
- 移液枪及枪头(标准型和低吸附宽口型)
可选仪器
- 恒温混匀仪
- Agilent Femto Pulse 系统(或用于读长质控的等效仪器)
起始 DNA
对于本工作流程,我们建议您使用样本制备步骤中推荐的试剂盒,按需从 2 mL 唾液、1 mL 全血或 5×10⁶ 个培养细胞中提取基因组 DNA(gDNA)。
您也可按需采用其他提取试剂盒,但需注意,Oxford Nanopore 未对其进行验证。
每个样本的文库制备需使用 2 µg 片段化 gDNA。长度小于 3 kb 的 DNA 片段应少于总量的 10%。短片段比例过高可能影响后续实验的顺利进行。 若短片段比例超过 10%,应按照本指南进行基于磁珠的片段大小筛选。
第三方试剂
Oxford Nanopore Technologies 推荐您使用本实验指南中列出的所有第三方试剂,并已对其进行验证。我们尚未对其它替代试剂进行测试。 我们建议您按制造商说明准备待用的第三方试剂。
测序芯片质检
我们强烈建议您在开始测序实验前,对测序芯片的活性纳米孔数进行质检。质检需在您收到 PromethION 测序芯片12周内进行。Oxford Nanopore 会对活性孔数量少于以下标准、且尚未投入测序的芯片进行替换*:请您按照测序芯片质检文档中的说明进行芯片质检。
| 测序芯片 | 芯片上的活性孔数确保不少于 |
|---|---|
| PromethION 测序芯片 | 5,000 |
*(请注意:自收到之日起,芯片须一直贮存于 Oxford Nanopore Technologies 推荐的条件下。且质检结果须在质检后的两日内递交给我们。)
3. 从多种生物样本类型中提取 DNA
本实验指南支持从全血、培养细胞和唾液三类样本中提取基因组 DNA(gDNA)。不同样本需采用相应的提取方法,以获得理想的 DNA 质量和产量。请根据样本类型选择相应的提取流程。
提取后,使用 Covaris g-TUBE 管将各类样本的基因组 DNA 机械打断至约 10 kb 的片段长度。唾液样本需按照专用流程进行片段化和纯化,并在进入文库制备前进行片段大小筛选。血液和培养细胞采用相同的 DNA 提取与片段化流程,片段化后的 DNA 可直接用于文库制备。
4. 唾液 DNA 提取
材料
- 2 mL 唾液样本(置于含 2 mL 裂解缓冲液的 GeneFix™ 唾液采集管中,GFX-02)
耗材
- GeneFix™ Saliva-Prep 2 DNA Isolation Kit(唾液 DNA 提取试剂盒,Isohelix,GSPN)
- 适用于 2 mL 唾液样本的 GeneFix™ 唾液采集管(用于 DNA/RNA 的采集与稳定保存;Isohelix,GFX-02)
- Qubit™ dsDNA Broad Range Quantitation Assay(双链DNA宽范围检测)试剂盒(ThermoFisher,Q32850)
- Qubit™ 分析管(ThermoFisher,Q32856)
- 15 mL 离心管(例如 Falcon 管)
- 2 ml Eppendorf DNA LoBind 离心管
仪器
- 适用于 15 mL 离心管的离心机
- 适用于 1.5 mL 和 2 mL 离心管的台式微量离心机
- Qubit™ Flex 荧光计(Thermo Fisher)
- 60°C 水浴锅
- 恒温加热仪
- 涡旋混匀仪
- 迷你离心机
- 计时器
- 移液枪及枪头(标准型和低吸附宽口型)
可选仪器
- 恒温混匀仪
- Agilent Femto Pulse 系统(或用于读长质控的等效仪器)
概览:
1.使用 Isohelix 试剂盒提取 DNA。
2.使用 Covaris g-TUBE 管对 DNA 进行片段化处理。
3.使用磁珠对片段化样本进行大小筛选,并检测其浓度、纯度和片段长度。
将装有唾液样本的 GeneFix™ 采集管涡旋混匀 10 秒。
向每支装有唾液样本的采集管中加入 40 µl Proteinase K(蛋白酶 K) 溶液,然后涡旋振荡充分混匀。
60℃ 下孵育 1 小时。
将各样本溶液分别转移至洁净的 15 mL 锥形离心管中。
向每支含有样本的 15 mL 离心管中加入 4 mL SPN 溶液,然后涡旋振荡充分混匀。
3,000 x g 离心 30 分钟。
小心倒去上清液,避免扰动沉淀。
3,000 x g 离心 1 分钟。
使用移液枪,小心吸去各管内残留的上清液,注意不要扰动 DNA 沉淀。
注意:请确保彻底去除所有清液。
向每支样本管中加入 400 µl TE 溶液(Isohelix,GSPN),涡旋振荡充分重悬样本并混匀。
将重悬后的样本置于室温下孵育不少于 5 分钟,使 DNA 充分溶解。
将重悬后的各份样本分别全部转移至对应的洁净 2 mL Eppendorf 管中。
将样本管以 12,000 × g 离心 15 分钟,使未溶解的固体杂质沉淀。
小心吸取上清液,分别转移至洁净的 2 mL Eppendorf 管中,避免扰动沉淀。
转移上清液后,弃去沉淀。
向每支含有样本上清液的离心管中加入 400 µl SLS 溶液。涡旋振荡充分混匀。
向每份样本上清液中加入 800 µl SPN 溶液。涡旋振荡充分混匀。
12,000 x g 离心 10 分钟。
小心倒去上清液,避免扰动沉淀。
12,000 x g 离心 1 分钟。
使用移液枪小心吸去残留的上清液,注意不要扰动 DNA 沉淀。
请注意:此时 DNA 沉淀可能难以观察,去除上清液时请务必小心。请确保彻底去除所有清液。
向每支含有样本沉淀的离心管中加入 103 μL TE 溶液(Isohelix,GSPN),轻弹管壁混匀。
将样本管置于 37℃ 下的恒温加热仪下孵育 30 分钟。每隔 5 分钟轻弹管壁,以促进样本重悬。
您也可以改用设置为 37°C、300 rpm 的恒温混匀仪进行孵育。
使用宽口枪头轻柔吹打混匀每支离心管中的样本。
使用 Qubit dsDNA BR Assay(双链 DNA 宽范围检测)试剂盒对每个 DNA 样本进行三次定量。
我们建议您分别检测样本管上部、中部和下部的样本,以确认样本的均一性。
如果 Qubit 测量结果存在较大差异,可能是由于 DNA 未充分重悬混匀所致。 此时,我们建议您增加混匀步骤,并延长孵育和洗脱时间:
- 使用宽口枪头再次混匀样本;
- 将样本置于恒温混匀仪中,在 50°C、300 rpm 条件下洗脱 1 小时。
唾液样本中预期的 gDNA 产量
从 2 mL 唾液中预计可提取约 11–35 µg 的基因组 DNA(gDNA)。
Qubit 测得的 DNA 浓度应在 100–350 ng/μL。
取 5 µg 唾液提取的 gDNA,用于后续 DNA 片段化步骤。
5. 唾液来源 DNA 的片段化
材料
- 从唾液样本中提取的 5 µg 基因组 DNA(gDNA)
耗材
- g-TUBE 管(Covaris,520079)
- Qubit™ dsDNA Broad Range Quantitation Assay(双链DNA宽范围检测)试剂盒(ThermoFisher,Q32850)
- Qubit™ 分析管(ThermoFisher,Q32856)
- TE 缓冲液(10 mM Tris、1 mM EDTA,pH 8)(Fisher Scientific, 10224683)
- 1.5 ml Eppendorf DNA LoBind 离心管
仪器
- 适用于 1.5 mL 和 2 mL 离心管的台式微量离心机
- Qubit™ Flex 荧光计(Thermo Fisher)
- 迷你离心机
- 移液枪和枪头
可选仪器
- Femto Pulse 系统(Agilent Technologies)(或等效仪器)
在制备测序文库前,请使用 Covaris g-TUBE 管对 gDNA 进行机械打断,目标片段长度约为 10 kb。
每个样本取 5 µg 提取的 gDNA,分别转移至 1.5 mL Eppendorf 管中。
使用 TE 缓冲液(10 mM Tris、1 mM EDTA,pH 8)将各管总体积补足至 100 μL。
用移液枪轻轻吹打 10 次以充分混匀。使用迷你离心机瞬时离心。
向每个 g-TUBE 管的上端加入 100 µL 相应样本,旋紧管盖。以 6000 rpm(3380 RCF) 离心 1 分钟。
离心后,将各 g-TUBE 管再次以 6000 rpm(3380 RCF)离心 10 秒, 以确保全部 gDNA 通过 g-TUBE 管内狭窄的剪切通道。
目视检查,确认样本已完全从 g-TUBE 上腔流入下腔。
将各 g-TUBE 管倒置,按照步骤 4 的离心条件再次离心:6000 rpm(3380 RCF) 离心 1 分钟。
再次以 6000 rpm(3380 RCF)离心 10 秒,以确保全部 gDNA 通过 g-TUBE 管内狭窄的剪切通道。
拧下 g-TUBE 管体,保留含样本的旋盖部分。从各旋盖中吸出样本,分别转移至洁净的 1.5 ml Eppendorf 离心管中。
使用 Qubit dsDNA Broad Range Assay(双链DNA宽范围检测)试剂盒,对每份片段化 gDNA 样本取 1 µL 进行定量。
gDNA 片段化后的预期浓度
g-TUBE 剪切后的样本浓度预计为 45–55 ng/µl。
从每个样本中取 5 µg 片段化 gDNA,用 TE 缓冲液补足至总体积 100 µL,用于后续磁珠法片段大小筛选。
6. 唾液样本中片段化 DNA 的片段大小筛选
材料
- 片段化 gDNA(共 4 份样本;每份含 5 µg gDNA,体积为 100 µL)
- AMPure XP 磁珠(免扩增条形码试剂盒-24 V14)
耗材
- Qubit™ dsDNA Broad Range Quantitation Assay(双链DNA宽范围检测)试剂盒(ThermoFisher,Q32850)
- Qubit™ 分析管(ThermoFisher,Q32856)
- 10 mM Tris HCl, pH 8
- 新制备的 80% 乙醇(用无核酸酶水配制)
- TE 缓冲液(10 mM Tris、1 mM EDTA,pH 8)(Fisher Scientific, 10224683)
- 1.5 ml Eppendorf DNA LoBind 离心管
仪器
- 适用于 1.5 mL 和 2 mL 离心管的台式微量离心机
- HulaMixer™ 样本混匀仪(例如 Thermo Fisher,15920D)
- 适用于 1.5ml Eppendorf 离心管的磁性分离架
- Qubit™ Flex 荧光计(Thermo Fisher)
- 迷你离心机
- 涡旋混匀仪
- 恒温加热仪
- 移液枪和枪头
可选仪器
- 恒温混匀仪
为获得适合测序的 DNA 片段长度,必须对唾液样本中的 DNA 进行片段大小筛选。
准备筛选用磁珠:
将 AMPure XP(AXP)磁珠充分涡旋振荡 30 秒。.
配制 35%(v/v)的 AXP 磁珠悬液:将 1750 µL AMPure XP(AXP) 磁珠与 3250 µL、10 mM Tris-HCl(pH 8)缓冲液混合。
注意:为获得最优结果,请准确移取后续步骤中规定体积的磁珠。
向 4 管唾液样本(每管含 100 µL、5 µg 机械打断的 DNA)中分别加入 310 µL(3.1 倍体积)的稀释至 35% 的 AMPure XP(AXP)磁珠悬液。
用移液枪上下吹打 10 次以充分混匀。
确保整个溶液体系充分混匀。
在 Hula 混匀仪上孵育 10 分钟。
短暂离心,使所有溶液集中到管底。随后将 4 个样本管置于磁力架上,待磁珠聚集。
保持样本管置于磁力架上,小心吸出并弃去清液,避免扰动或吸走磁珠。
向每管加入 800 µl 新鲜配制的 80% 乙醇,孵育 1 分钟。然后吸出乙醇并弃去。
重复一次乙醇洗涤步骤,即总共进行两次洗涤。
短暂离心,使所有溶液集中到管底。随后将样本管置于磁力架上,待磁珠聚集。使用 10 µl 移液枪吸去管底残留的乙醇。
将磁珠沉淀在空气中干燥约 30 秒。
向每管加入 50 µl TE 缓冲液(10 mM Tris、1 mM EDTA,pH 8),移液枪吹打重悬磁珠沉淀。
将样本置于 37°C 恒温加热仪中孵育 10 分钟,并每隔 2 分钟轻弹管壁。
您也可将 4 个样本管置于设定为 37°C、300 rpm 的恒温混匀仪上孵育。
将离心管置于磁力架上至少一分钟,直到磁珠和液相分离,且洗脱液澄清无色。
将每个样本的 50 μl 洗脱产物分别转移至一支新的 1.5 ml Eppendorf DNA LoBind 管中。
使用 Qubit dsDNA BR Assay(双链 DNA 宽范围检测)试剂盒,分别取每份洗脱样本 1 µL 进行定量。
预期回收率应不低于 50% 。
片段大小筛选后的 DNA 预期产量
以 5 µg gDNA 为起始量,经片段大小筛选后,预计最终可获得至少约 2.5 µg gDNA。
各样本分别取 48 µL 经片段化和片段大小筛选的 gDNA(含量约为 2 µg),用于后续文库制备。
7. 从全血中提取 DNA
材料
- 人全血:≥1 mL,采集于 K2-EDTA 真空采血管中
耗材
- Puregene Blood Kit(血液 DNA 提取试剂盒,Qiagen,158023)
- Qubit™ dsDNA Broad Range Quantitation Assay(双链DNA宽范围检测)试剂盒(ThermoFisher,Q32850)
- Qubit™ 分析管(ThermoFisher,Q32856)
- TE 缓冲液(10 mM Tris、1 mM EDTA,pH 8)(Fisher Scientific, 10224683)
- 新制备的 80% 乙醇(用无核酸酶水配制)
- 100% 异丙醇(Fisher Scientific,10723124)
- 15 mL 离心管(例如 Falcon 管)
- 2 ml Eppendorf DNA LoBind 离心管
- 1.5 ml Eppendorf DNA LoBind 离心管
- 吸水材料(如吸水纸或纸巾)
仪器
- 适用于 15 mL 离心管的离心机
- 适用于 1.5 mL 和 2 mL 离心管的台式微量离心机
- Qubit™ Flex 荧光计(Thermo Fisher)
- 设定为 37°C 和 50°C 的培养箱或水浴锅
- 涡旋混匀仪
- 盛有冰的冰桶
- 移液枪及枪头(标准型和低吸附宽口型)
可选仪器
- 恒温混匀仪
本节介绍了使用 Qiagen Puregene Blood Kit 从经 EDTA-K2 抗凝处理的全血中提取 DNA 的方法。
根据血液样本数量,准备一支合适的离心管。按每份样本 300 µL 的用量(另预留适量余量)计算并量取新鲜配制的 80% 乙醇,将其预先加入离心管中,并置于冰上冷却。
按每份样本 3 mL 的用量,将 RBC Lysis Solution(红细胞裂解液)分别加入对应的 15 mL 离心管中。
确保 EDTA K2 采血管中的血液充分混匀。随后,从每份血液样本中取 1 ml,转移至装有红细胞裂解液的对应离心管中。
将各离心管上下颠倒混匀 10 次。
室温下孵育5分钟。孵育期间,至少将各离心管颠倒混匀 1 次。
2,000 x g 离心 2 分钟以沉淀白细胞。
小心弃去各管上清液,确保管内留有白细胞沉淀及约 200 µL 液体。
上清液可用移液枪吸除,或直接倒入生物危害废物容器中。
轻弹各离心管,并/或用宽口吸头轻轻吹打,将白细胞沉淀重悬于残留液体中。
细胞沉淀在重悬后应完全分散,以利于后续的细胞裂解步骤。
向每管中加入 3 ml 细胞裂解液。
轻柔吹打 10–15 次,使细胞充分裂解,直至样本完全均一、无结块。确保溶液混合均匀。
37℃ 下孵育 30 分钟。
孵育结束后,应确保溶液均一且无结块。必要时,可使用宽口移液枪头吹打混匀,或轻柔倒转各管以促进溶液混匀。
向各样本管内分别加入 15 μl RNase A 溶液,在 37°C 孵育 15 分钟。
随后将各样本管转移至冰上孵育 3 分钟,使样本快速冷却。
向各样本中分别加入 1 ml 蛋白沉淀液(Protein Precipitation Solution)。将各管涡旋振荡两次,每次 5 秒。
2,000 x g 离心 5 分钟。
蛋白应形成紧实的红褐色沉淀。若蛋白沉淀不够紧实,可将离心管在冰上放置 5 分钟后重复离心。
为每份样本准备一支洁净的 15 ml 离心管,并向每管中加入 3 ml 异丙醇。
将各样本管中的上清液小心倒入装有异丙醇的对应 15 ml 离心管中,
倾倒时,请避免扰动蛋白沉淀。
或者,您也可使用移液枪转移上清液,操作过程中同样应确保蛋白沉淀保持完整,不被扰动。
若蛋白沉淀在任一步骤中受到扰动,请重新以 2,000 × g 离心 10 分钟。仅转移澄清的上清液,以避免蛋白污染最终洗脱液。
轻柔倒转各离心管约 50 次混匀,直至 DNA 呈丝状或结块。
2,000 x g 离心 3 分钟。
DNA 应在管底形成小的白色沉淀。
小心弃去上清液,并将各离心管倒置在干净的吸水纸上以沥干残液。确保 DNA 沉淀未被扰动且留在管内。
上清液可用移液枪吸除,或直接倒入废液容器中。 操作时需小心,DNA 沉淀可能较为松散,容易脱落。如担心沉淀脱落,可将上清液倒入另一支洁净的 15 ml 离心管中,以便回收脱落的沉淀。
向每个样本管中加入 300 µl 预冷、新鲜配制的 80% 乙醇(步骤 1 中配制)。轻轻倒转数次以洗涤 DNA 沉淀。
使用宽口吸头,小心地将每份样本的沉淀连同全部 300 μl 乙醇分别转移至一支洁净的 1.5 ml Eppendorf 离心管中。
2,000 x g 离心 1 分钟。
小心弃去各管内上清液,并将离心管倒置在干净的吸水纸上以沥干残液。确保 DNA 沉淀未被扰动且留在管内。
弃去上清液时,可用移液枪吸除,或将其倾倒在吸水材料上。操作时需小心,DNA 沉淀可能较为松散,容易脱落。如担心沉淀脱落,可将上清液倒入另一支洁净的 2 ml 离心管中,以便回收脱落的沉淀。
打开管盖,将 DNA 沉淀在空气中干燥 1 分钟。
请注意:避免沉淀干燥至表面开裂。
向各管 DNA 沉淀中加入 100 μl TE 缓冲液(10 mM Tris、1 mM EDTA、pH 8)。轻弹离心管以重悬沉淀。
在 50°C 下孵育 2 小时,期间使用宽口枪头不时吹打混匀全部体积(100 μl)。
DNA 沉淀可能需要一定时间才能完全溶解;定量前请确保溶液已充分混匀。在 50°C 孵育期间,每隔 30 分钟使用宽口枪头吹打混匀 10–15 次。
为促进溶解,可将样本置于恒温混匀仪中,在 50°C、300 rpm 条件下轻柔振荡孵育;也可使用翻转式混匀仪。
孵育步骤亦可在室温下过夜完成。
使用 Qubit dsDNA BR Assay(双链 DNA 宽范围检测)试剂盒,分别对各样本进行 3 次定量测定。在继续后续步骤前,请确认三次测量结果一致。
我们建议您分别检测样本管上部、中部和下部的样本,以确认样本的均一性。
请注意:如果 Qubit 测量结果存在较大差异,可能是由于 DNA 未充分重悬混匀所致。
此时建议延长孵育时间,以促进 DNA 完全溶解。
全血样本中预期的 gDNA 产量
从 1 mL 全血中预计可提取约 15–35 µg 的基因组 DNA(gDNA)。
Qubit 测定浓度预计为 75–300 ng/µl。
取 2 µg gDNA, 用于后续血液或细胞来源 DNA 的片段化一节。
8. 从培养细胞中提取 DNA
材料
- 5x10⁶ cells(例如细胞培养物或组织样本)
耗材
- Puregene Cell Kit( 细胞 DNA 提取试剂盒,Qiagen,158043)
- Qubit™ dsDNA Broad Range Quantitation Assay(双链DNA宽范围检测)试剂盒(ThermoFisher,Q32850)
- Qubit™ 分析管(ThermoFisher,Q32856)
- TE 缓冲液(10 mM Tris、1 mM EDTA,pH 8)(Fisher Scientific, 10224683)
- 新制备的 80% 乙醇(用无核酸酶水配制)
- 异丙醇,100%(Fisher, 10723124)
- 磷酸盐缓冲液(PBS),pH 7.4(Thermo Fisher,10010023)
- 15 mL 离心管(例如 Falcon 管)
- 2 ml Eppendorf DNA LoBind 离心管
- 1.5 ml Eppendorf DNA LoBind 离心管
- 吸水材料(如吸水纸或纸巾)
仪器
- 适用于 15 mL 离心管的离心机
- 适用于 1.5 mL 和 2 mL 离心管的台式微量离心机
- Qubit™ Flex 荧光计(Thermo Fisher)
- 设定为 37°C 和 50°C 的培养箱或水浴锅
- 涡旋混匀仪
- 盛有冰的冰桶
- 移液枪及枪头(标准型和低吸附宽口型)
可选仪器
- 恒温混匀仪
根据细胞样本数量,准备一支合适的离心管。按每份样本 300 µL 的用量(另预留适量余量)计算并量取新鲜配制的 80% 乙醇,将其预先加入离心管中,并置于冰上冷却。
在 15 ml 离心管中,将 5 × 10⁶ 个细胞以 300 × g 离心 3 分钟收集沉淀。若细胞沉淀中仍有残留液体,可再次瞬时离心后,小心吸取残余上清液并丢弃。
向沉淀的细胞中加入 200 µl PBS。
300 x g 离心三分钟。
注意避免扰动沉淀,用移液枪小心吸出上清液并弃去。
再次加入 200 µl PBS,轻弹各离心管或使用宽口枪头吹打以重悬沉淀。
细胞沉淀在重悬后应完全分散,以利于后续的细胞裂解步骤。
向每管中加入 3 ml 细胞裂解液(Cell Lysis Solution)。
轻柔吹打 10–15 次,使细胞充分裂解,直至样本完全均一、无结块。确保溶液混合均匀。
37℃ 下孵育 30 分钟。
孵育结束时,请确保溶液充分均一,且无结块残留。您可按需使用宽口移液枪头吹打混匀,或轻柔倒转各样本管以促进溶液混匀。
向各样本管中加入 5 µl RNase A 溶液,倒转混匀 20 次。
在 37°C 孵育 15 分钟,随后将样本管置于冰上冷却 3 分钟。
向裂解的细胞中加入 1 ml 蛋白沉淀液(Protein Precipitation Solution)。将各管以最大转速涡旋振荡两次,每次 5 秒。
涡旋振荡时应确保管内全部液体充分混匀,形成均一的白色溶液。
2,000 x g 离心 10 分钟。
蛋白应形成紧实的白色沉淀。若蛋白沉淀不够紧实,可在冰上放置 5 分钟后重复离心。
请注意:后续步骤中切勿带入蛋白沉淀。
每个样本取一支洁净的 15 ml 离心管,加入 3 ml 异丙醇。
将样本管中的上清液小心倒入装有异丙醇的 15 ml 离心管中。
倾倒时,请避免扰动蛋白沉淀。
或者,您也可使用移液枪转移上清液,操作过程中同样应确保蛋白沉淀保持完整,不被扰动。
若蛋白沉淀在任一步骤中受到扰动,请重新以 2,000 × g 离心 10 分钟。仅转移澄清的上清液,以避免蛋白污染最终洗脱液。
轻柔倒转各离心管约 50 次混匀,直至 DNA 呈丝状或结块。
2,000 x g 离心 3 分钟。
DNA 应在管底形成小的白色沉淀。
小心弃去上清液,并将各离心管倒置在干净的吸水纸上以沥干残液。确保 DNA 沉淀未被扰动且留在管内。
上清液可用移液枪吸除,或直接倒入废液容器中。操作时需小心,DNA 沉淀可能较为松散,容易脱落。如担心沉淀脱落,可将上清液倒入另一支洁净的 15 ml 离心管中,以便回收脱落的沉淀。
向每个样本管中加入 300 µl 预冷、新鲜配制的 80% 乙醇(步骤 1 中配制)。轻轻倒转数次以洗涤 DNA 沉淀。
使用宽口吸头,小心地将每份样本的沉淀连同全部 300 μl 乙醇分别转移至一支洁净的 1.5 ml Eppendorf 离心管中。
2,000 x g 离心 1 分钟。
小心弃去上清液,并将各离心管倒置在干净的吸水纸上以沥干残液。确保 DNA 沉淀未被扰动且留在管内。
弃去上清液时,可用移液枪吸除,或将其倾倒在吸水材料上。操作时需小心,DNA 沉淀可能较为松散,容易脱落。如担心沉淀脱落,可将上清液倒入另一支洁净的 2 ml 离心管中,以便回收脱落的沉淀。
打开各样本管管盖,将 DNA 沉淀在空气中干燥 1 分钟。
请注意:避免沉淀干燥至表面开裂。
向各管 DNA 沉淀中加入 200 μl TE 缓冲液(10 mM Tris、1 mM EDTA、pH 8)。轻弹离心管以重悬沉淀。
在 50°C 下孵育 2 小时,期间使用宽口枪头不时吹打混匀全部体积(200 μl)。
DNA 沉淀可能需要一定时间才能完全溶解;定量前请确保溶液已充分混匀。在 50°C 孵育期间,每隔 30 分钟使用宽口枪头吹打混匀 10–15 次。
为促进溶解,可将样本置于恒温混匀仪中,在 50°C、300 rpm 条件下轻柔振荡孵育;也可使用翻转式混匀仪。
孵育步骤亦可在室温下过夜完成。
使用 Qubit dsDNA BR Assay(双链 DNA 宽范围检测)试剂盒对每个样本进行三次定量。在继续后续步骤前,请确认三次测量结果一致。
我们建议您分别检测样本管上部、中部和下部的样本,以确认样本的均一性。
请注意:如果 Qubit 测量结果存在较大差异,可能是由于 DNA 未充分重悬混匀所致。
此时建议延长孵育时间,以促进 DNA 完全溶解。
从培养细胞中提取 gDNA 的预期产量
以 5×10⁶ 个细胞为起始材料,预计可提取 15–35 µg 基因组 DNA(gDNA)。
Qubit 测定浓度预计为 75–300 ng/µl。
取 2 µg gDNA, 用于后续血液或细胞来源 DNA 的片段化一节。
9. 血液和细胞来源 DNA 的片段化
材料
- 从血液或培养细胞中提取的 2 µg 基因组 DNA(gDNA)
耗材
- g-TUBE™(Covaris,520079)
- Qubit™ dsDNA Broad Range Quantitation Assay(双链DNA宽范围检测)试剂盒(ThermoFisher,Q32850)
- Qubit™ 分析管(ThermoFisher,Q32856)
- TE 缓冲液(10 mM Tris、1 mM EDTA,pH 8)(Fisher Scientific, 10224683)
- 1.5 ml Eppendorf DNA LoBind 离心管
仪器
- 适用于 1.5 mL 和 2 mL 离心管的台式微量离心机
- Qubit™ Flex 荧光计(Thermo Fisher)
- 迷你离心机
- 移液枪和枪头
可选仪器
- Femto Pulse 系统(Agilent Technologies)(或等效仪器)
在制备测序文库前,请使用 Covaris g-TUBE 管对 gDNA 进行机械打断,目标片段长度约为 10 kb。
每个样本取 2 µg 提取的 gDNA,分别转移至 1.5 mL Eppendorf 管中。
使用 TE 缓冲液(10 mM Tris、1 mM EDTA,pH 8)将各管总体积补足至 50 μL。
用移液枪吹打 10 次以充分混匀。使用迷你离心机瞬时离心。
向每个 g-TUBE 管的上端加入 50 µL 相应样本,旋紧管盖。以 6000 rpm(3380 RCF) 离心 1 分钟。
离心后,将离心管再次以 6000 rpm(3380 RCF)离心 10 秒, 以确保全部 gDNA 通过 g-TUBE 管内狭窄的剪切通道。
目视检查,确认样本已完全从 g-TUBE 上腔流入下腔。
将各 g-TUBE 管倒置,按照步骤 4 的离心条件再次离心:以 6000 rpm(3380 RCF) 离心 1 分钟。
再次以 6000 rpm(3380 RCF)离心 10 秒,以确保全部 gDNA 通过 g-TUBE 管内狭窄的剪切通道。
拧下 g-TUBE 管体,保留含样本的旋盖部分。从各旋盖中吸出样本,分别转移至洁净的 1.5 ml Eppendorf 离心管中。
使用 Qubit dsDNA BR Assay(双链 DNA 宽范围检测)试剂盒,分别取每份片段化 gDNA 样本 1 µL 进行定量。
gDNA 片段化后的预期浓度
g-TUBE 剪切后的样本浓度预计为 38–45 ng/µl。
各样本分别取 48 µL 片段化 gDNA(含量约为 2 µg),用于后续文库制备。
10. DNA损伤及末端修复
材料
- 片段化 gDNA:每份样本 2 µg,体积 48 µL
- AMPure XP 磁珠(免扩增条形码试剂盒-24 V14)
耗材
- NEBNext FFPE DNA 修复混合液(NEB,M6630)
- NEBNext® Ultra II 末端修复/ dA尾添加模块(NEB,E7546)
- Qubit™ dsDNA High Sensitivity Quantitation Assay (双链 DNA 高灵敏度检测)试剂盒(ThermoFisher,Q32851)
- Qubit™ 分析管(ThermoFisher,Q32856)
- 无水乙醇
- 无核酸酶水(如 Thermo Scientific,AM9937)
- 1.5 ml Eppendorf DNA LoBind 离心管
- 0.2 ml 薄壁PCR管
仪器
- 适用于 0.2 mL、1.5 mL 和 2 mL 离心管的台式微量离心机
- 热循环仪
- HulaMixer™ 样本混匀仪(例如 Thermo Fisher,15920D)
- 适用于 1.5ml Eppendorf 离心管的磁性分离架
- Qubit™ Flex 荧光计(Thermo Fisher)
- 迷你离心机
- 涡旋混匀仪
- 盛有冰的冰桶
- 移液枪和枪头
根据生产厂家的说明准备FFPE修复混合液和NEBNext末端修复/ dA尾添加模块,并置于冰上。
为获得最优表现,NEB建议如下:
1.于冰上解冻所有试剂。
2.轻弹或倒转试剂管,使其充分混匀。
注意: 请勿涡旋振荡 FFPE 修复混合液或 Ultra II 末端修复酶混合物。
3.每日首次打开一管试剂前,请务必先瞬时离心。
4.Ultra II 末端修复反应缓冲液 及 FFPE DNA 修复缓冲液中可能会含有少量沉淀。请待液体回复至室温后,使用移液枪上下吹打数次,打散沉淀;随后涡旋振荡 30 秒,至沉淀完全溶解。
注意: 通过涡旋振荡充分混合缓冲液至关重要。
5.FFPE DNA 修复缓冲液 v2 可能呈淡黄色,此属正常现象,不影响其使用。
使用无核酸酶水配制 DNA 样本:
1.请确保每份样本均含有 2 µg 提取并片段化的 DNA,并已分别分装至洁净的 0.2 mL 薄壁 PCR 管中。
注意: 共应有 4 支样本管。
2.如不足48 μl,请加入无核酸酶水补足。
3.吹打或轻弹离心管,充分混匀。
4.使用离心机瞬时离心。
向上述含片段化 DNA 样本的各 0.2 ml PCR 管中加入以下试剂:
| 试剂 | 体积 |
|---|---|
| 前一步骤所得 ~2 µg 片段化 DNA | 48 µl |
| Ultra II 末端修复反应缓冲液 | 3.5 µl |
| Ultra II 末端修复酶混合物 | 3 µl |
| NEBNext FFPE DNA 修复缓冲液 | 3.5 µl |
| NEBNext FFPE DNA 修复混合液 | 2 µl |
| 总体积 | 60 µl |
轻轻吹打各反应体系以充分混匀,并瞬时离心。
使用带加热盖的热循环仪,在 20°C 下孵育 5 分钟,再于 65°C 下孵育 5 分钟,随后在 4°C 保持。
将样本从热循环仪中取出。短暂离心后,将每个样本分别转移至洁净的 1.5 mL Eppendorf DNA LoBind 离心管中,并置于冰上。
涡旋振荡以重悬 AMPure XP 磁珠(AXP)。
向每个末端修复反应中加入 1 倍体积(60 µL)重悬后的 AMPure XP 磁珠(AXP),轻弹离心管混匀。
将离心管置于 Hula 混匀仪(低速旋转式混匀仪)上室温孵育 5 分钟。
用无核酸酶水新鲜配制 3 ml 80% 乙醇。
请注意: 请确保配制足量的 80% 乙醇,以满足 4 个样本的处理需求。
将样本瞬时离心后置于磁力架上,待磁珠与液相分离,且液相澄清无色。保持离心管在磁力架上不动,用移液枪吸去清液。
保持离心管在磁力架上不动,以 200 µl 新鲜制备的 80% 乙醇洗涤磁珠。小心不要扰动磁珠。用移液枪将乙醇吸走并弃掉。
如果沉淀被扰动,请等待磁珠重新沉降后再吸走乙醇。
重复上述步骤。
将离心管瞬时离心后置于磁力架上。用移液枪吸走残留的乙醇。将磁珠在空气中干燥约 30 秒,避免干至表面开裂。
将各样本管从磁力架上移开,轻轻吹打或轻弹各管,使磁珠重悬于 20 µl 无核酸酶水中。室温下孵育 2 分钟。
将离心管置于磁力架上至少一分钟,直到磁珠和液相分离,且洗脱液澄清无色。
将每个样本的 20 μl 洗脱产物分别转移至一支新的 1.5 ml Eppendorf DNA LoBind 管中。
请注意:由于样本尚未添加条形码,请务必单独处理各样本。
用 Qubit 荧光计为各洗脱样本定量。
请注意: 我们建议分别对这 4 个样本各进行 3 次 Qubit 测定,以获得更准确的定量结果,便于后续在添加条形码前将各样本调整至相同浓度。
末端修复后的预期回收量为每个样本 1–1.6 µg。
根据定量结果,以产量最低的样本为基准,对所有样本进行调整,具体步骤如下:
1.取16 µl 产量最低的样本,转移至一支新的 0.2ml 薄壁 PCR 管中。
2.从其余各样本中分别取出与产量最低样本等质量的 DNA,分别加入洁净的 0.2 ml 薄壁 PCR 管中。
3.使用无核酸酶水将每个样本的体积补足至 16 μL。
上述完成末端修复、按等摩尔量配制且总体积为 16 µL 的各份样本 DNA,可直接用于后续的免扩增条形码连接反应。如有需要,可将样本置于 4°C 下过夜保存。
11. 免扩增条码连接
材料
- 上一节获得的末端修复 DNA 样本:共 4 份,每份体积为 16 µL(各样本的 DNA 量均调整至与产量最低的样本一致)
- 免扩增条形码试剂盒-24 V14 中的试剂:
- 免扩增条形码(NB01-24)
- AMPure XP 磁珠(AXP)
- 短片段缓冲液(SFB)
- EDTA(EDTA)
耗材
- NEB Blunt/TA 连接酶预混液(NEB,M0367)
- Qubit™ dsDNA High Sensitivity Quantitation Assay (双链 DNA 高灵敏度检测)试剂盒(ThermoFisher,Q32851)
- Qubit™ 分析管(ThermoFisher,Q32856)
- 无核酸酶水(如 Thermo Scientific,AM9937)
- 1.5 ml Eppendorf DNA LoBind 离心管
- 0.2 ml 薄壁PCR管
仪器
- 适用于 0.2 mL、1.5 mL 和 2 mL 离心管的台式微量离心机
- HulaMixer™ 样本混匀仪(例如 Thermo Fisher,15920D)
- 适用于1.5ml Eppendorf 离心管的磁力架
- Qubit™ Flex 荧光计(Thermo Fisher)
- 涡旋混匀仪
- 迷你离心机
- 恒温加热仪
- 盛有冰的冰桶
- 移液枪和枪头
根据生产厂家说明制备 NEB Blunt/TA 连接酶预混液,并置于冰上。
1.在室温下解冻试剂。
2.将各试剂管瞬时离心5秒。
3.用移液枪全量吹打试剂 10 次,确保充分混匀。
将 EDTA 于室温下解冻,涡旋振荡混匀。瞬时离心后置于冰上。
在室温下解冻免扩增条形码(NB01–24),瞬时离心后,根据样本数量,分别用移液枪吹打混匀所需的每一种条形码,然后置于冰上。
条形码板孔仅限单次使用。使用前请确认所选孔密封完好;一旦刺穿或开启,不得再次使用。
为计划上样于同一测序芯片的各个样本选择不同的条形码。每个实验需为四个样本添加条形码并合并。
请注意: 每个样本应仅对应一种条形码。
在各支装有已调整至相同 DNA 量样本的 0.2 ml PCR 管中,按下列顺序加入试剂:
| 试剂 | 体积 |
|---|---|
| 经过末端修复的 DNA | 16 µl |
| 免扩增条形码(NB01-24) | 4 µl |
| Blunt/TA 连接酶预混液 | 20 µl |
| 总体积 | 40 µl |
轻轻吹打各反应体系以充分混匀,并瞬时离心。
室温下孵育 20 分钟。
向每管中加入 4 µl EDTA(蓝盖),充分吹打混匀后,瞬时离心。
将各带条形码的 DNA 样本合并至一支洁净的 1.5 ml Eppendorf DNA LoBind 离心管中。
请注意: 4 个样本的总体积应为 176 µl。
涡旋振荡以重悬 AMPure XP 磁珠(AXP)。
向混合样本中加入0.65 倍体积的 AMPure XP 磁珠(AXP),吹打混匀。
将离心管置于 Hula 混匀仪(低速旋转式混匀仪)上室温孵育 10 分钟。
以下纯化步骤中使用的是短片段缓冲液(SFB)而非80%的乙醇来洗涤磁珠。使用乙醇会严重破坏测序反应。
将样本瞬时离心后置于磁力架上 5 分钟,直到磁珠和液相分离,且洗脱液澄清无色,吸除上清。
向样本管内加入 500 μl 短片段缓冲液(SFB)洗涤磁珠。轻弹离心管将磁珠混匀后,将离心管瞬时离心,再放回磁力架,静置待磁珠和液相分离。保持试管在磁力架上不动,用移液枪吸出清液并弃去。
重复上述步骤。
将离心管瞬时离心后置于磁力架上。用移液枪吸去残留的短片段缓冲液(SFB)。让磁珠在空气中干燥约 30 秒,但不要干至表面开裂。
将离心管从磁力架上移开,轻弹离心管,使磁珠重悬于 32 µl 无核酸酶水中。
37℃ 下孵育 15 分钟。每隔两分钟,轻弹含样本的离心管 10 秒,以促进 DNA 的洗脱。
将离心管置于磁力架上,直到磁珠和液相分离,且洗脱液澄清无色。
将 32 µl 洗脱液转移至一支新的 1.5ml Eppendorf DNA LoBind 管中。
取 1µl 洗脱样本,用 Qubit 定量。
在条形码连接步骤完成后,预期可回收约 2.2–3.2 µg 的 DNA。
带条形码的 DNA 样本将用于稍后的接头连接及纯化步骤。如需要,您也可以此时将样本置于4°C储存过夜。
12. 接头连接及纯化
材料
- 免扩增条形码试剂盒-24 V14 中的试剂:
- 长片段缓冲液(LFB)
- 洗脱缓冲液(EB)
- 免扩增接头(NA)
- AMPure XP 磁珠(AXP)
耗材
- NEBNext®快速连接模块(NEB,E6056)
- Qubit™ dsDNA High Sensitivity Quantitation Assay (双链 DNA 高灵敏度检测)试剂盒(ThermoFisher,Q32851)
- Qubit™ 分析管(ThermoFisher,Q32856)
- 1.5 ml Eppendorf DNA LoBind 离心管
仪器
- 适用于 1.5 mL 和 2 mL 离心管的台式微量离心机
- HulaMixer™ 样本混匀仪(例如 Thermo Fisher,15920D)
- 适用于1.5ml Eppendorf 离心管的磁力架
- Qubit™ Flex 荧光计(Thermo Fisher)
- 热循环仪
- 迷你离心机
- 涡旋混匀仪
- 盛有冰的冰桶
- 移液枪和枪头
SQK-NBD114.24 试剂盒中使用的免扩增接头(NA)不可与其他测序接头互换使用。
测序芯片质检
我们强烈建议在开始文库制备之前,对测序芯片的活性纳米孔数量进行质检,以确保其足够支持实验的顺利进行。
详情请参阅 MinKNOW 实验指南中的 测序芯片质检说明。
请根据厂家的说明准备 NEBNext 快速连接反应模块,并置于冰上。
1.室温下解冻
2.将各试剂管瞬时离心5秒。
3.用移液枪全量吹打试剂 10 次,确保充分混匀。
注意: 请勿涡旋振荡快速 T4 DNA 连接酶。
NEBNext 快速连接反应缓冲液(5X)可能会出现少量沉淀。请待液体回复至室温后,使用移液枪上下吹打数次,打散沉淀;然后涡旋振荡数秒,确保充分混匀。
请勿涡旋振荡快速 T4 DNA 连接酶。
瞬时离心免扩增接头(NA)和快速 T4 DNA 连接酶,吹打混匀后置于冰上。
于室温下解冻长片段缓冲液(LFB)和洗脱缓冲液(EB),涡旋振荡混匀,瞬时离心后置于冰上。
在一支1.5ml Eppendorf DNA LoBind离心管内,将所有试剂按以下顺序混合:
| 试剂 | 体积 |
|---|---|
| 合并后的带条码样本 | 30 µl |
| 免扩增接头(NA) | 5 µl |
| NEBNext 快速连接反应缓冲液(5X) | 10 µl |
| 快速 T4 DNA 连接酶 | 5 µl |
| 总体积 | 50 µl |
轻轻吹打反应体系以充分混匀,并瞬时离心。
室温下孵育 20 分钟。
涡旋振荡以重悬 AMPure XP 磁珠(AXP)。
将 25 µl(0.5x)重悬的 AMPure XP 磁珠(AXP)加入反应体系中,吹打混匀。
将离心管置于 Hula 混匀仪(低速旋转式混匀仪)上室温孵育 10 分钟。
将样本瞬时离心后置于磁力架上,待磁珠与液相完全分离,且液相澄清无色。保持离心管在磁力架上不动,用移液枪吸去清液。
加入 250 μl 长片段缓冲液(LFB)洗涤磁珠。轻弹离心管将磁珠混匀后,将离心管瞬时离心,再放回磁力架,静置至少 5 分钟,待磁珠和液相分离。保持离心管在磁力架上不动,用移液枪吸除清液并弃去。
请注意: 吸取上清液时请谨慎操作,由于缓冲液黏度较高,可能会将磁珠一同吸出。
重复上述步骤。
将离心管瞬时离心后置于磁力架上。用移液枪吸走残留的上清液。让磁珠在空气中干燥约 30 秒,但不要干至表面开裂。
将离心管从磁力架上移开。将磁珠重悬于 97 µl 洗脱缓冲液中(EB)。
瞬时离心后,于 37 °C 下孵育 20 分钟。每隔两分钟轻弹样本 10 秒,以促进 DNA 洗脱。
将离心管静置于磁力架上至少 1 分钟,直到磁珠和液相分离,且洗脱液澄清无色。
将此 97 µl DNA 文库洗脱液转移至一支新的 1.5ml Eppendorf DNA LoBind 管中。
将磁珠丢弃。
取 1µl 洗脱样本,用 Qubit 定量。
在接头连接及纯化步骤完成后,预期可在 96 µl 的体积中回收约 1–1.2 µg 的 DNA。
构建好的文库即可用于测序芯片上样。在上样前,请将文库置于冰上或4℃条件下保存。
文库保存建议
若为 短期 保存或重复使用(例如在清洗芯片后再次上样),我们建议将文库置于Eppendorf DNA LoBind 离心管中 4℃ 保存。 若为一次性使用且储存时长 超过3个月 ,我们建议将文库置于Eppendorf DNA LoBind 离心管中 -80℃ 保存。
13. PromethION测序芯片的预处理及上样
材料
- 免扩增条形码试剂盒-24 V14 中的试剂:
- 测序缓冲液(SB)
- 文库颗粒(LIB)
- 测序芯片系绳(FCT)
- 测序芯片冲洗液(FCF)
耗材
- PromethION 测序芯片
- 1.5 ml Eppendorf DNA LoBind 离心管
仪器
- PromethION 测序设备
- PromethION 测序芯片遮光片
- 迷你离心机
- 涡旋混匀仪
- 盛有冰的冰桶
- 移液枪和枪头
测序将运行 72 小时,以确保目标区域获得足够的覆盖度。为维持测序性能和通量,首次上样后,分别在测序运行 24 小时和 48 小时时对测序芯片进行清洗并重新上样。因此,整个 72 小时的测序运行期间共进行 3 次上样。
免扩增条形码试剂盒-24 V14 仅兼容 R10.4.1 测序芯片(FLO-PRO114M)。
测序芯片的预处理及上样
我们建议您在首次运行测序芯片前,观看视频如何为 PromethION 测序芯片上样。
将芯片从冰箱中取出后,请将其置于室温环境孵育 20 分钟再插入 PromethION 测序仪。潮湿环境下的测序芯片上可能会形成冷凝水。因此,请检查测序芯片顶部和底部的金色连接器引脚处是否有水凝结。如有,请使用无绒布擦干。请确保测序芯片的底部有热垫(黑色)覆盖。
于室温下解冻测序缓冲液(SB)、文库颗粒(LIB)、测序芯片系绳(FCT)和测序芯片冲洗液(FCF)。完全解冻后,涡旋振荡混匀。然后瞬时离心,置于冰上。
按下文制备测序芯片的预处理液,室温下涡旋振荡混匀。
请根据待上样测序芯片的数量,另拿一支适当体积的离心管,按下表制备测序芯片预处理液。
| 试剂 | 体积(每张芯片) |
|---|---|
| 测序芯片冲洗液 (FCF) | 1,170 µl |
| 测序芯片系绳(FCT) | 30 µl |
| 总体积 | 1,200 µl |
对 PromethION 2 Solo 和 PromethION 2 Integrated,请按以下步骤为测序芯片上样:
1.将测序芯片平放在金属板上。
2.将测序芯片推入对接端口,直至金色引脚或绿色电路板不可见。
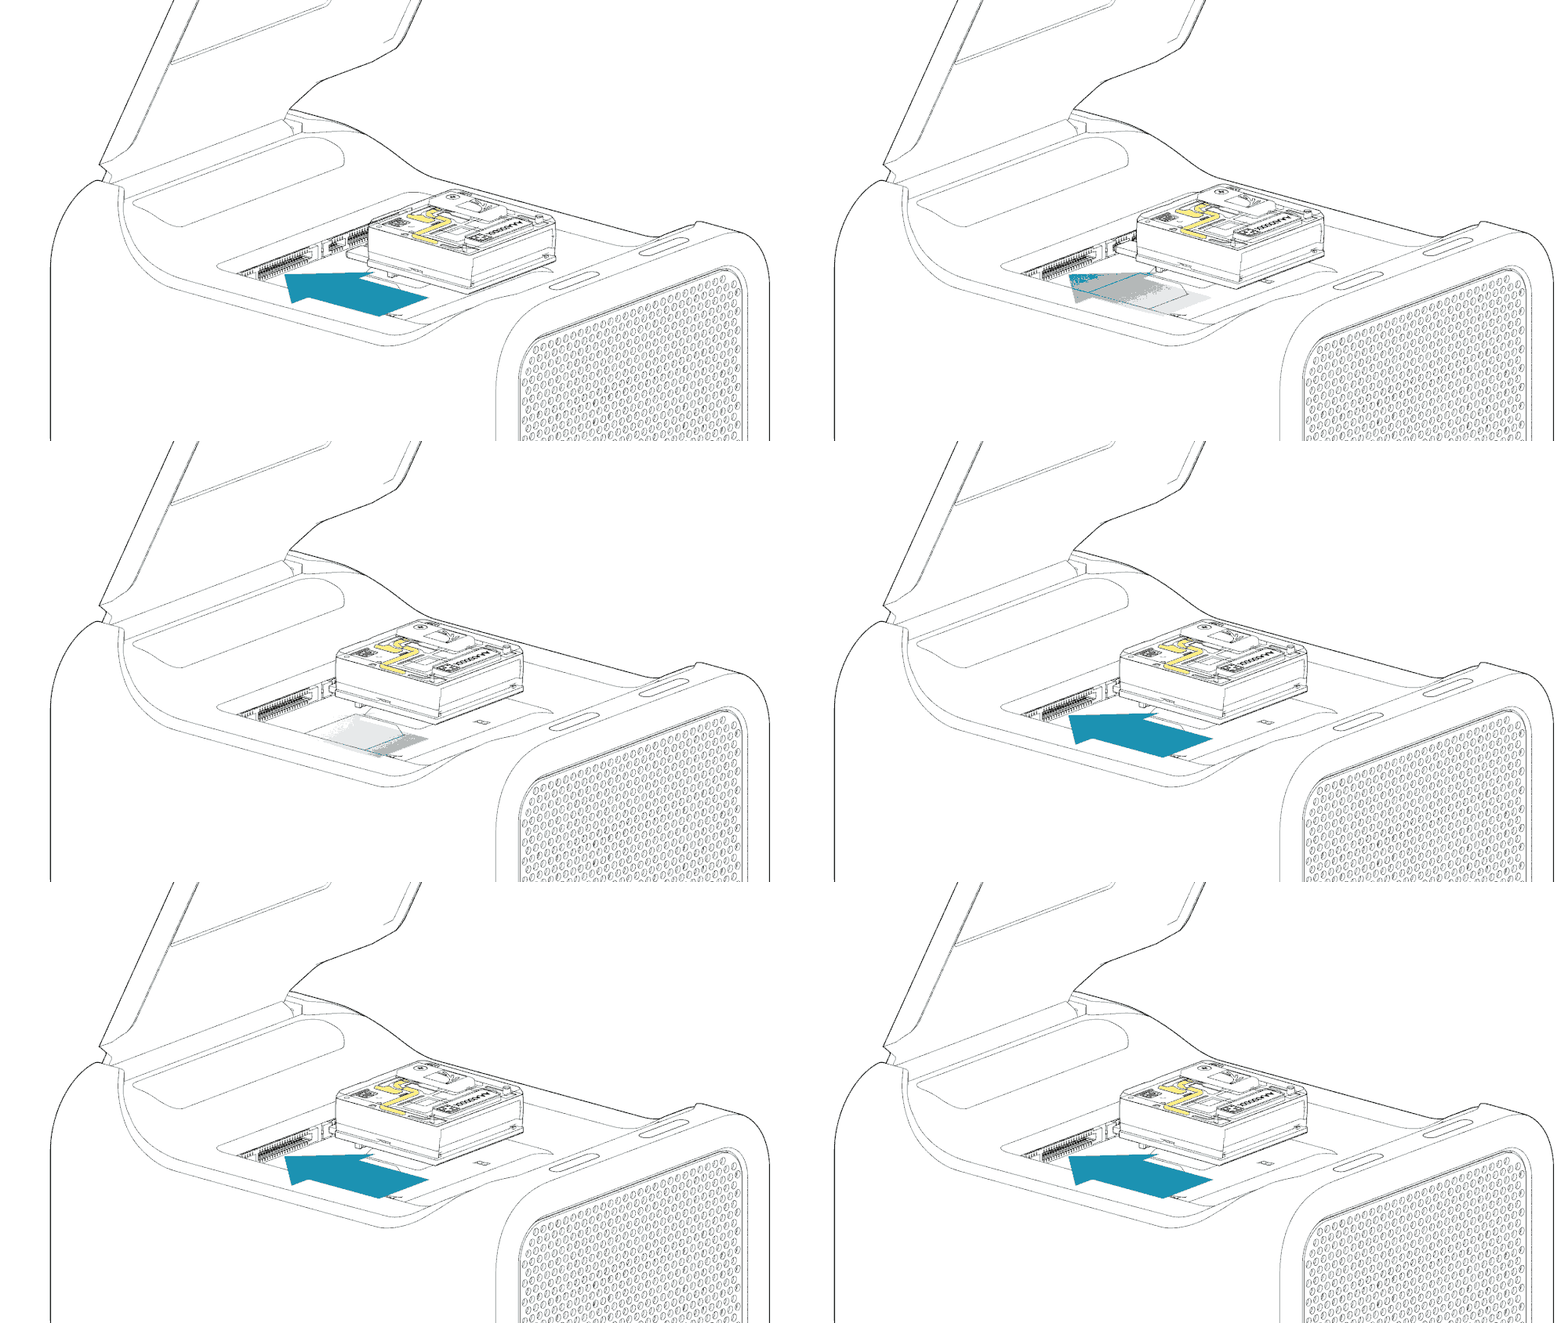
对PromethION 24/48,将测序芯片插入相应卡槽的对接端口:
1.将测序芯片与连接器横竖对齐,以便顺利卡入。
2.用力下压芯片至卡槽,并确认卡夹位置归位。
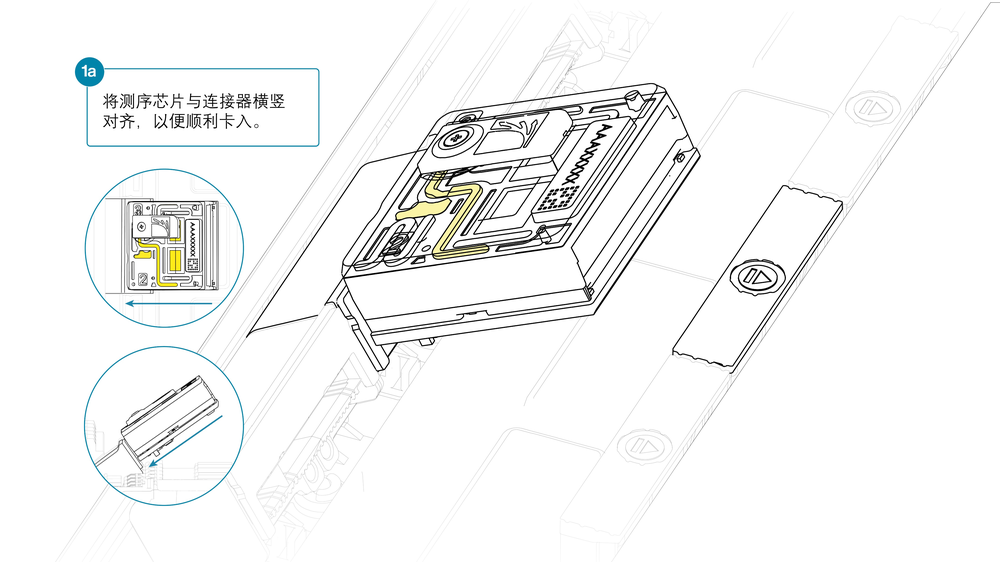
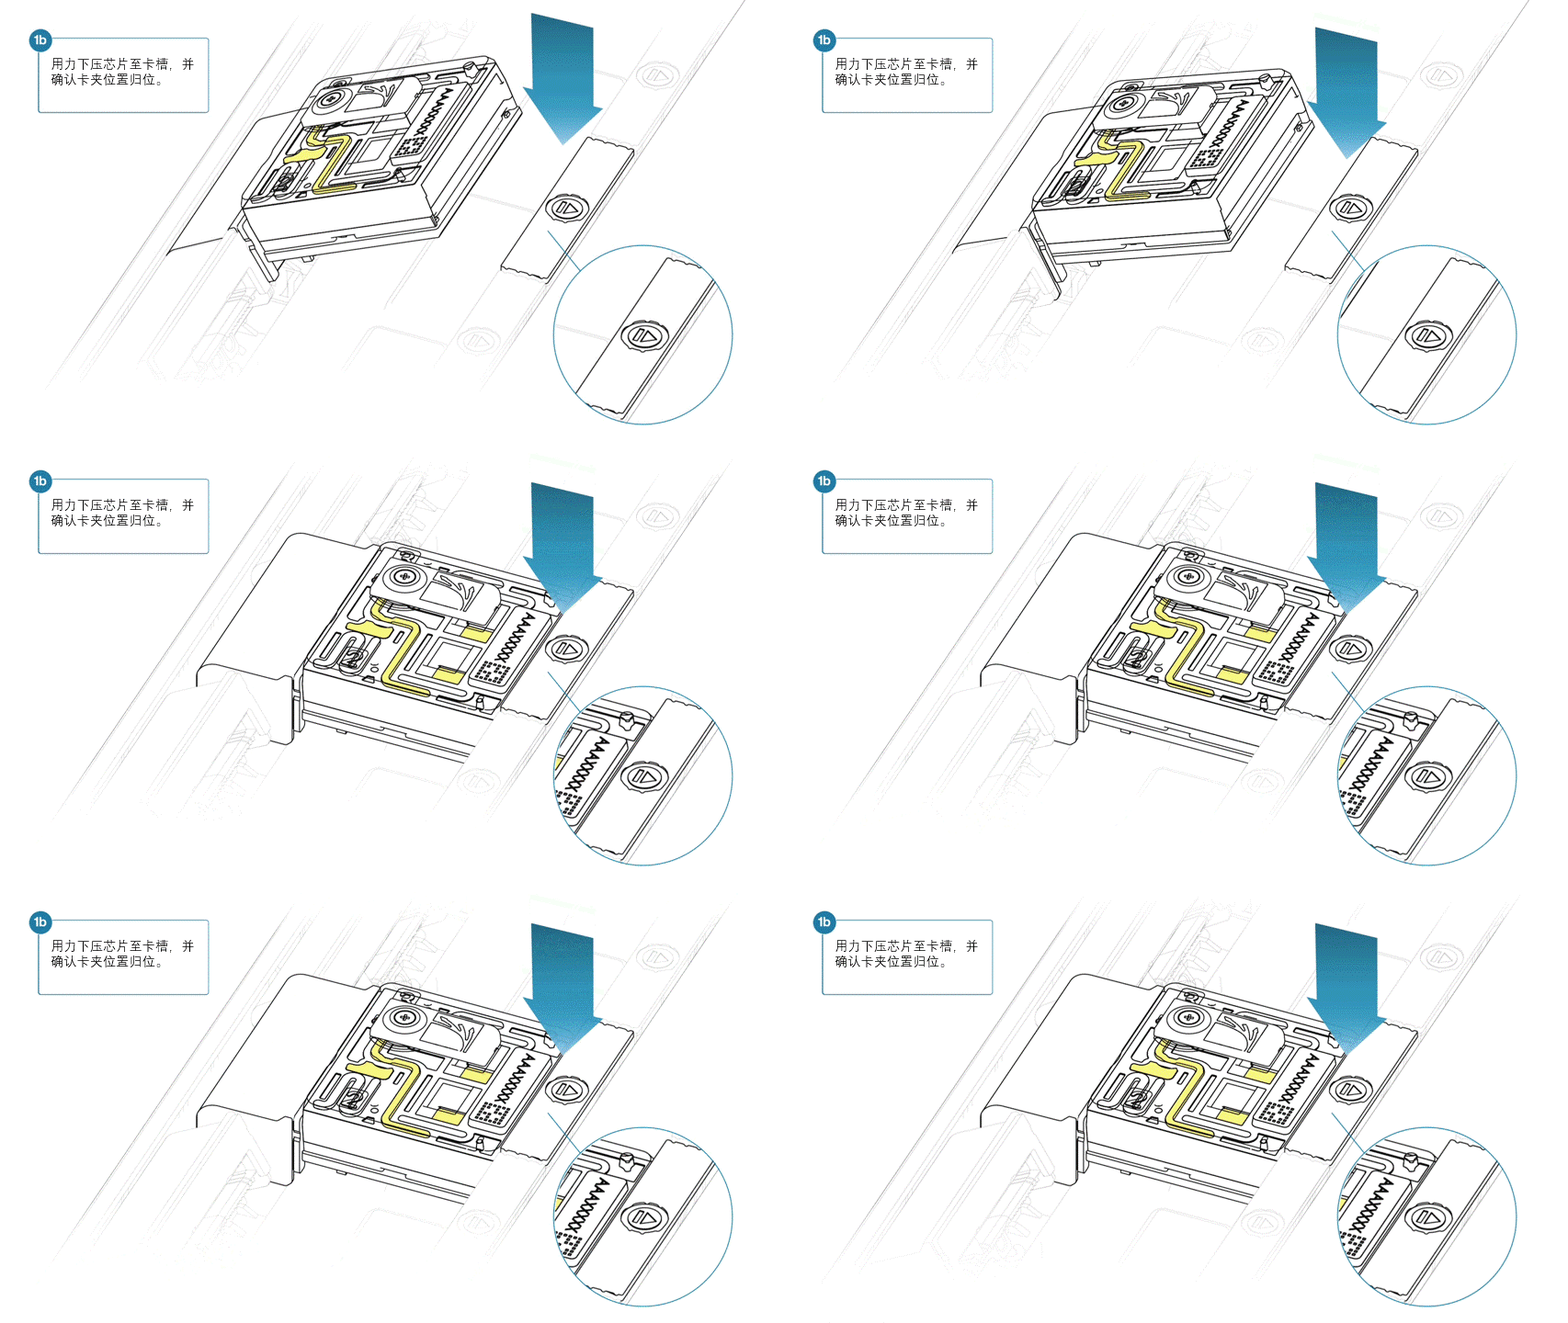
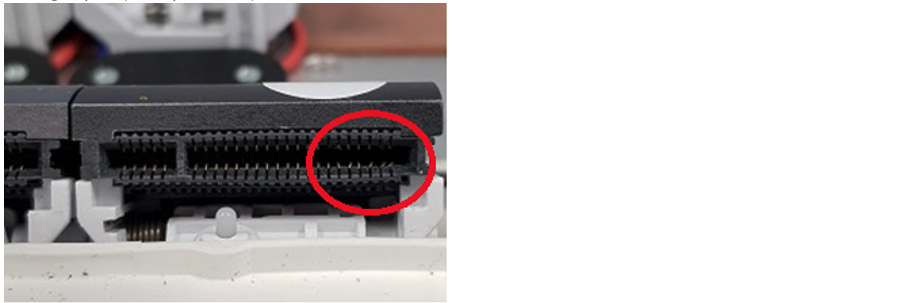
如插入测序芯片的角度出现偏差,可能会损坏 PromethION 上的引脚并影响测序结果。如您发现 PromethION 测序仪芯片卡槽上的引脚损坏,请通过电子邮件(support@nanoporetech.com)联系我们的技术支持团队。
请在文库上样前完成测序芯片质检,评估可用的活性纳米孔数量。
若该测序芯片此前已完成质检,则可跳过此步骤。
详细操作说明请参阅 MinKNOW 实验指南中的测序芯片质检说明部分。
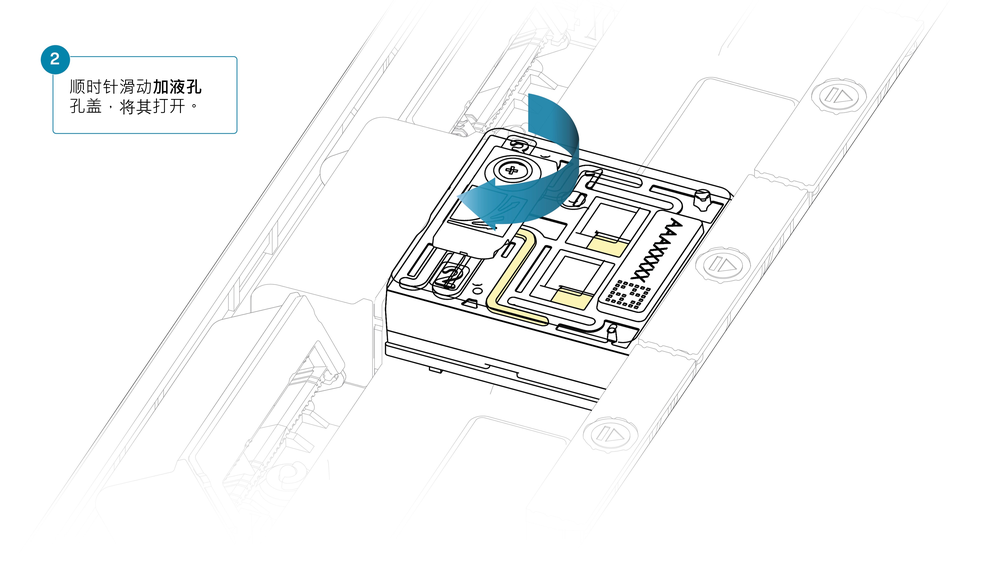
顺时针滑动加液孔孔盖,将其打开。
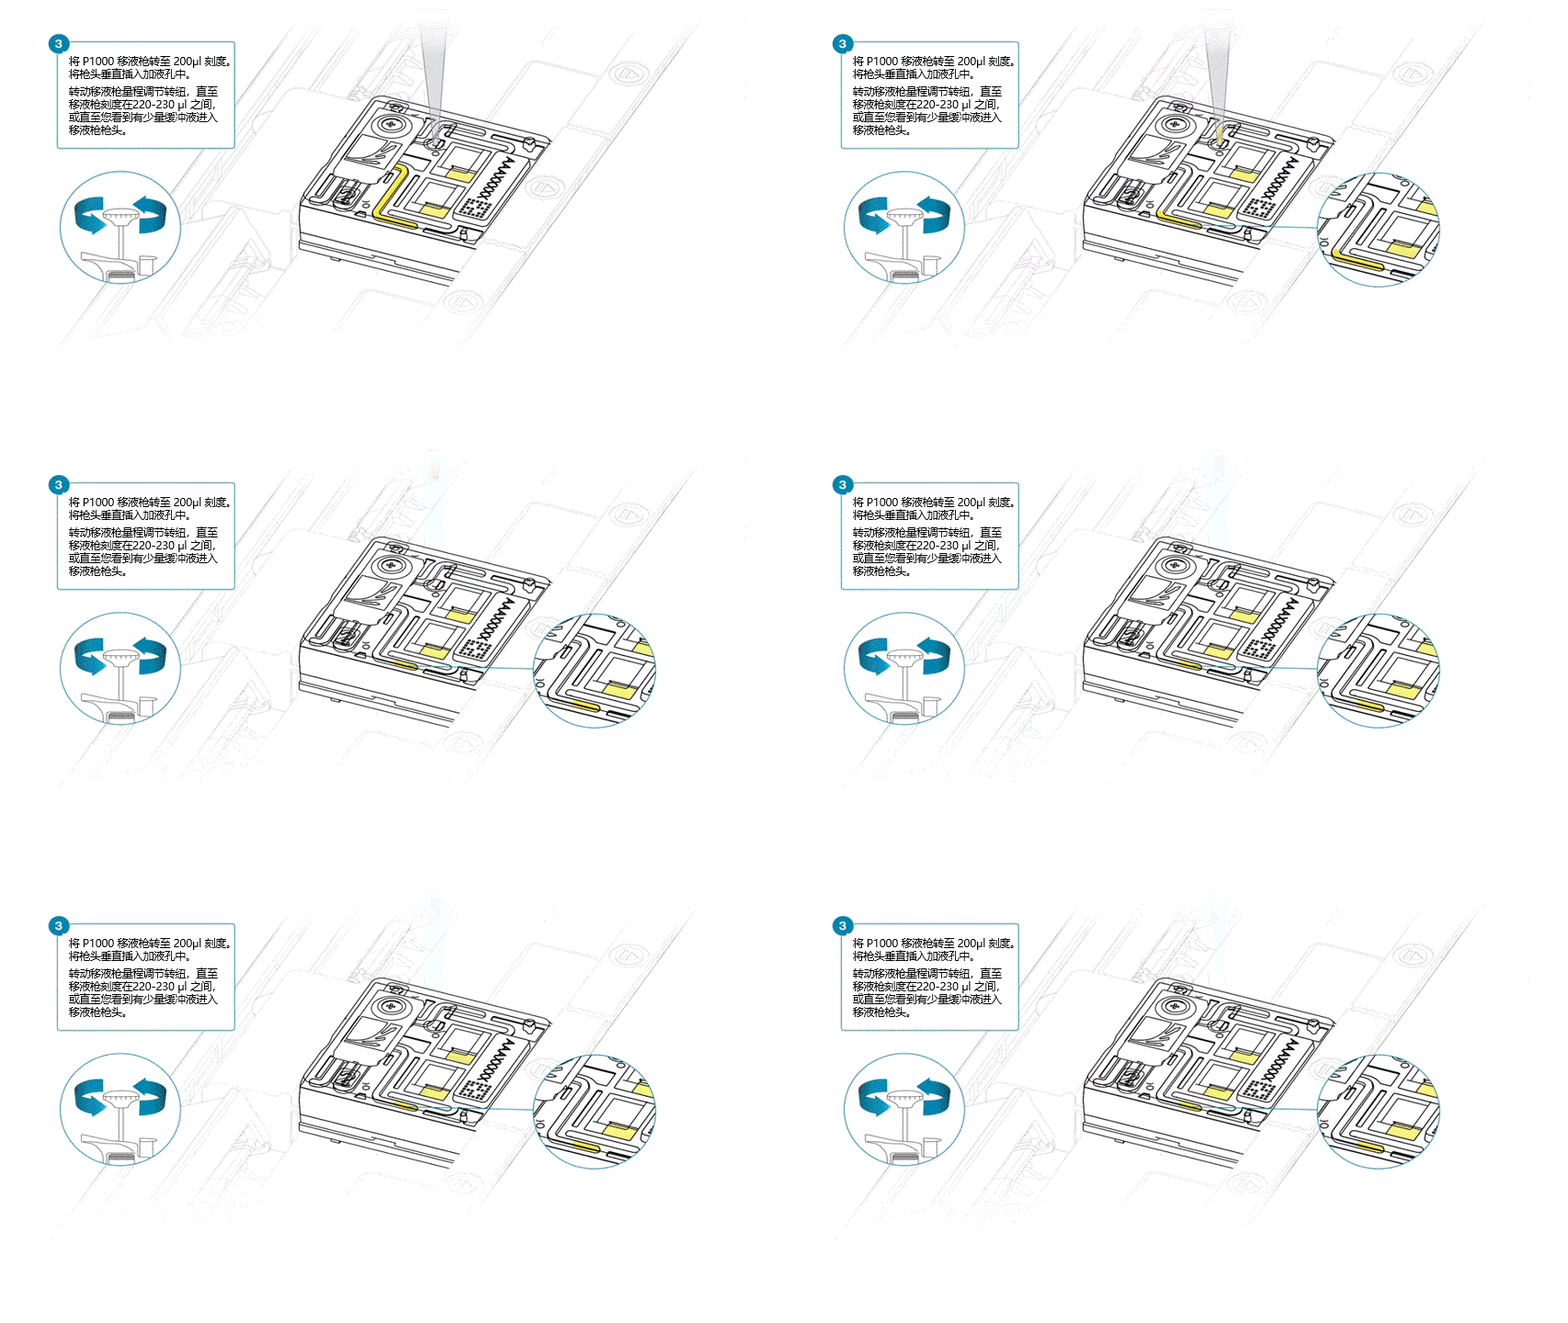
小心地从测序芯片中反旋吸出缓冲液。请勿吸出超过 20-30 µl的缓冲液,并确保芯片上的纳米孔阵列一直有缓冲液覆盖。将气泡引入阵列会对纳米孔造成不可逆转地损害。
在加液孔打开的状态下,按下述步骤吸取少量液体,同时避免引入气泡:
1.将 P1000 移液枪转至 200µl 刻度。
2.将枪头垂直插入加液孔中。
3.反向转动移液枪量程调节转纽,直至移液枪刻度在 220-230 µl之间,或直至您看到有少量缓冲液进入移液枪枪头。
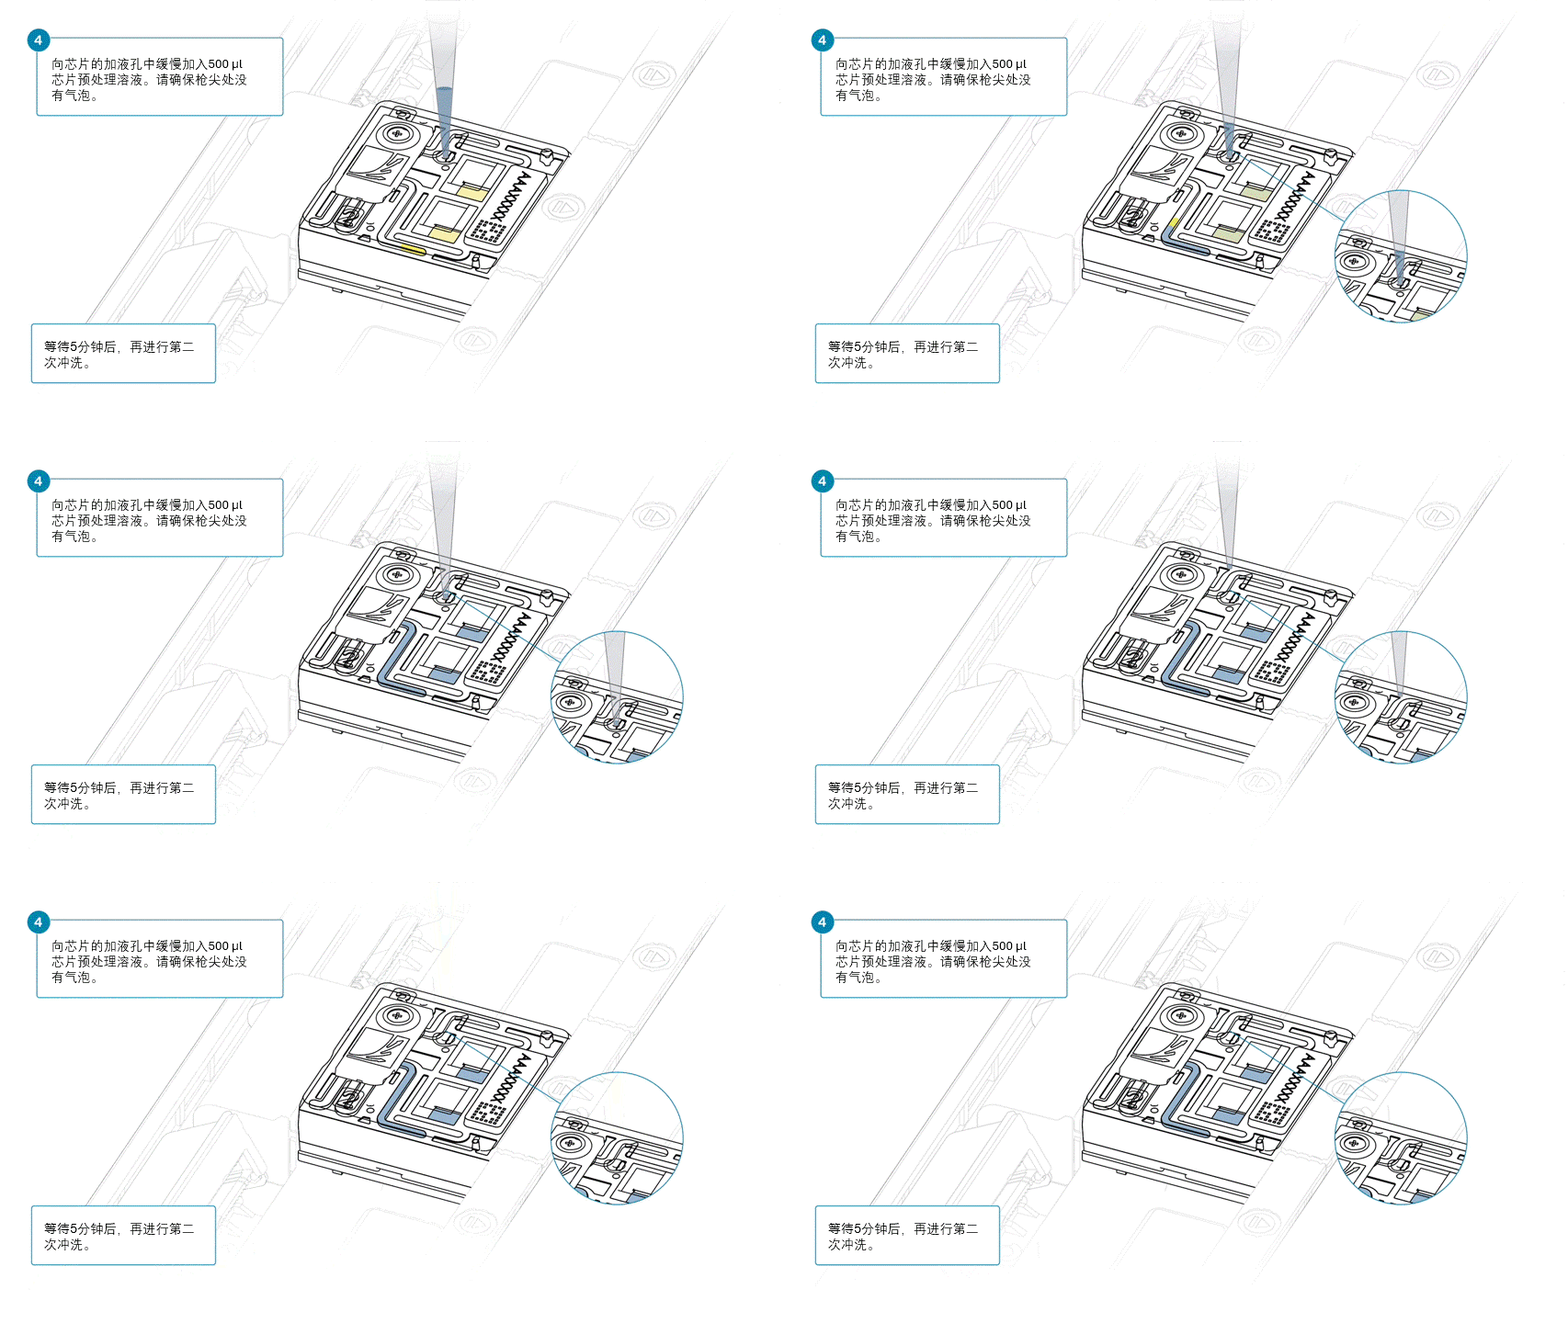
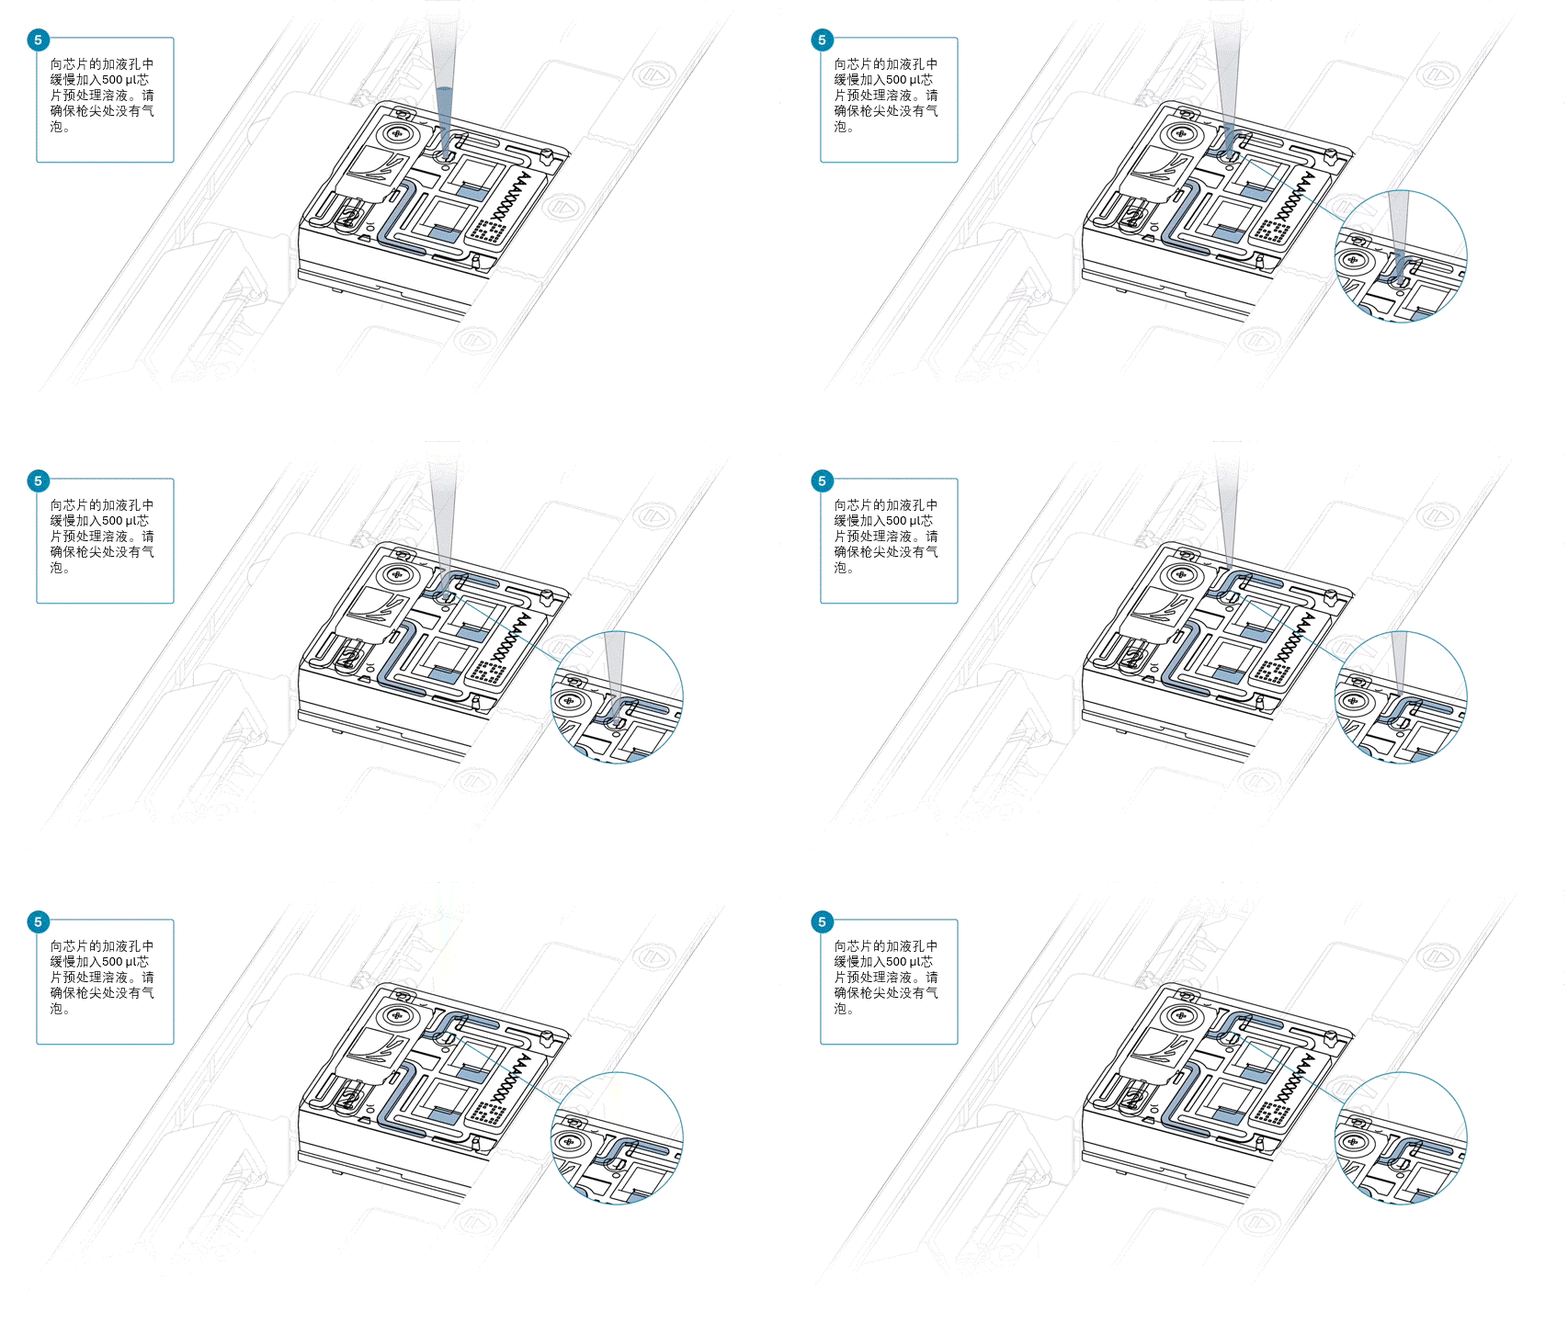
向芯片的加液孔中加入 500 µl 芯片预处理液。加入过程中,请避免引入气泡。等待5分钟。与此同时,您可按以下步骤准备上样文库。
将含有文库颗粒的 LIB 管用移液枪充分吹打混匀。
LIB管内的文库颗粒分散于悬浮液中。由于颗粒沉降速度非常快,因此请在混匀颗粒后立即使用。
在一支新的1.5ml Eppendorf DNA LoBind离心管内,将所有试剂按以下顺序混合:
| 试剂 | 每张测序芯片的上样体积 |
|---|---|
| 测序缓冲液(SB) | 100 µl |
| 文库颗粒 (LIB),使用前充分混匀 | 68 µl |
| DNA 文库 | 32 µl |
| 总体积 | 200 µl |
请注意: 配制好的文库即可用于测序芯片上样。在上样前,请将文库置于冰上或4℃条件下保存。
缓慢向芯片的加液口中加入 500 µl 预处理液,完成芯片的预处理。
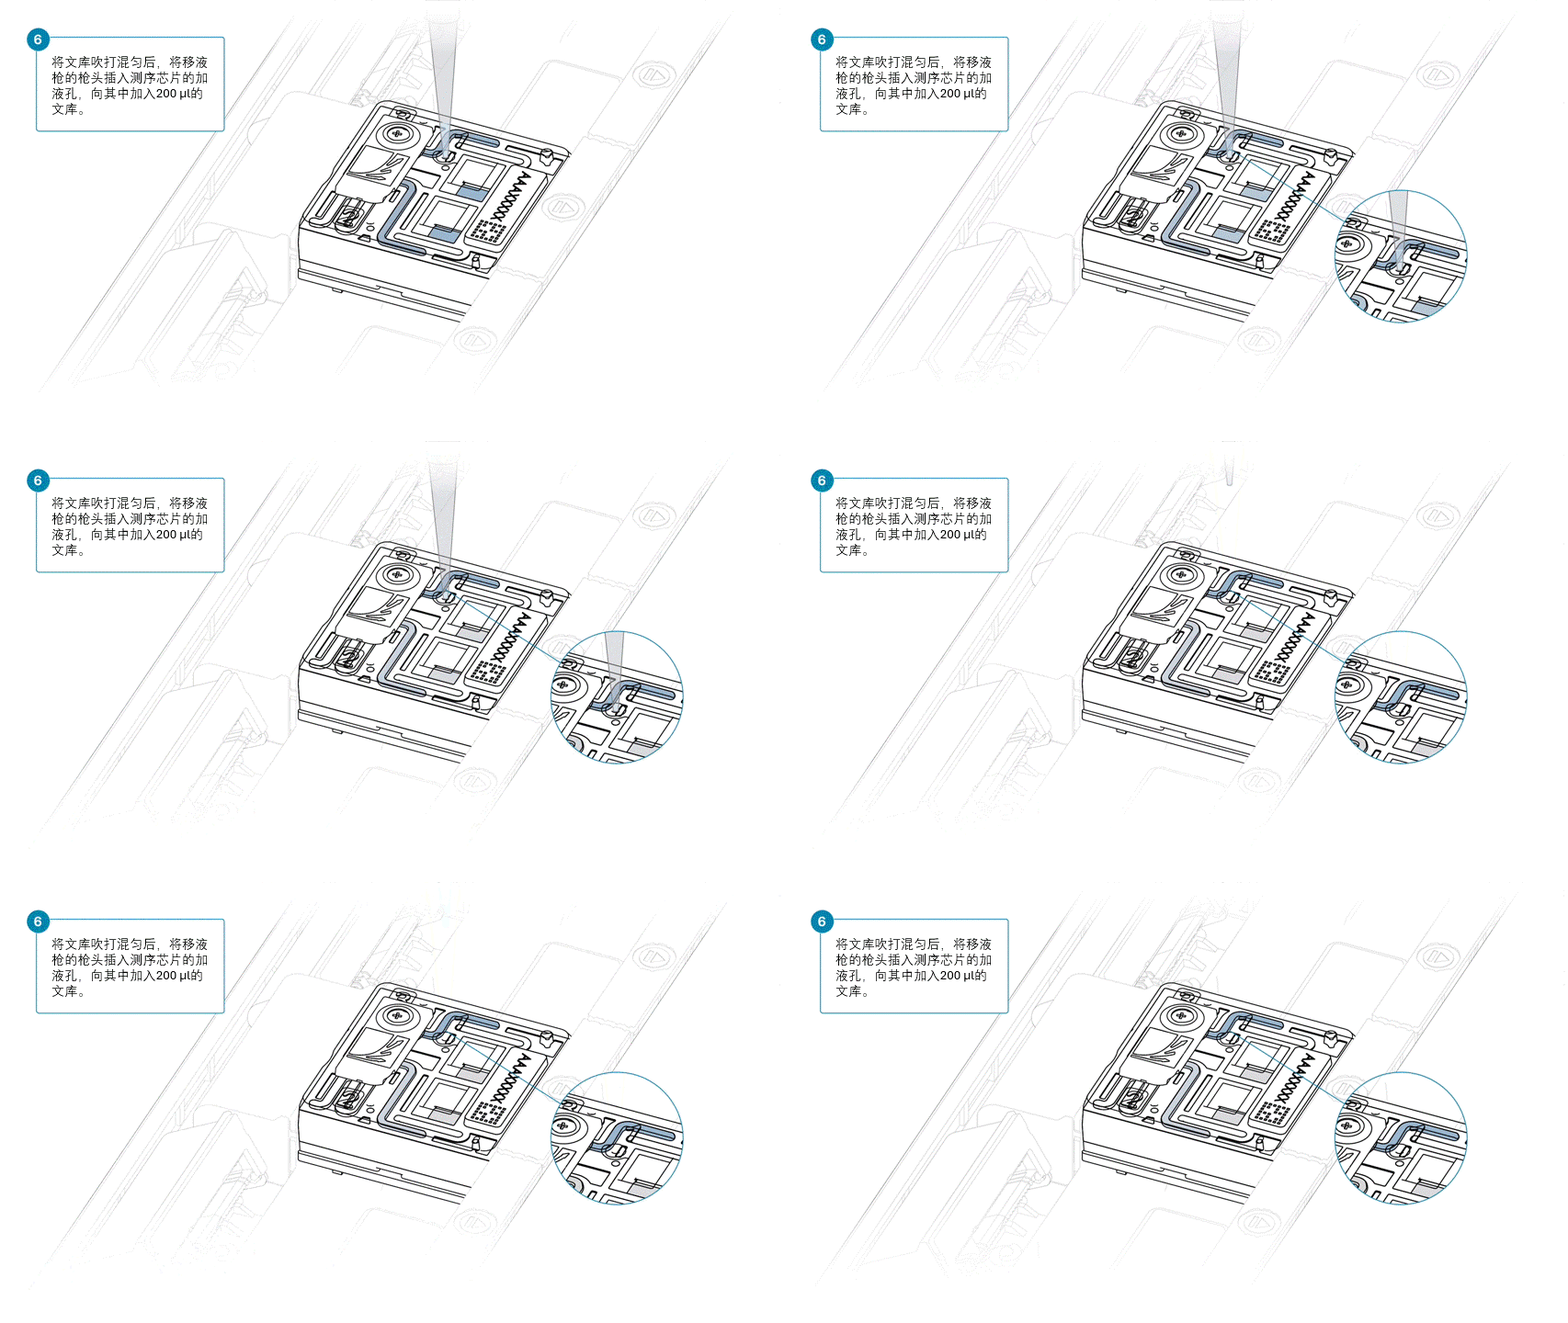
临上样前,用移液枪轻轻吹打混匀制备好的文库。
使用 P1000 移液枪向加液孔中加入 200 µl 文库。
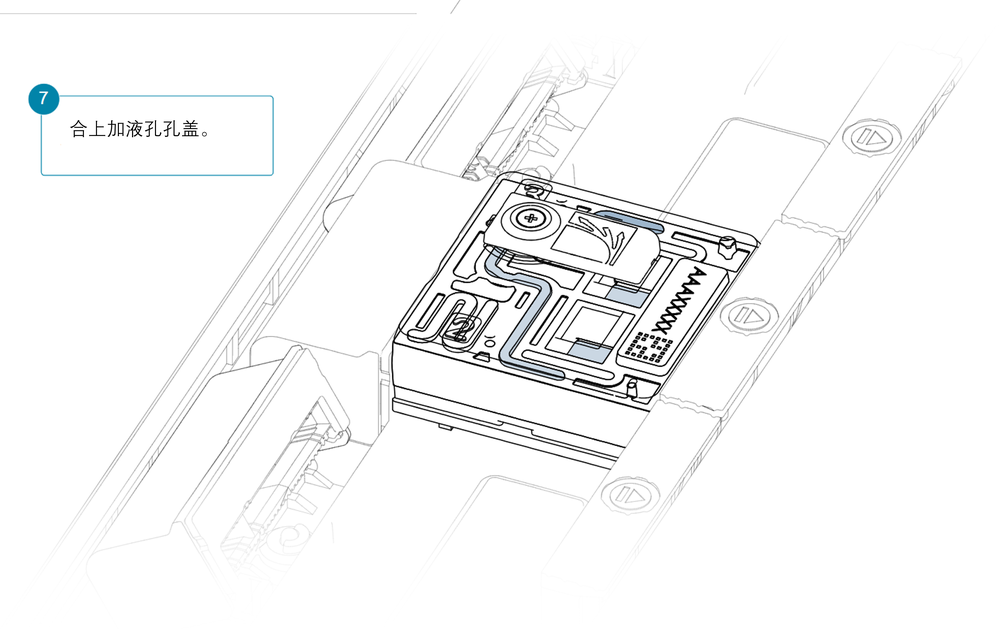
合上加液孔孔盖。
为获得最佳测序产出,在文库样本上样后,请立即在测序芯片上安装遮光片。
我们建议在文库加样至测序芯片后(包括芯片清洗并重新加样时),将遮光片保留在测序芯片上。一旦文库从测序芯片中吸出,即可取下遮光片。
如遮光片不在测序芯片上,请您按照以下步骤安装:
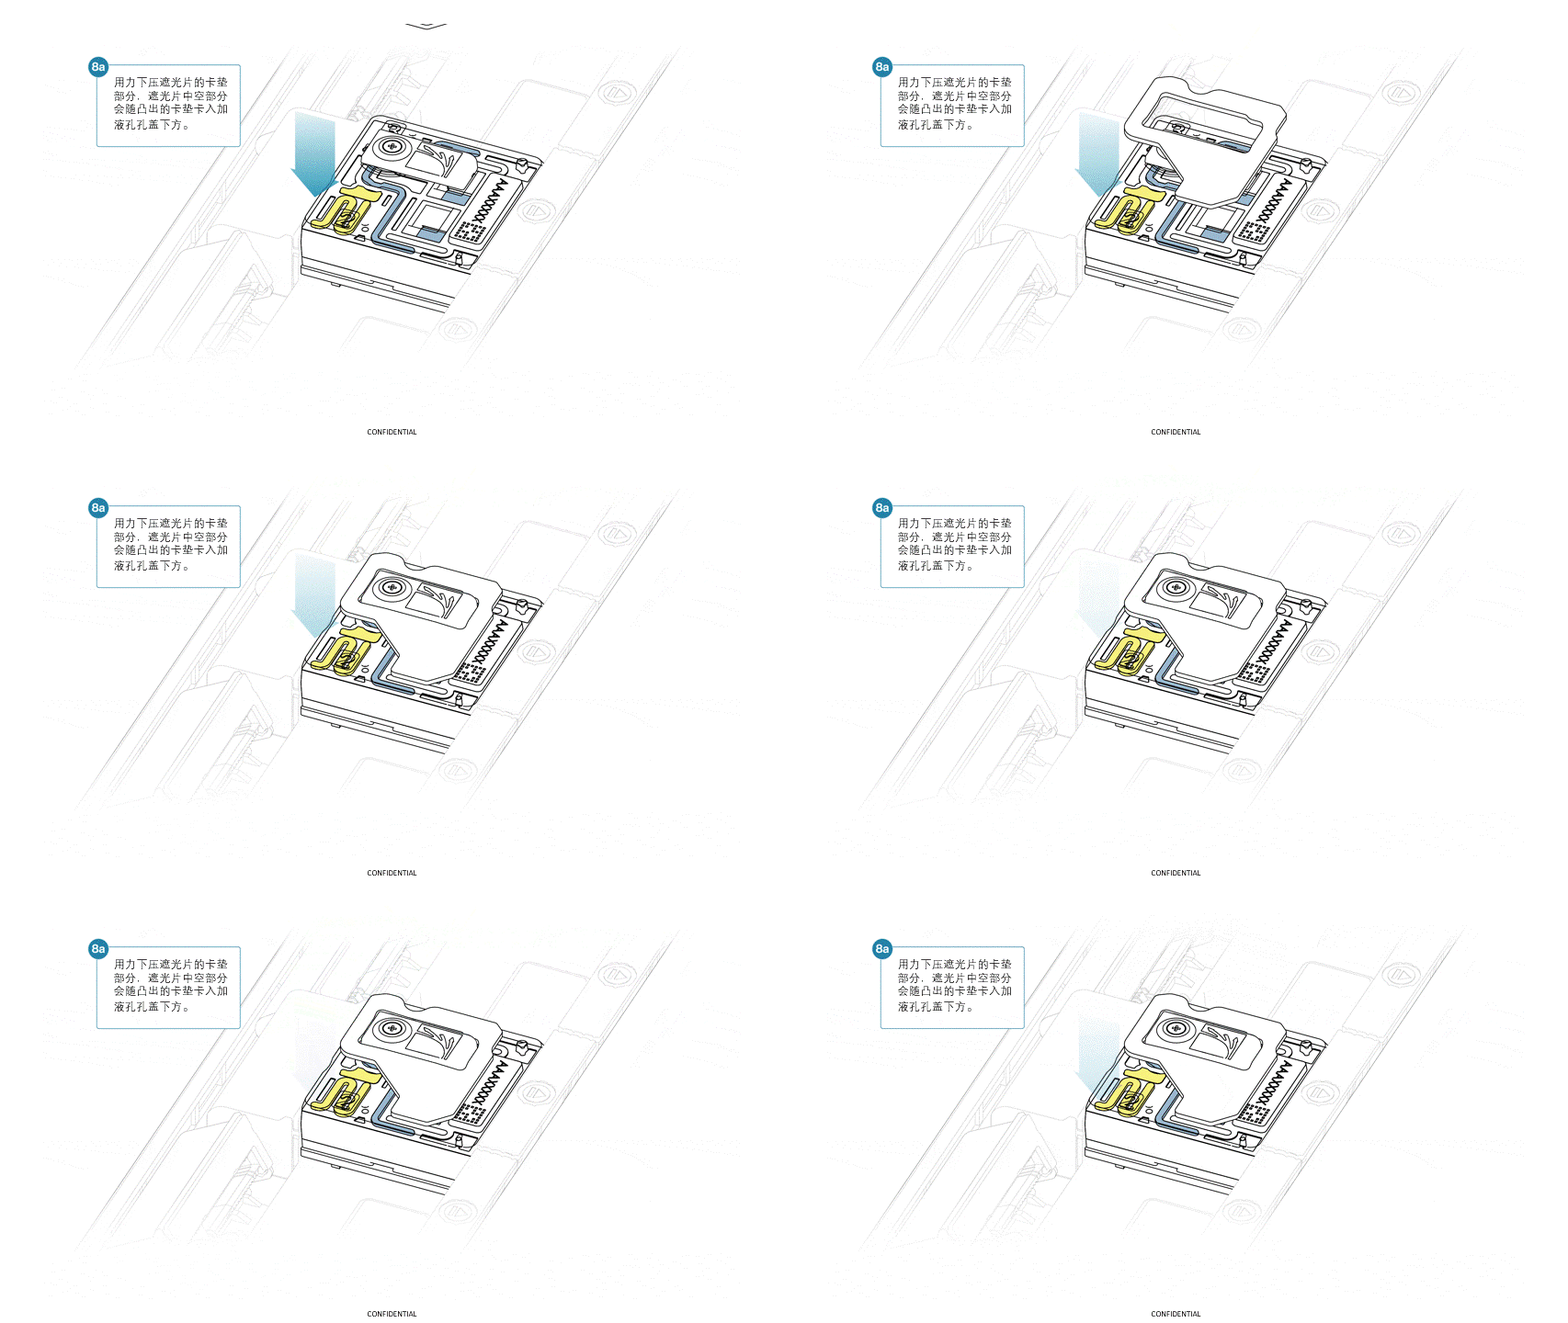
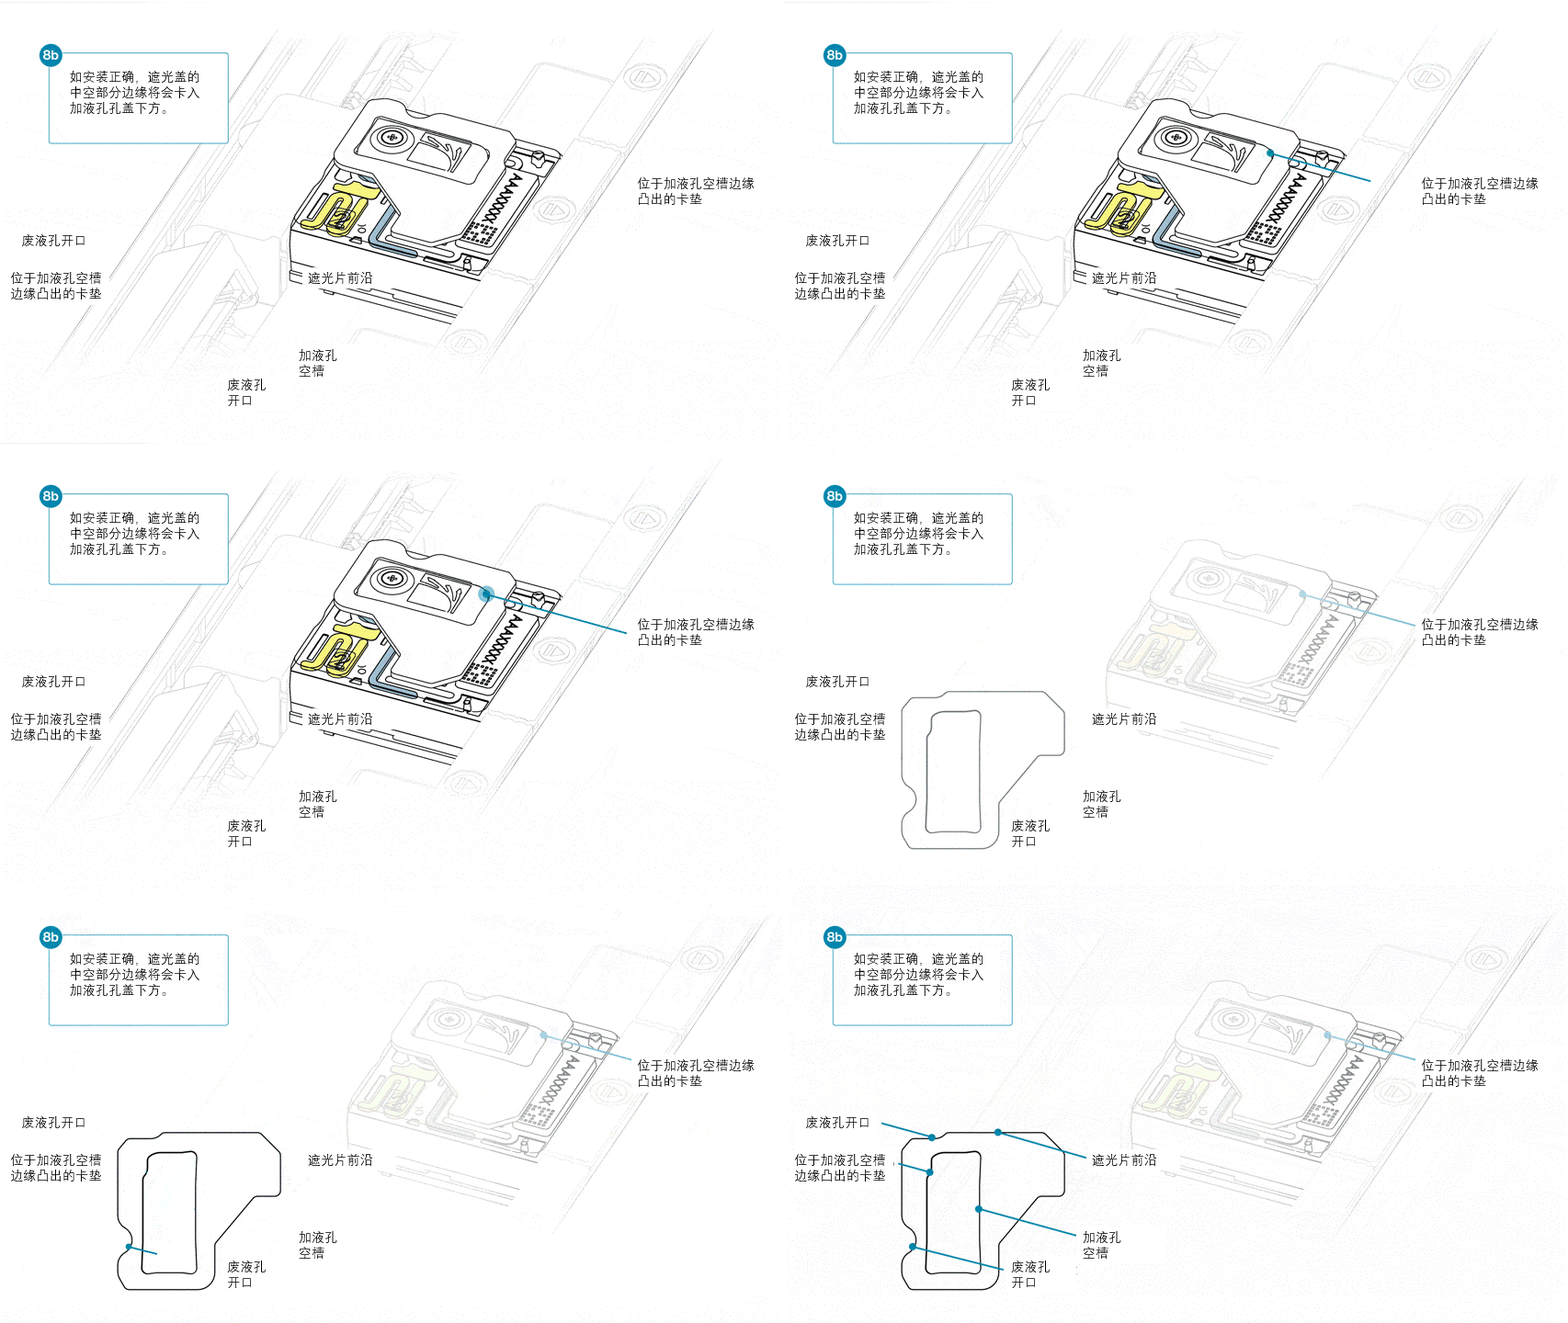
1.将遮光片的中空部分(空槽)与测序芯片的加液孔孔盖对齐。确保遮光片的前沿位于测序芯片ID的上方。
2.用力下压遮光片的卡垫部分,遮光片空槽边缘会随卡垫卡入加液孔孔盖下方。
准备就绪后,合上 PromethION 设备上盖。
请在为 PromethION 芯片上样后,等待 10 分钟再启动实验,以提高芯片产出。
有关如何设置测序实验的说明,请参阅本指南中“数据采集与碱基识别”一节。
注意: 本实验指南建议在测序运行约 24 小时后,对测序芯片进行清洗并重新上样,以保持较高的数据采集效率。
请按照本指南中 “PromethION 从测序芯片的清洗与重新上样” 一节的说明进行操作。
14. PromethION 测序芯片的清洗与重新上样
材料
- 之前步骤获得的已连接接头的 DNA 文库
- 测序芯片清洗剂盒(EXP-WSH004)
- 测序辅助扩展包 V14(EXP-AUX003)
耗材
- 1.5 ml Eppendorf DNA LoBind 离心管
仪器
- 迷你离心机
- 涡旋混匀仪
- 计时器
- 盛有冰的冰桶
- 移液枪和枪头
我们建议在测序约 24 小时后对测序芯片进行清洗并重新上样。
本方法建议在测序约 24 小时后对芯片进行首次清洗,以恢复纳米孔活性并维持高效的数据采集。 再经过约 24 小时测序后,应进行第二次清洗并重新上样。 接头连接步骤中已预先制备足够的文库,以满足三次芯片上样的需求。
- 此清洗步骤旨在去除测序芯片内现存的大部分文库并疏通纳米孔,为芯片的下一次上样做好准备。
- 请在清洗及上样过程中 暂停 MinKNOW 的数据采集。
- 测序芯片经清洗后,即可用于下一文库的上样。
下图展示了测序芯片在清洗前后纳米孔状态的示例数据。红色星号标示了执行测序芯片清洗与重新上样的时间点。
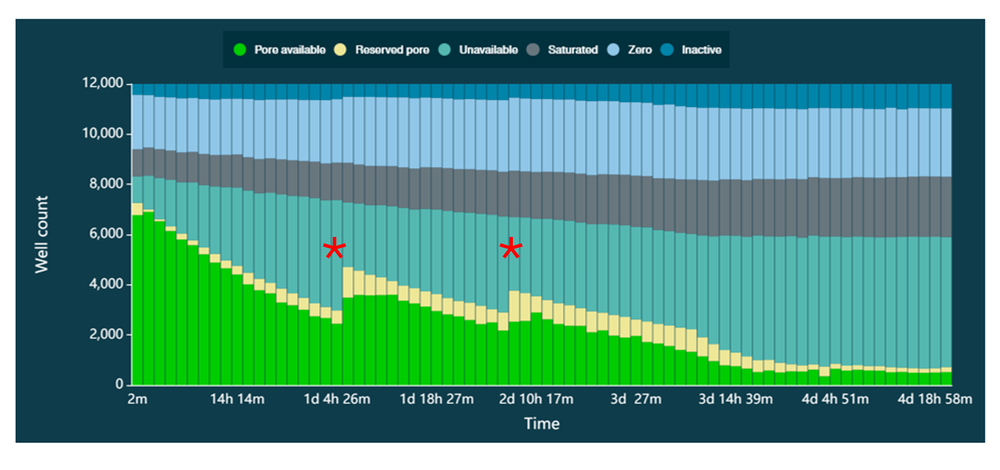
图 1. 96 小时测序过程中的通道状态变化。通过对测序芯片进行清洗,可恢复被堵塞的纳米孔,从而实现连续高效的数据采集。红色星号表示执行冲洗的时间点。
PromethION 测序芯片的清洗与重新上样视频
以下视频演示了如何在测序运行结束后清洗测序芯片并上样新的文库。
如您计划在清洗后立即进行下一次文库上样,建议在清洗过程中保留测序芯片的遮光片。
若芯片在清洗后需暂时保存,则可将遮光片移除。
将清洗混合液(WMX)置于冰上。请勿涡旋振荡该离心管。
于室温下解冻一管清洗稀释液(DIL)。
涡旋振荡混匀清洗稀释液(DIL),瞬时离心,置于冰上。
在一支干净的1.5ml Eppendorf DNA LoBind离心管内,将所有试剂按以下顺序混合:
| 试剂 | 体积(每张芯片) |
|---|---|
| 清洗混合液(WMX) | 2 μl |
| 清洗稀释液(DIL) | 398 μl |
| 总体积l | 400 μl |
吹打混匀,然后置于冰上。请勿涡旋振荡该离心管。
在 MinKNOW 中暂停测序实验,保持测序芯片于测序仪内。
在吸出废液前,请确保加液孔已关闭,以避免气泡进入传感器阵列,造成大量测序通道损失。
吸出废液的步骤如下:
1.合上加液孔孔盖。
2.将 P1000 移液枪插入废液口,吸出废液。
注意: 由于加液孔已关闭,因此传感器阵列内的液体不会流失。
顺时针转动加液孔孔盖,使加液孔显露出来。
小心地从测序芯片中反旋吸出缓冲液。请勿吸出超过 20-30 µl的缓冲液,并确保芯片上的纳米孔阵列一直有缓冲液覆盖。将气泡引入阵列会对纳米孔造成不可逆转地损害。
将加液孔打开后,检查孔周围是否有小气泡。请按照以下方法,从孔中排出少量液体以清除气泡:
1.将P1000移液枪转至200µl刻度。
2.将枪头垂直插入加液孔中。
3.反向转动移液枪量程调节转纽,直至移液枪刻度在 220-230 µl 之间,或直至您看到有少量缓冲液进入移液枪枪头。
取 200 µl 测序芯片清洗混合液,并按以下步骤缓缓加入测序芯片的加液孔:
1.使用 P1000 移液枪吸取 200 µl 测序芯片清洗混合液。
2.将移液枪枪头插入加液孔,请确保枪头没有气泡。
3.缓慢转动移液枪的量程调节齿轮(若移液枪具备该功能),将预处理液加入测序芯片;或 非常缓慢地 按压移液枪按钮,直至枪尖内剩余少量缓冲液。
4.设置计时器,孵育 5 分钟。
孵育 5 分钟后,按以下步骤小心地将余下的 200 µl 测序芯片清洗混合液加入加液孔:
1.使用 P1000 移液枪吸取 200 µl 测序芯片清洗混合液。
2.将移液枪枪头插入加液孔,请确保枪头没有气泡。
3.缓慢转动移液枪的量程调节齿轮(若移液枪具备该功能),将预处理液加入测序芯片;或 非常缓慢地 按压移液枪按钮,直至枪尖内剩余少量缓冲液。
合上加液孔并等待 60 分钟。
在吸出废液前,请确保加液孔已关闭,以避免气泡进入传感器阵列,造成大量测序通道损失。
吸出废液的步骤如下:
1.确保加液孔孔盖已关闭。
2.将 P1000 移液枪插入废液口,吸出废液。
注意: 由于加液孔已关闭,因此传感器阵列内的液体不会流失。
本节中使用的缓冲液不支持芯片质检。系统将在下一次孔扫描后报告可用活性纳米孔的数量。
于室温下解冻测序缓冲液(SB)、文库颗粒(LIB)、测序芯片系绳(FCT)和测序芯片冲洗液(FCF)。完全解冻后,涡旋振荡混匀。然后瞬时离心,置于冰上。
返回“测序芯片预处理与上样”一节,重复相关操作,冲洗掉清洗试剂,然后将同一批混合样本再次上样至测序芯片。
执行两次“PromethION 测序芯片清洗与重新上样” 操作,共完成三次文库上样(即初始上样 + 两次清洗与重新上样),以最大化数据产出。
- 第一次清洗与重新上样应在测序约 24 小时时进行。
- 第二次清洗与重新上样应在测序约 48 小时时进行。
15. 数据采集和碱基识别
在完成测序芯片的加样后,您即可在 MinKNOW 中启动测序实验。
MinKNOW 提供两种启动测序实验的方法:
直接启动测序实验(不使用样本列表):输出文件将使用默认的条形码 ID 命名(如 barcode01、barcode02);
通过样本列表启动测序实验:您可以在样本列表的 alias 列中,为每个条形码指定自定义样本别名。输出文件将以该别名命名,从而提高样本的可追溯性。下文将分别介绍这两种启动方式的操作步骤。
在 MinKNOW 中启动测序实验(不使用样本列表)
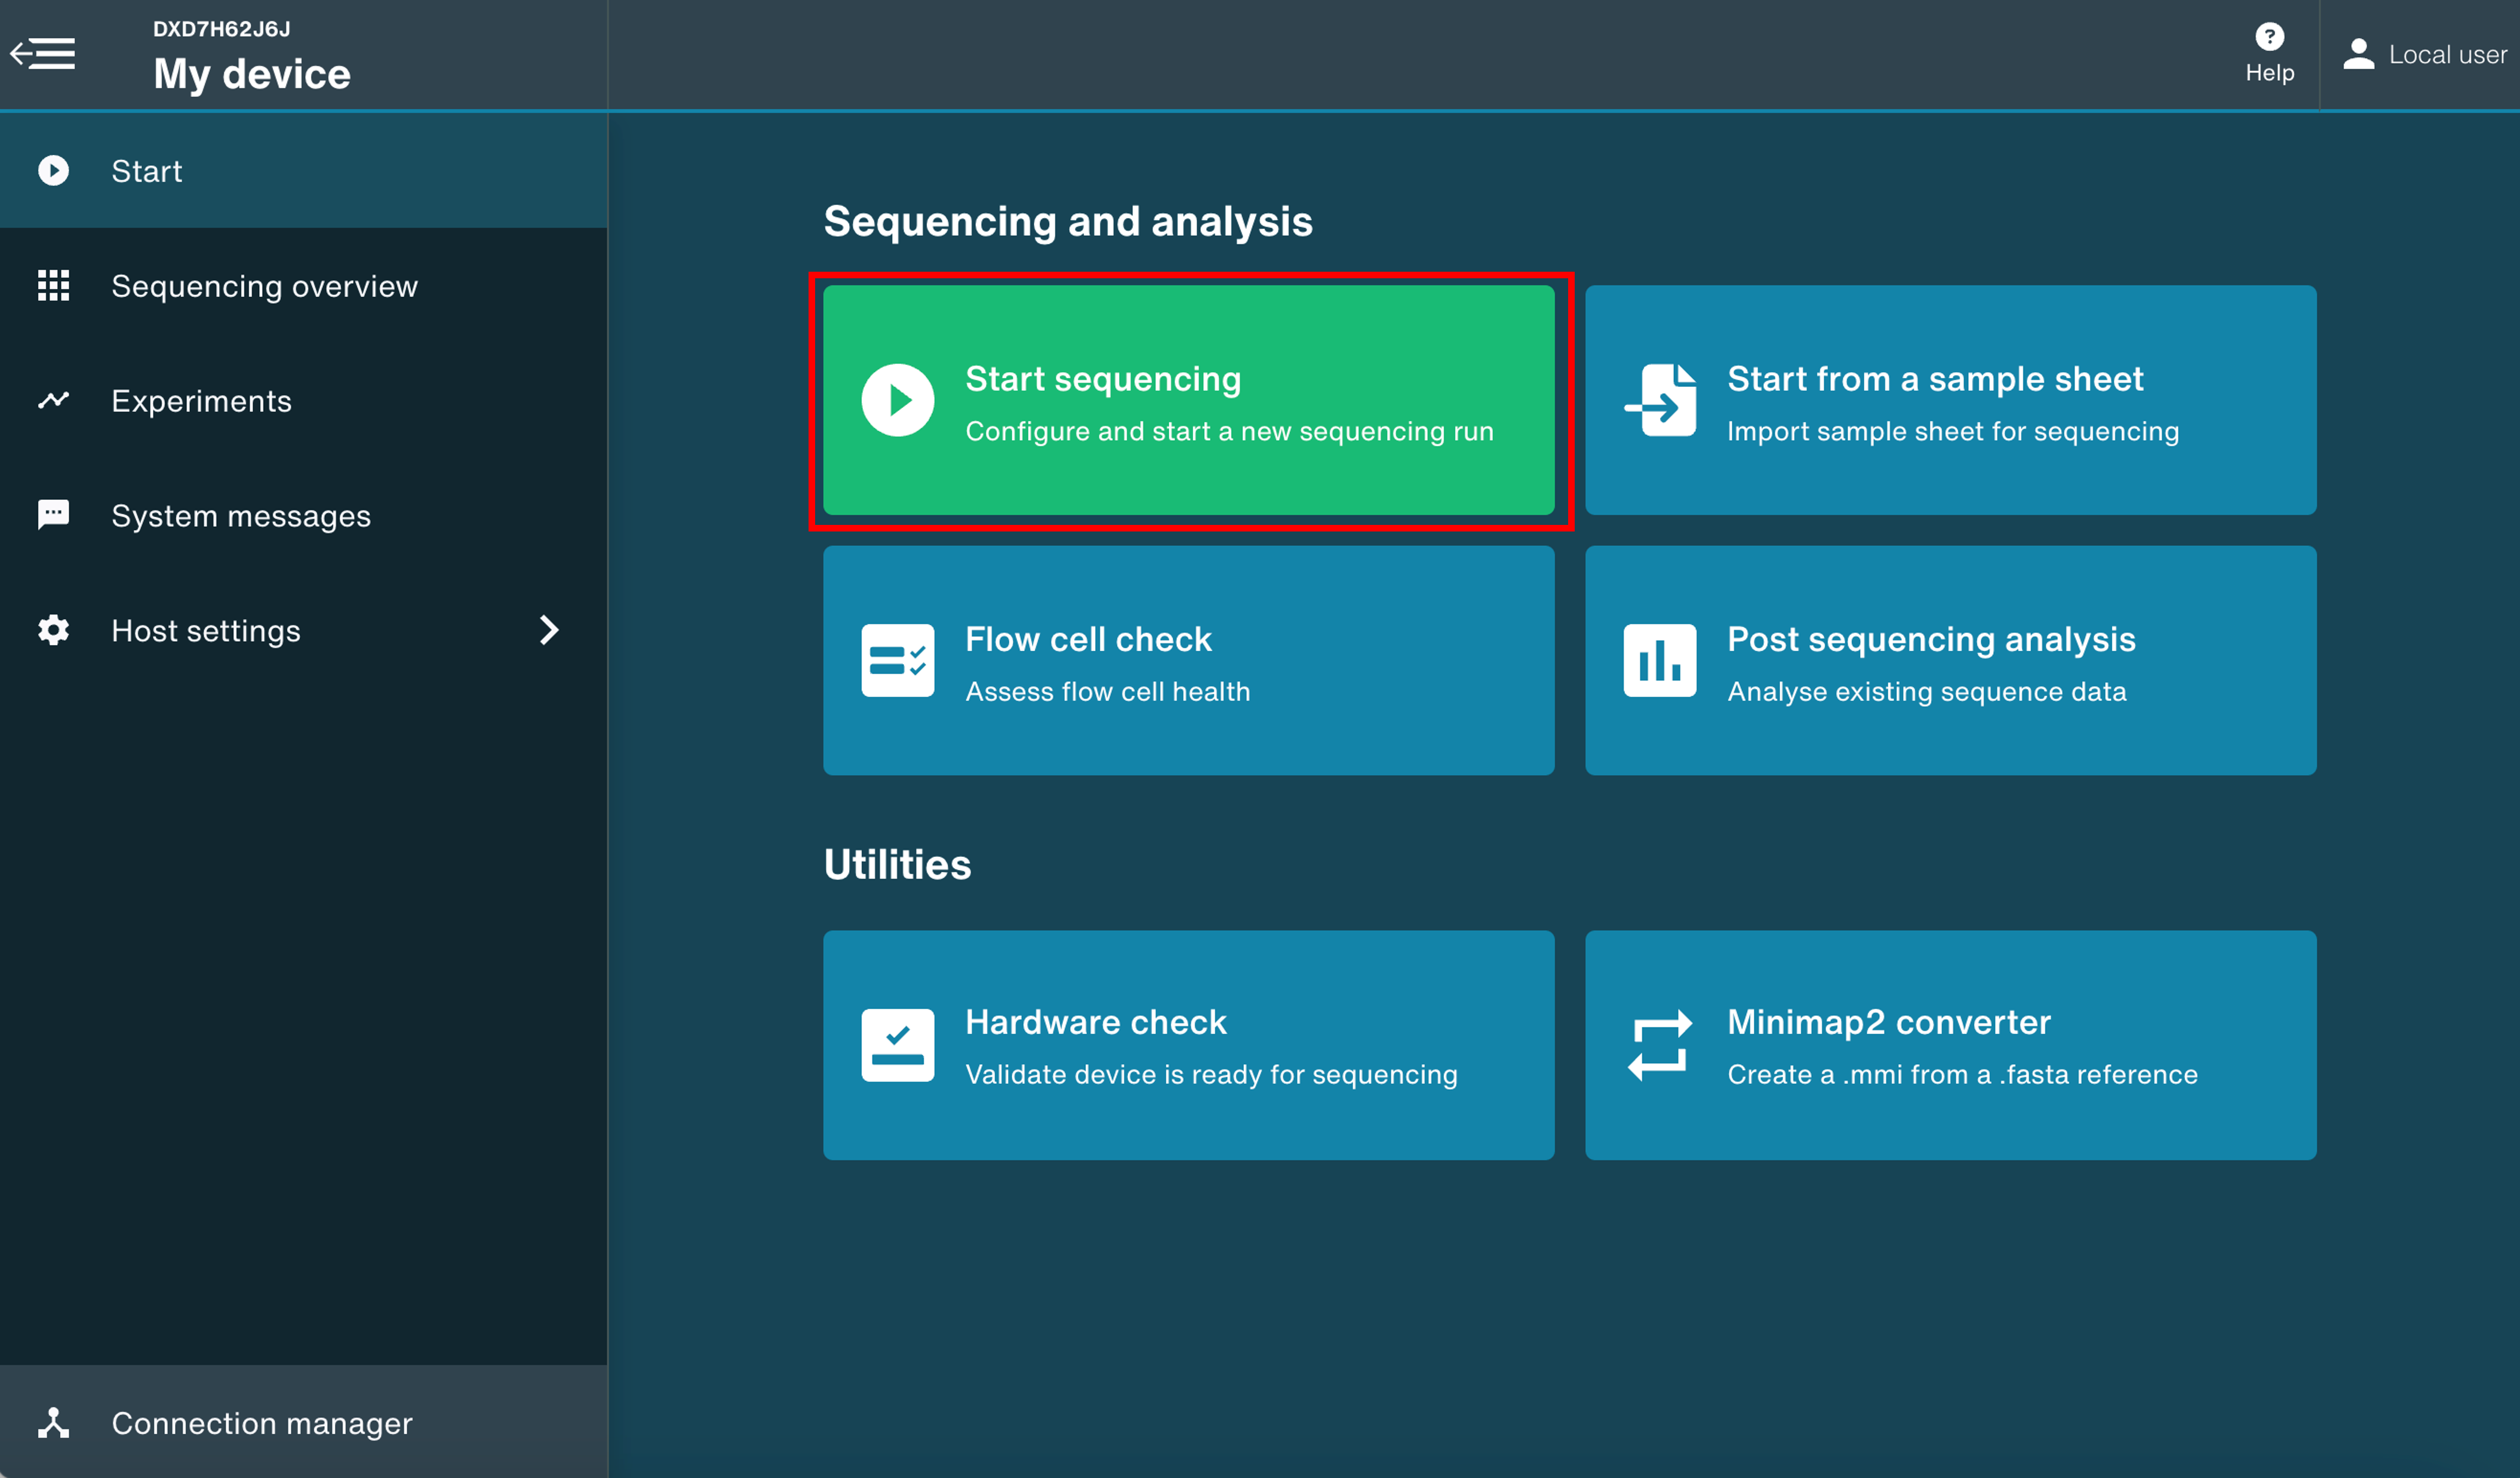
1.在 "开始 "(Start)页面上,选择 开始测序 (Start Sequencing)。
2.输入实验名称( experiment name)、样本编号(sample Id),从下拉菜单中选择测序芯片的类型。 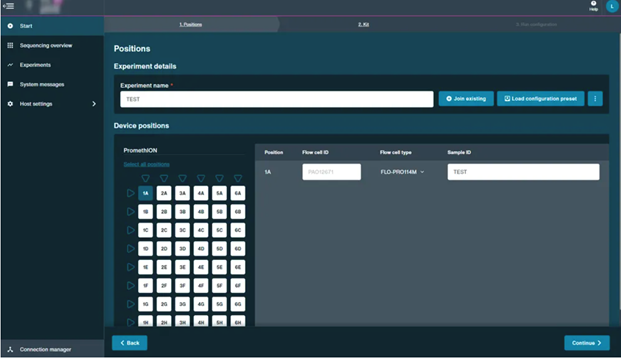
3.选择试剂盒:免扩增条形码试剂盒-24(SQK-NBD114.24) 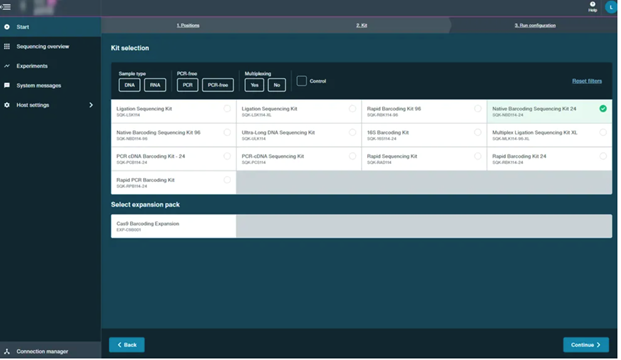
4.启用(ON)碱基识别(Basecalling),并使用高精准(HAC)模型(默认设置)。启用(ON)条码拆分(Barcoding,使用任何条形码试剂盒时默认启用)。启用(ON)适应性采样(Adaptive Sampling)。 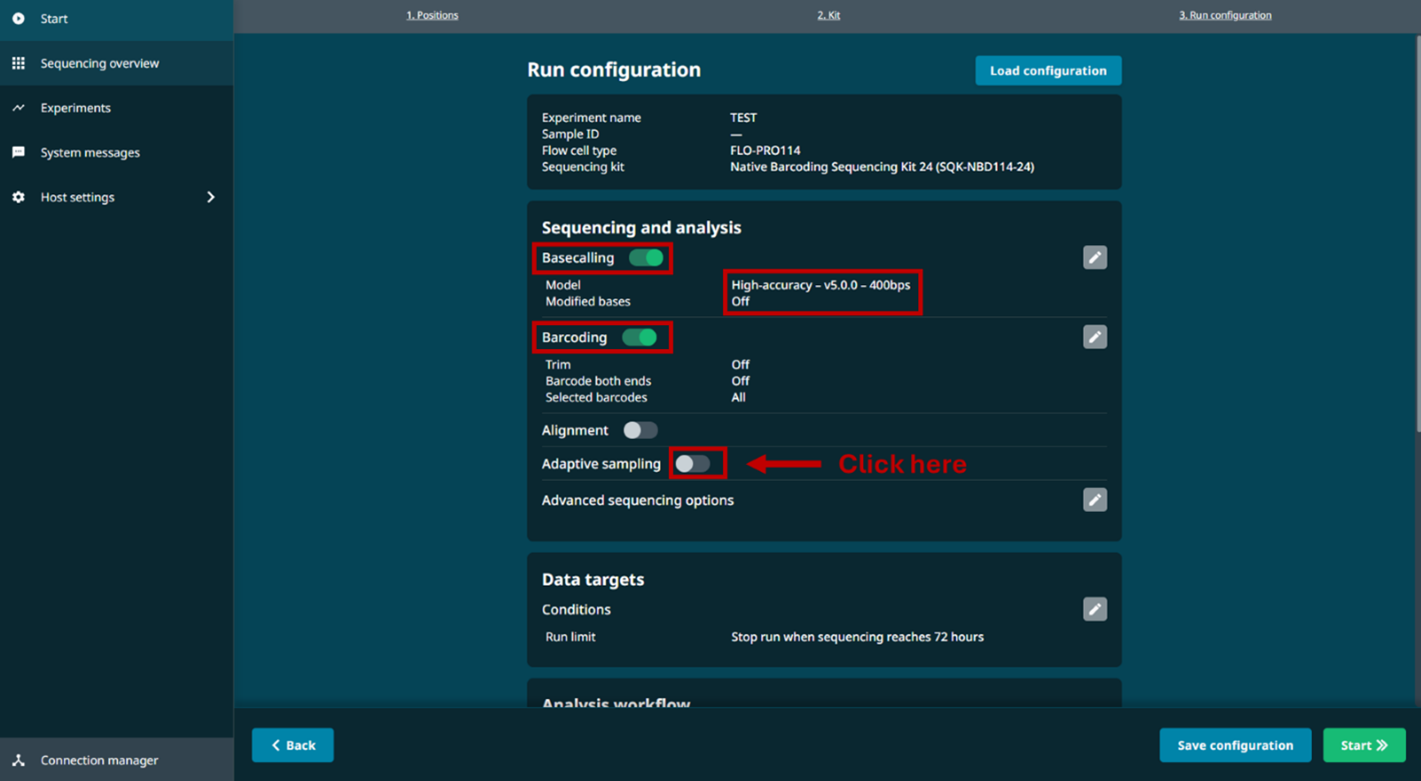
5.选择 富集(Enrich)模式,并启用“仅对目标区域进行碱基识别”(Basecall on-target reads only)选项。然后使用数据包中提供的 PGx BED 文件 和 参考基因组 文件。这些文件专为 PGx 富集分析配置。使用其他 BED 文件或参考文件,可能导致分析结果存在差异。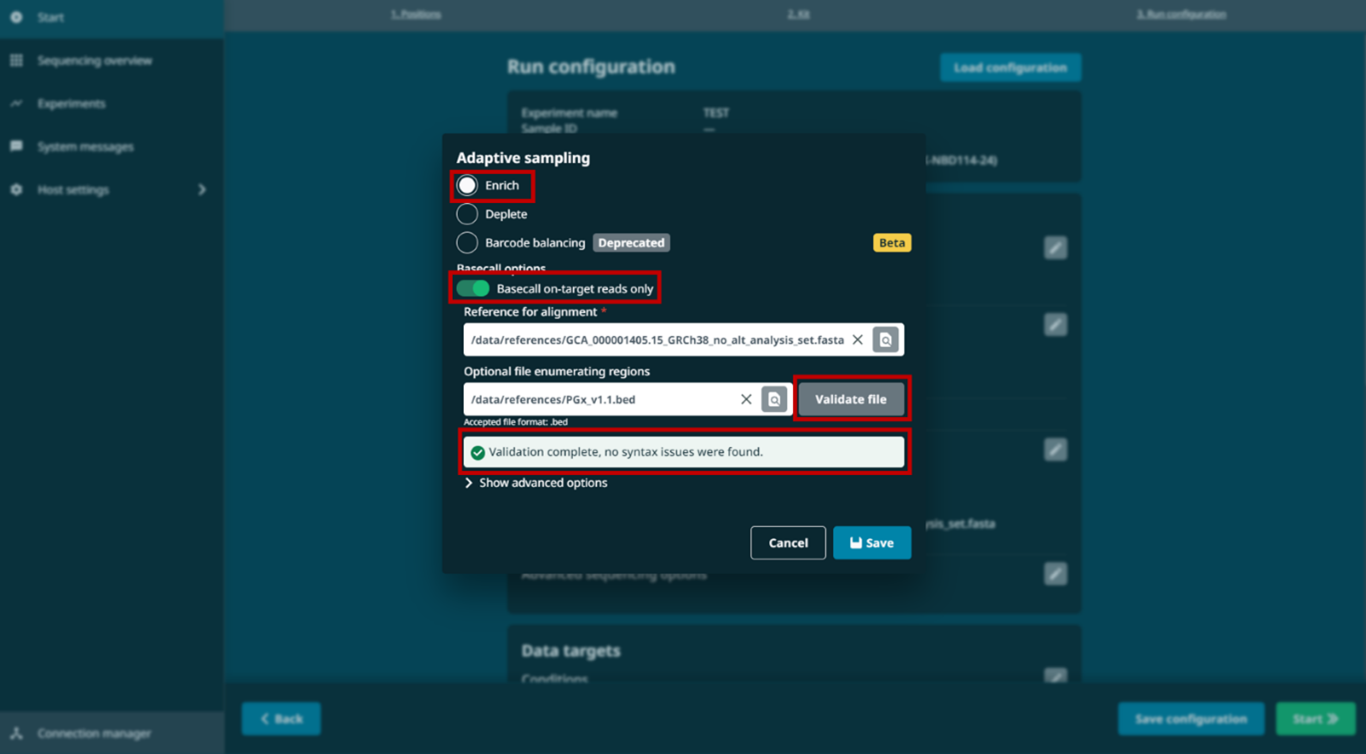
6.将输出格式设置为 BAM,并将输出频率设置为 每 10 分钟 。 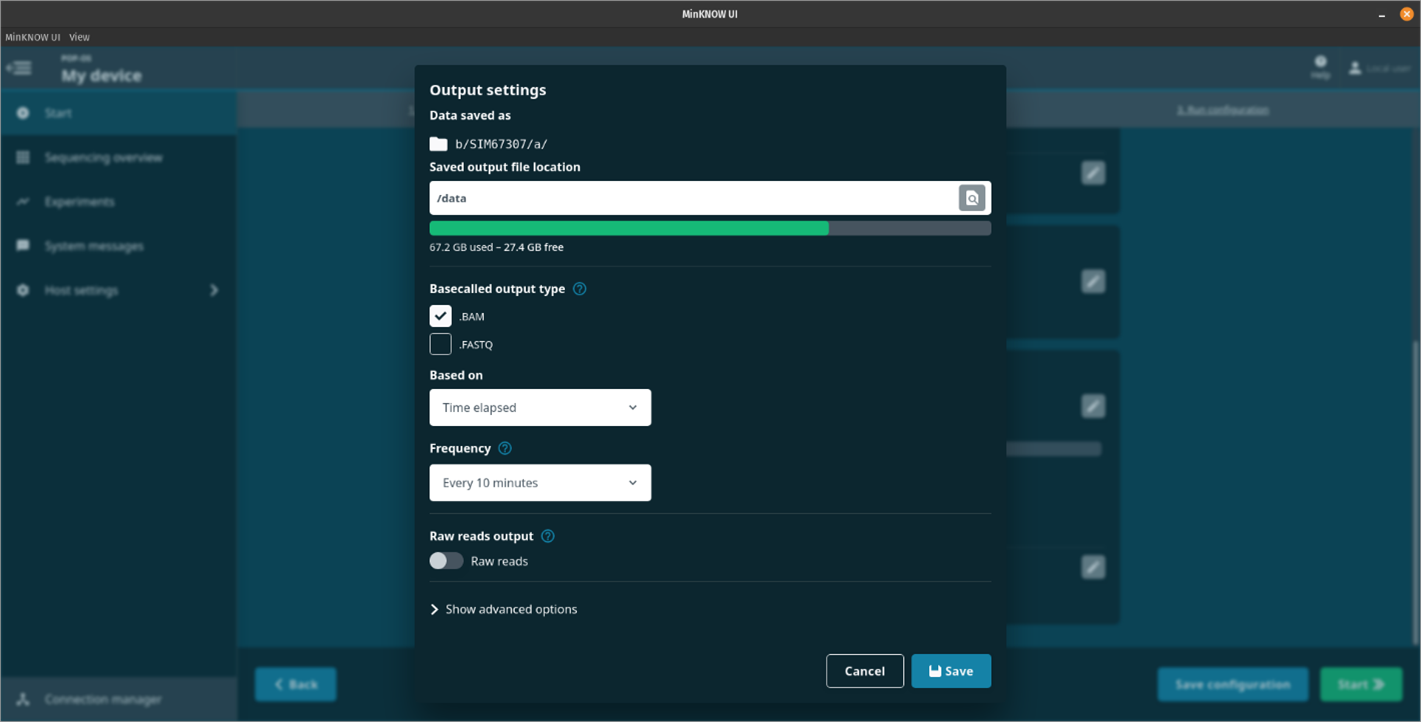
7.保持 比对(Alignment)功能为"关闭"(OFF) 状态。 
8.继续至参数确认页面,然后点击 开始(Start)启动测序实验。 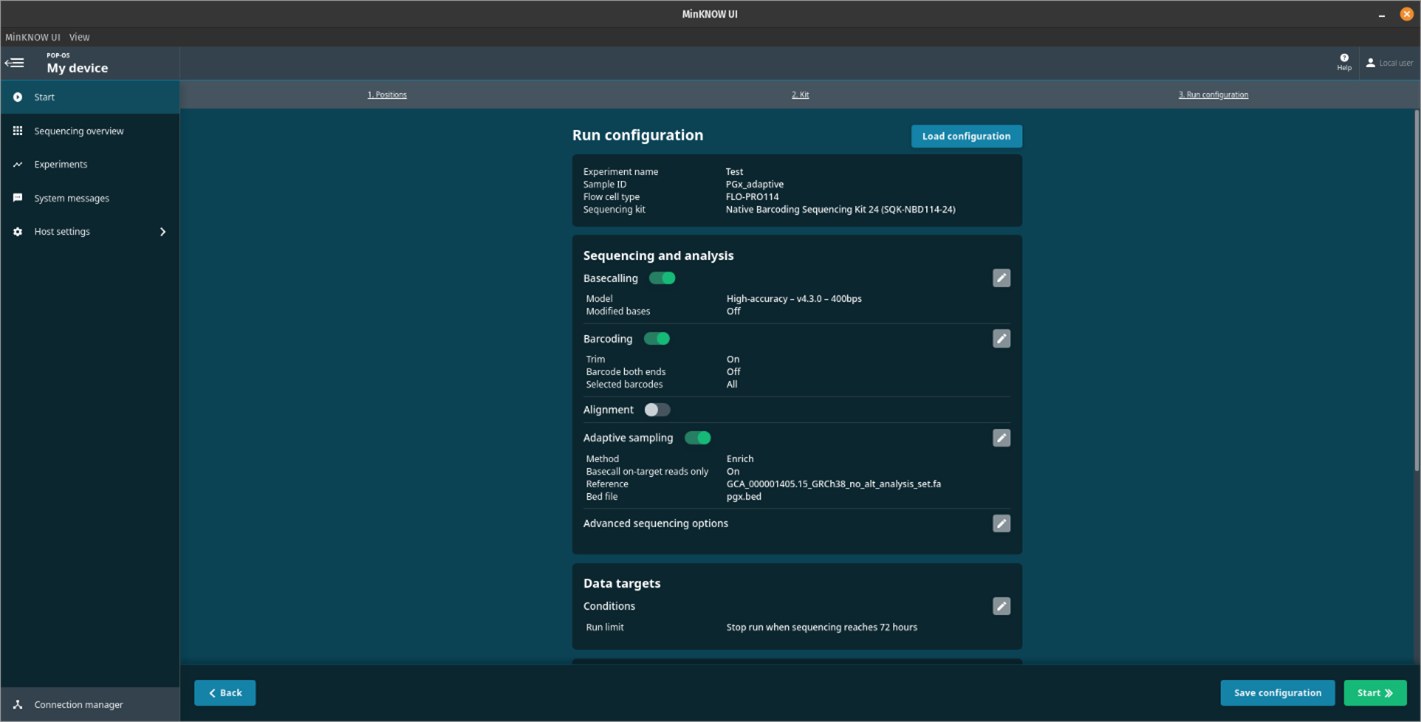
在 MinKNOW 中通过样本列表启动测序实验
1.在”开始“(Start)菜单中选择 通过样本列表启动测序实验 (Start from a sample sheet)。 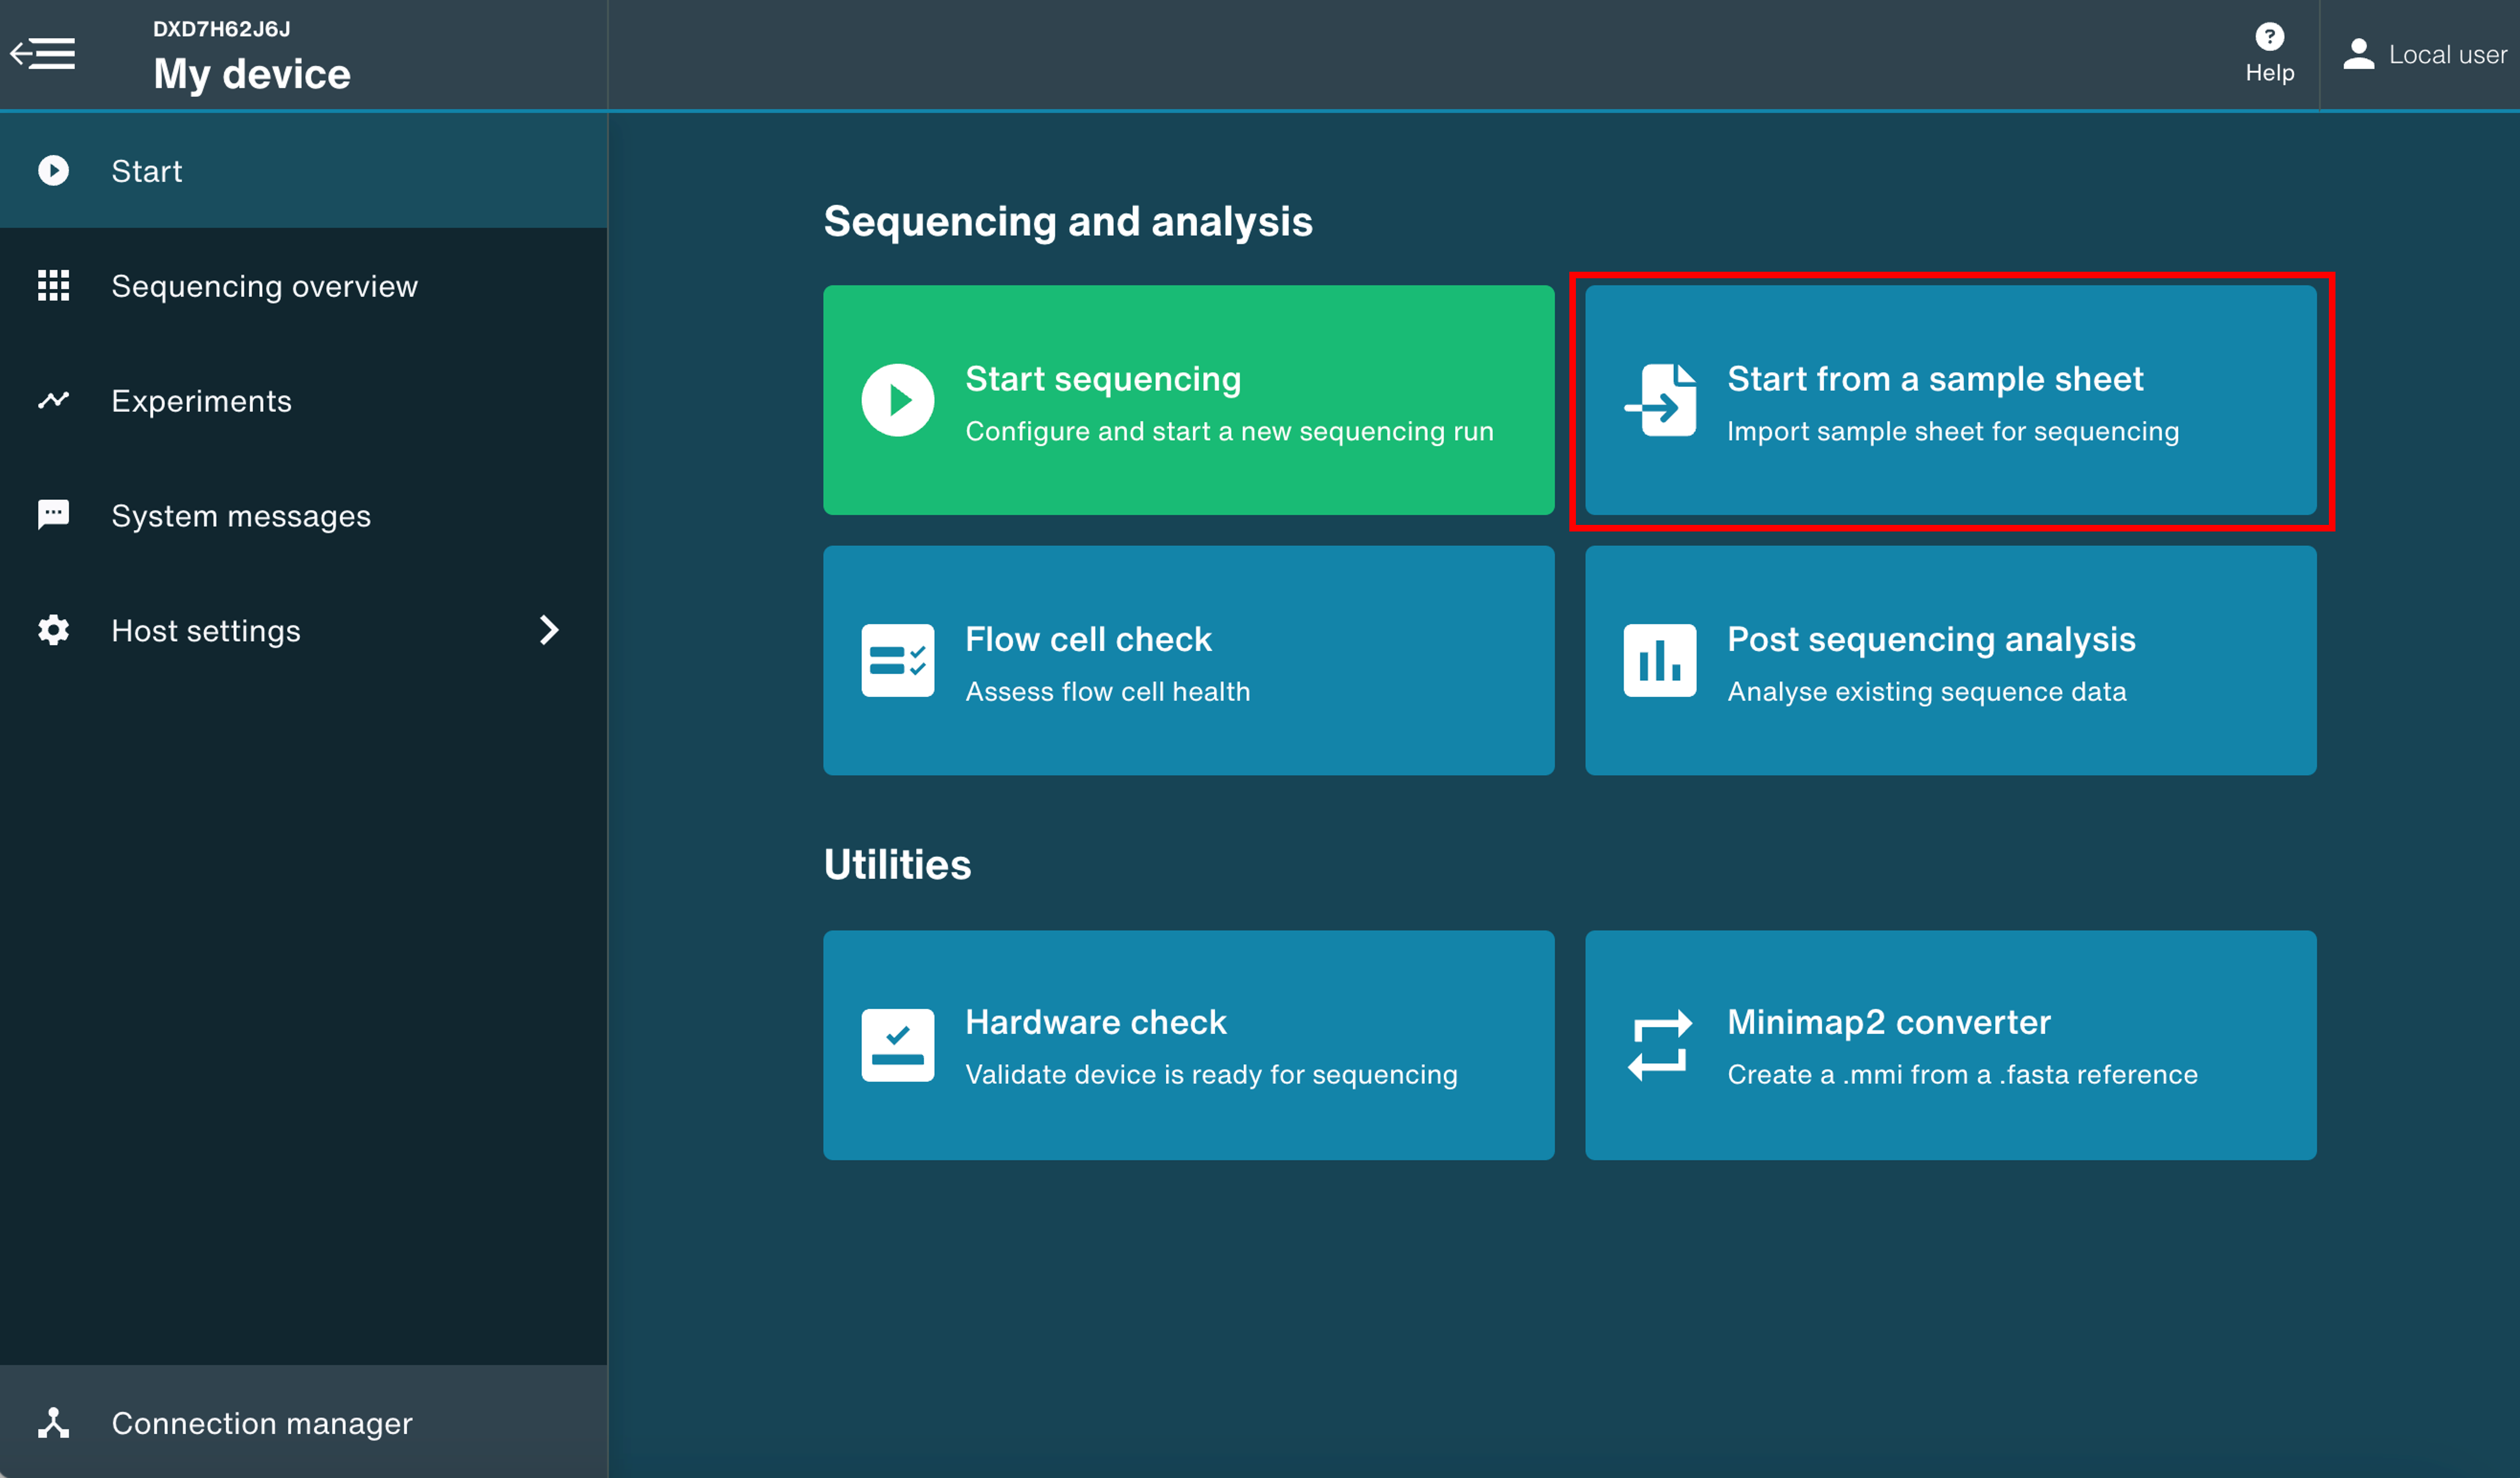
- 当在 MinKNOW 中使用样本列表启动测序实验时,您需要上传一个包含样本信息的 CSV 文件。该文件必须符合下表规定的格式。样本列表中的每一行对应一个带条形码的样本,所有列标题均须使用 小写 字母,且必须与下表保持一致。
上传后,MinKNOW 会自动检查样本列表是否有误。若未检测到任何错误,单击 继续 (Continue),即可进入测序设置。
| 样本列表列名 | 说明 |
|---|---|
| flow_cell_id | 所用测序芯片的 ID(例如 SIM72476),必须对应当前设备上的测序芯片。 |
| flow_cell_product_code | 测序芯片的产品代码(例如 FLO-PRO114M)。 |
| kit | 所用文库制备试剂盒的名称(例如 SQK-NBD114-24)。 |
| sample_id | 样本或样本池的名称或编号(例如 pgx_1)。 |
| experiment_id | 实验名称或编号,用于实验分组或追踪。 |
| barcode | 与样本对应的条形码(例如 barcode01),必须属于所使用的条形码试剂盒。 |
| alias | 用户可自定义样本名称,输出文件将使用该名称代替条形码 ID(例如 test1)。名称长度必须为 1–40 个字符,且只能包含字母、数字、连字符(-)或下划线(_)。“unclassified”、“classified” 和 “mixed” 为保留名称,不可使用。 |
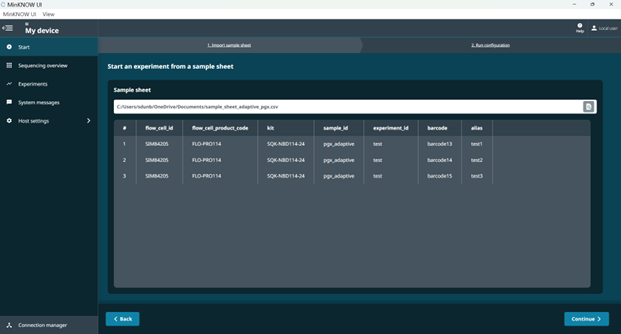
3.样本列表通过验证并确认后,即进入下图所示的 实验运行配置 (Run Configuration)界面。 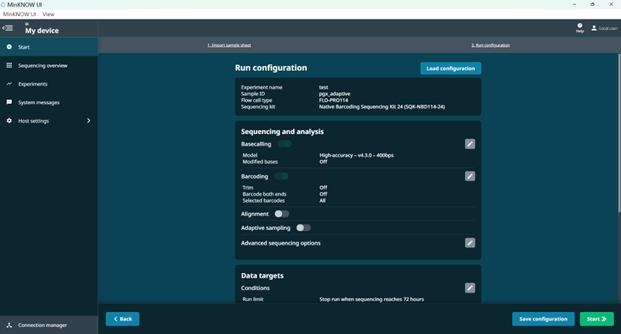
4.启用(ON)碱基识别(Basecalling),并使用高精准(HAC)模型(默认设置)。启用(ON)条码拆分(Barcoding,使用任何条形码试剂盒时默认启用)。启用(ON)适应性采样(Adaptive Sampling)。 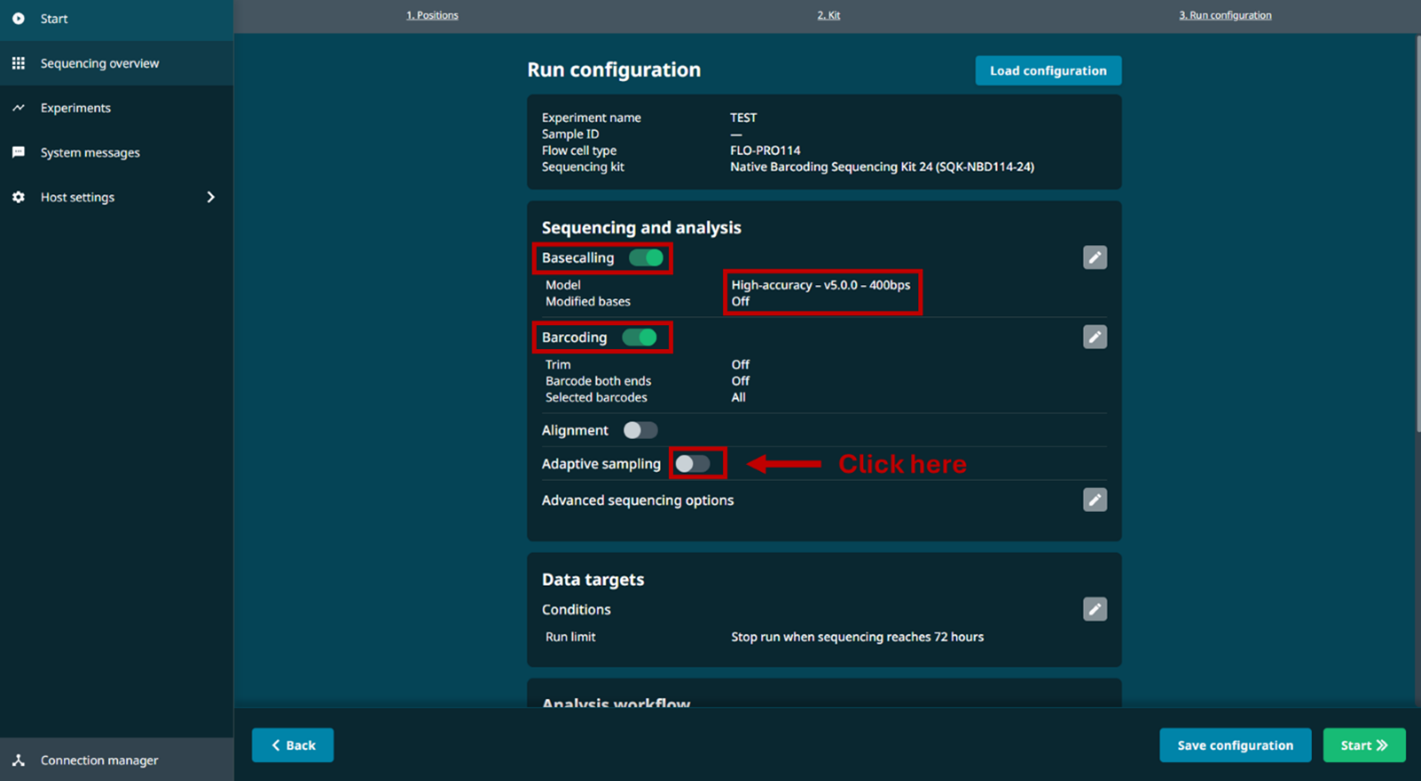
5.选择 富集(Enrich)模式,并启用“仅对目标区域进行碱基识别”(Basecall on-target reads only)选项。使用数据包中提供的 PGx BED 文件和参考基因组。这些文件专为 PGx 富集分析配置,使用其他 BED 文件或参考基因组可能导致分析结果不一致。 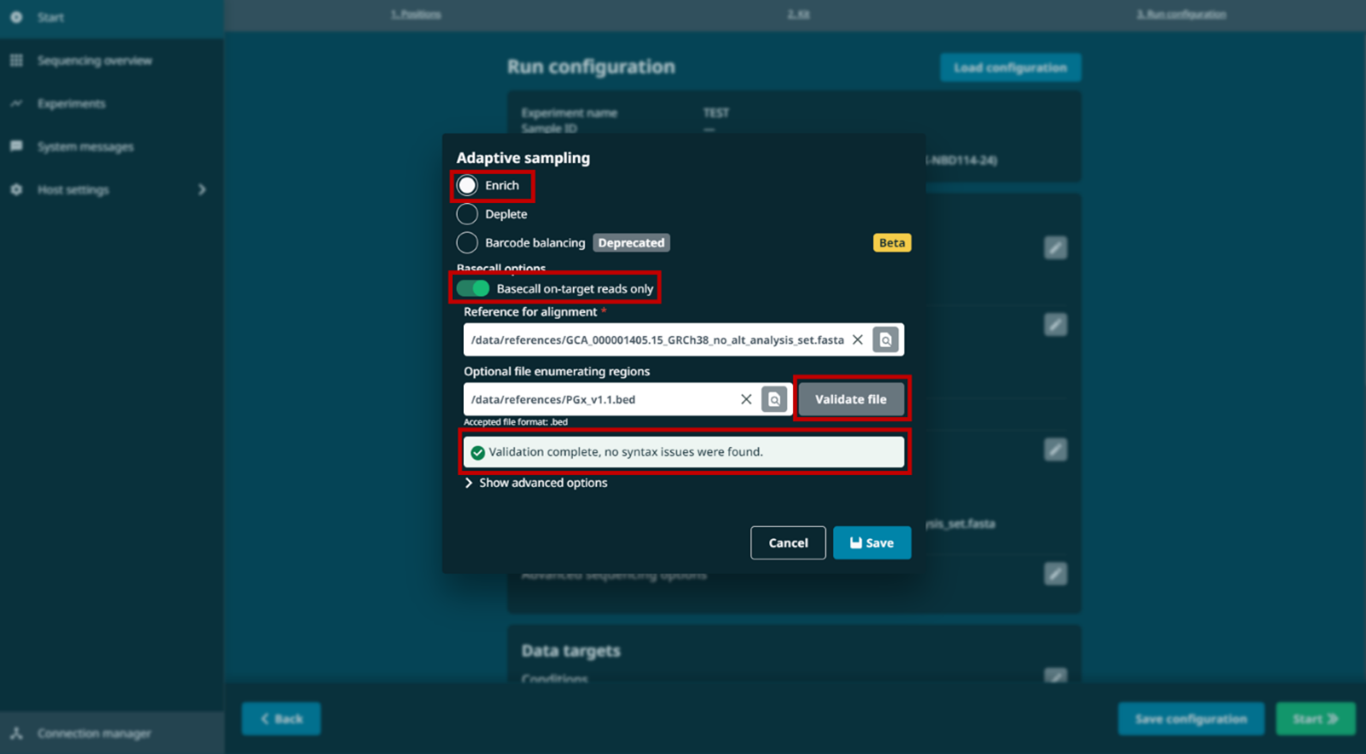
6.将输出格式设置为 BAM,并将输出频率设置为 每 10 分钟 。 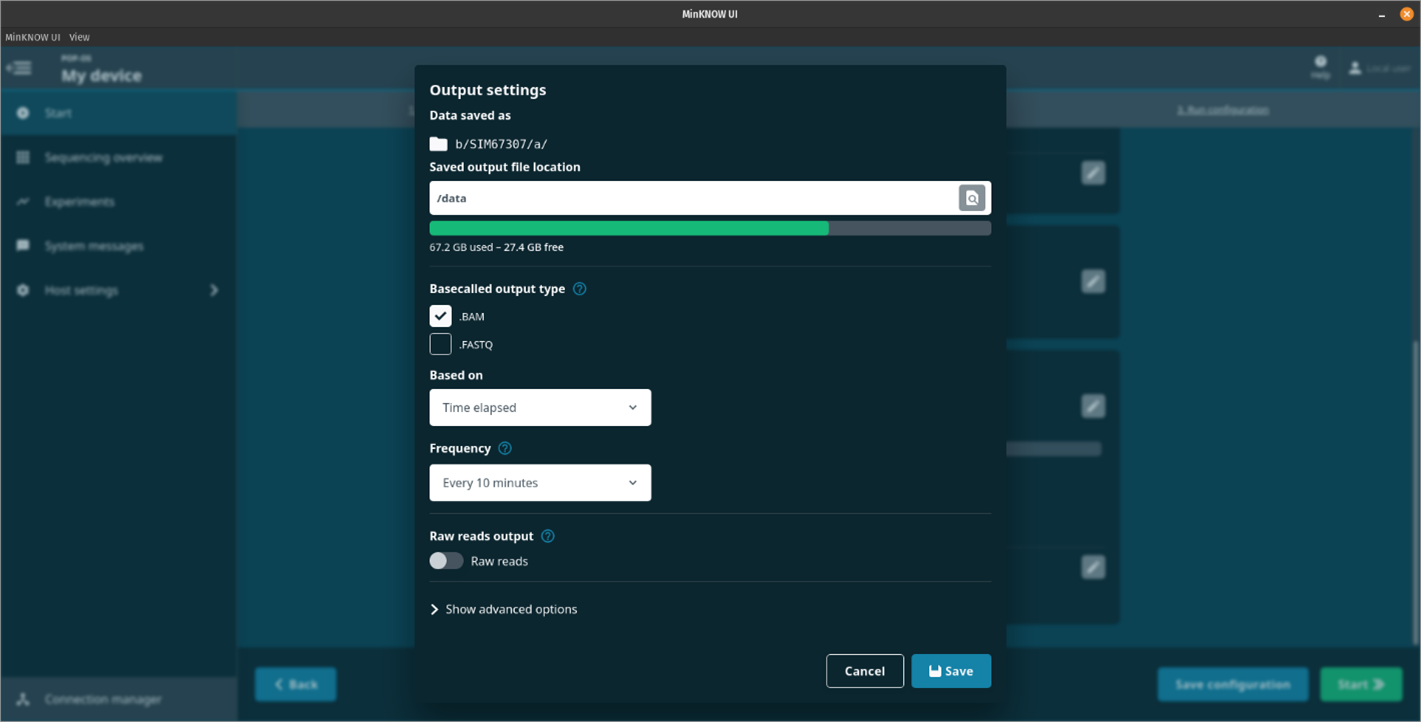
7.保持 比对(Alignment)功能为“关闭”(OFF) 状态。
8.继续至参数确认页面,然后点击 Start (开始)启动测序实验。 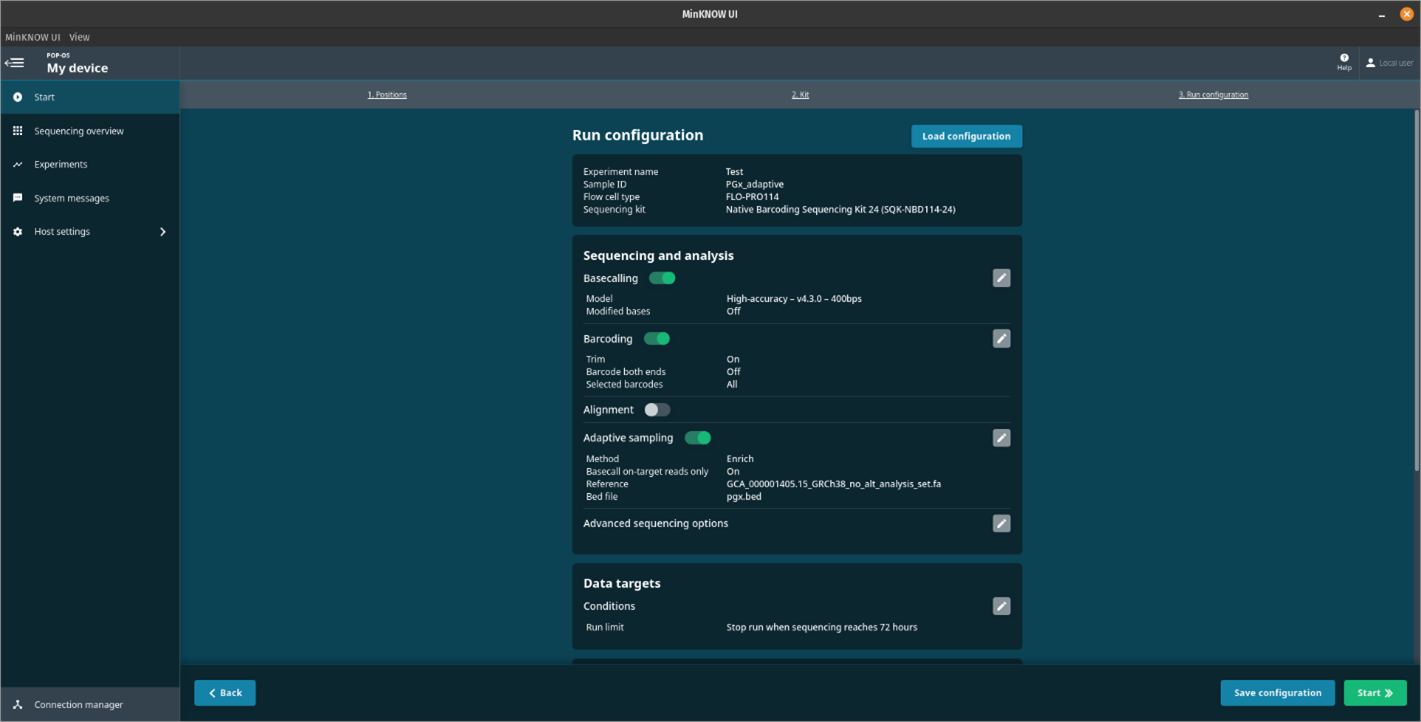
16. 使用 wf-pgx 工作流程进行数据分析
PromethION 24/48、PromethION 2 Integrated(P2i)以及与 GridION 连接的 PromethION 2 Solo,均可满足该分析流程的计算机配置要求。
如使用一体式测序设备(如 PromethION 24/48 或 P2i)进行分析,请在测序结束后再启动分析。请勿在测序过程中运行分析流程, 以免干扰测序任务。
如使用专用计算机(即非 Oxford Nanopore 设备)进行分析,该计算机应满足以下配置要求。
| 最低配置 | 推荐配置 | |
|---|---|---|
| CPU 核心数 | 8 | 16 |
| 内存 | 32 GB | 64 GB |
| 操作系统 | Linux/Windows/macOS | Linux/Windows/macOS |
| 存储空间 | 500 GB | 500 GB |
软件要求
EPI2ME Desktop
运行本分析前,请安装 5.2.5 或更高版本的 EPI2ME Desktop 应用程序。 具体安装步骤取决于所用操作系统。请按照相应的 安装说明进行安装。
1.EPI2ME Desktop 应用程序安装完成后,请按下图所示,在主控制面板中单击 Settings (设置),并将工作目录设置为 /data/epi2melabs 。此举可避免分析过程中生成的文件占用系统主目录(home directory)的存储空间。
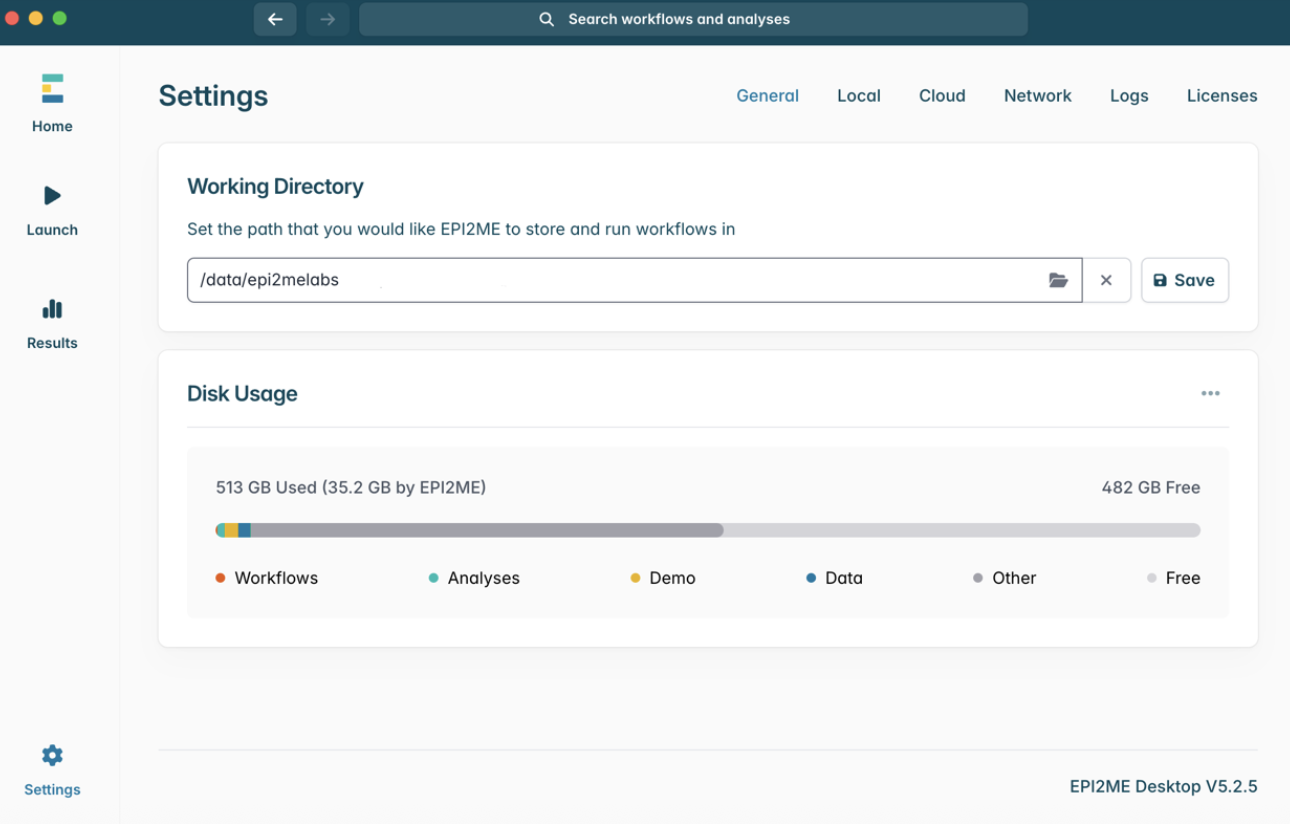
wf-pgx 分析工作流程以 2ME 文件形式发布,其中内置了运行该流程所需的 Docker 镜像文件和参考基因组。
2.请打开 Launch(启动) 菜单,安装该分析流程。 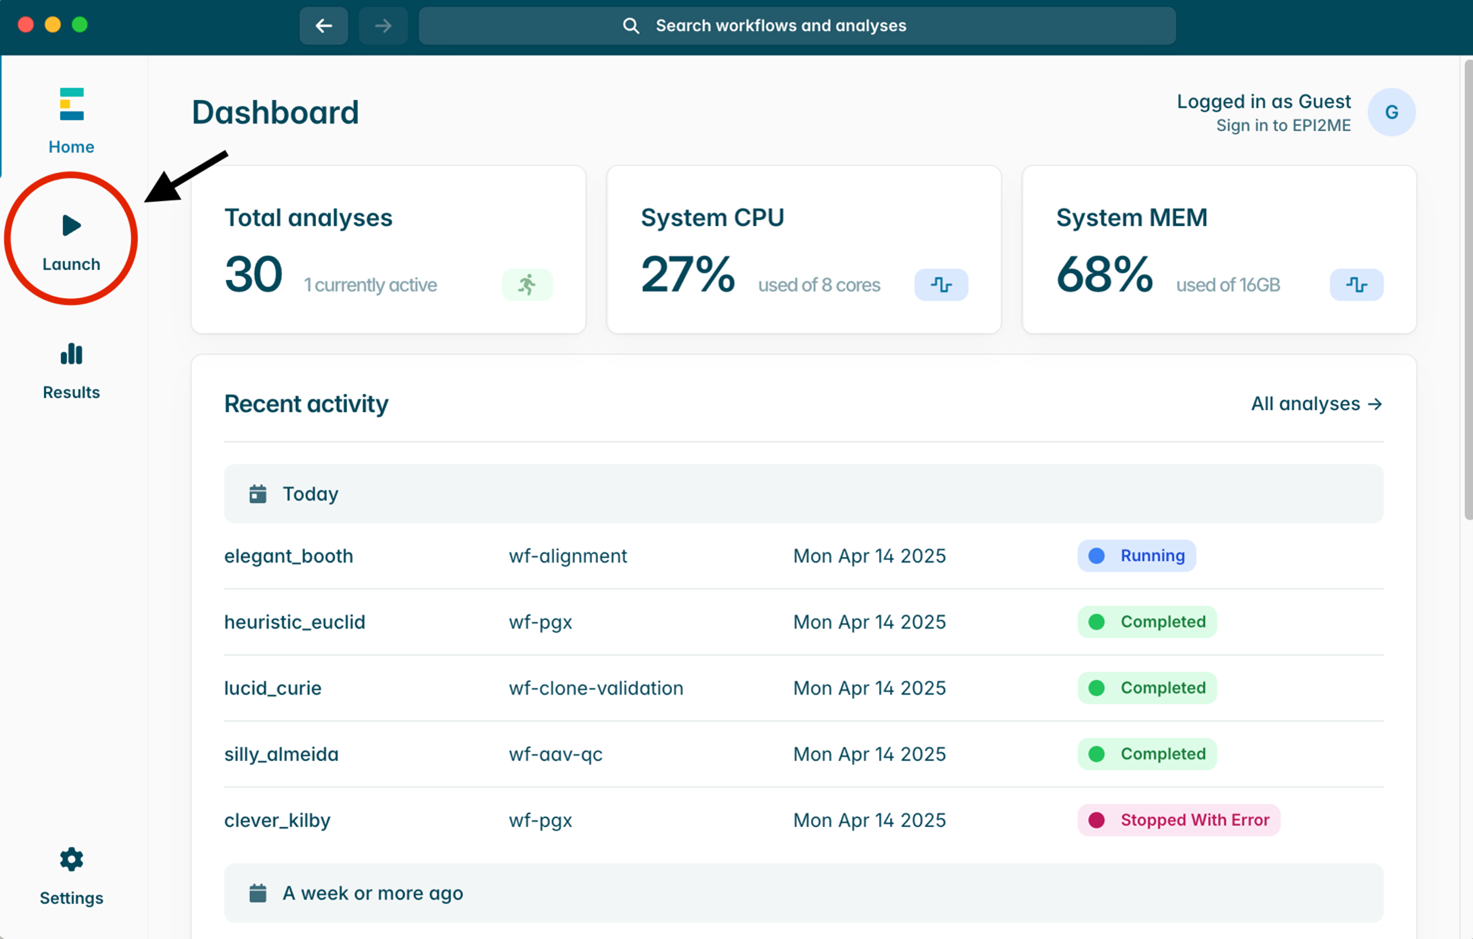
3.选择 Import workflow(导入工作流程)选项。
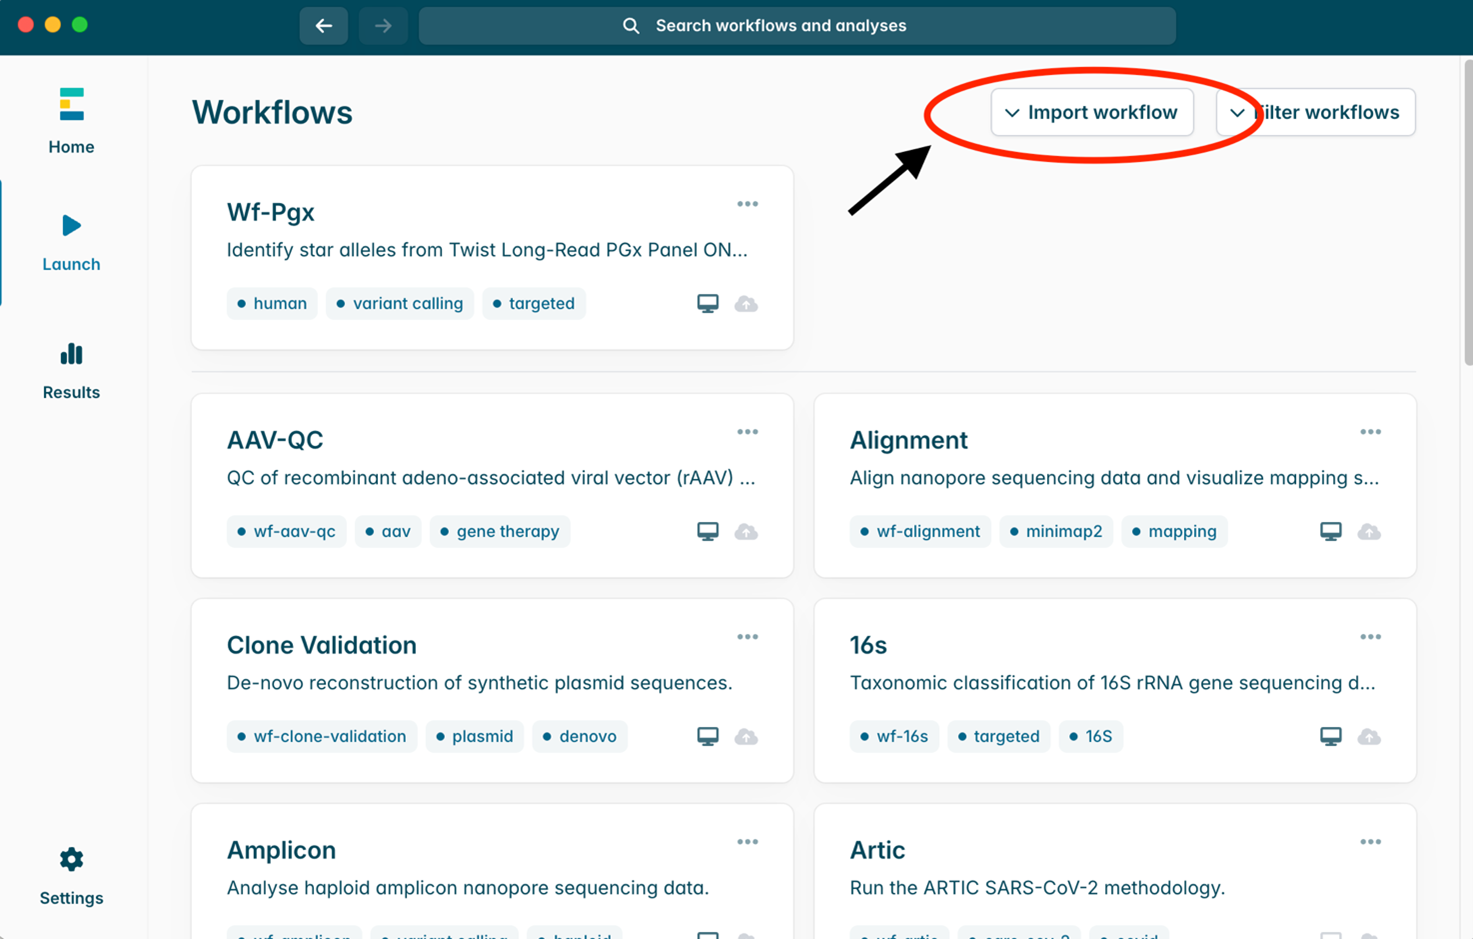
4.点击文件夹图标,选择 .2ME 文件,然后点击 Install (安装)。 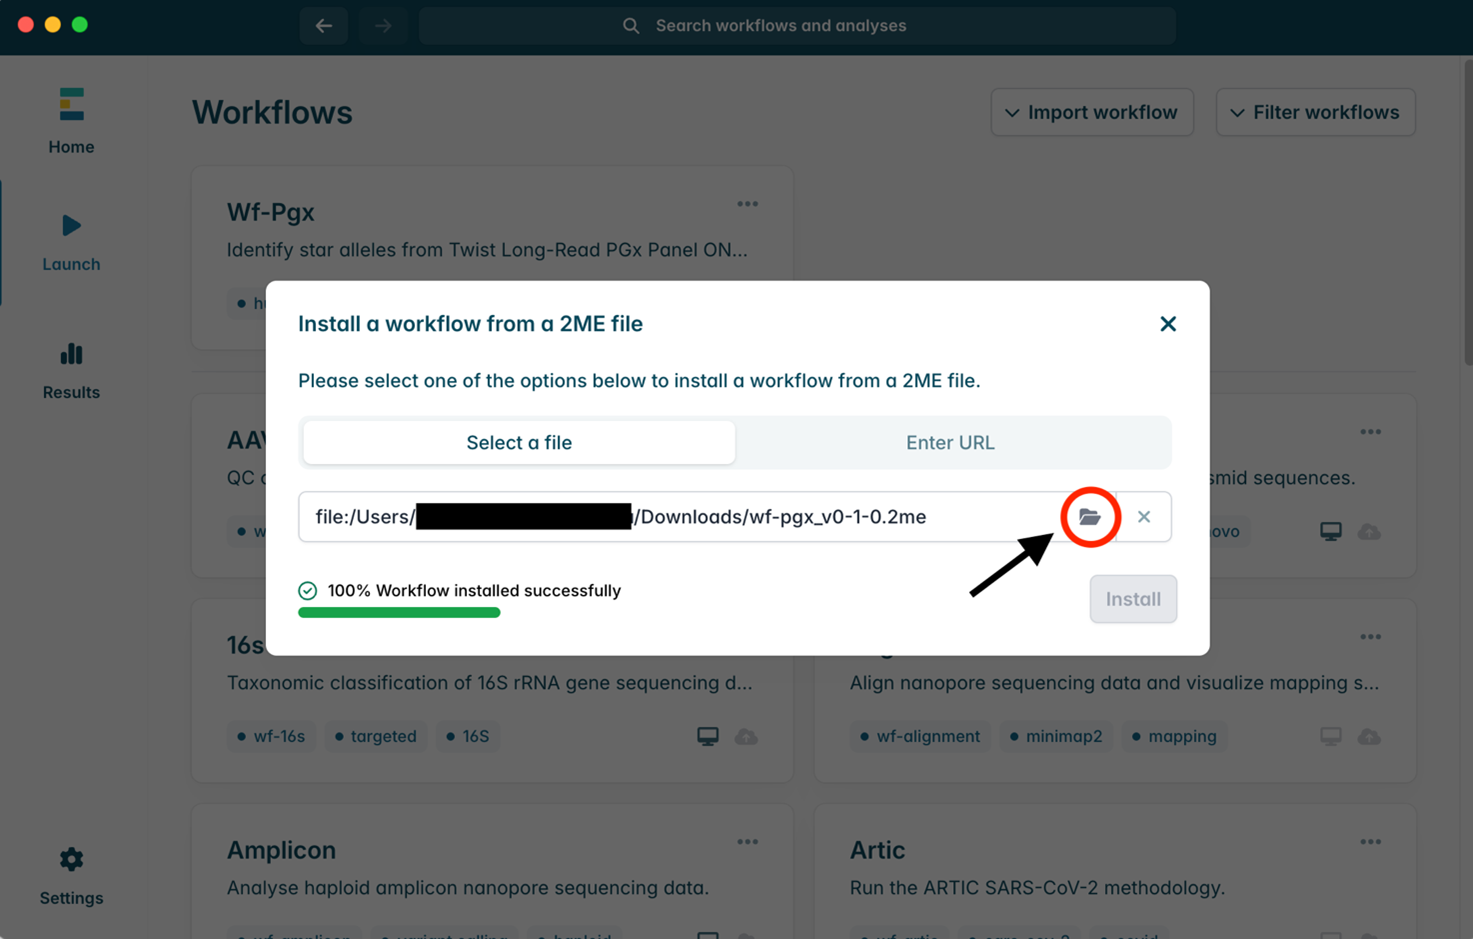
为验证安装是否成功,我们建议您使用示例数据运行一次该分析流程。运行示例数据时,需要联网下载两个较小的 BAM 文件。下载完成后,系统会自动运行分析流程。
5.点击 Options(选项)下拉菜单中,选择 Run demo analysis(运行演示分析)。 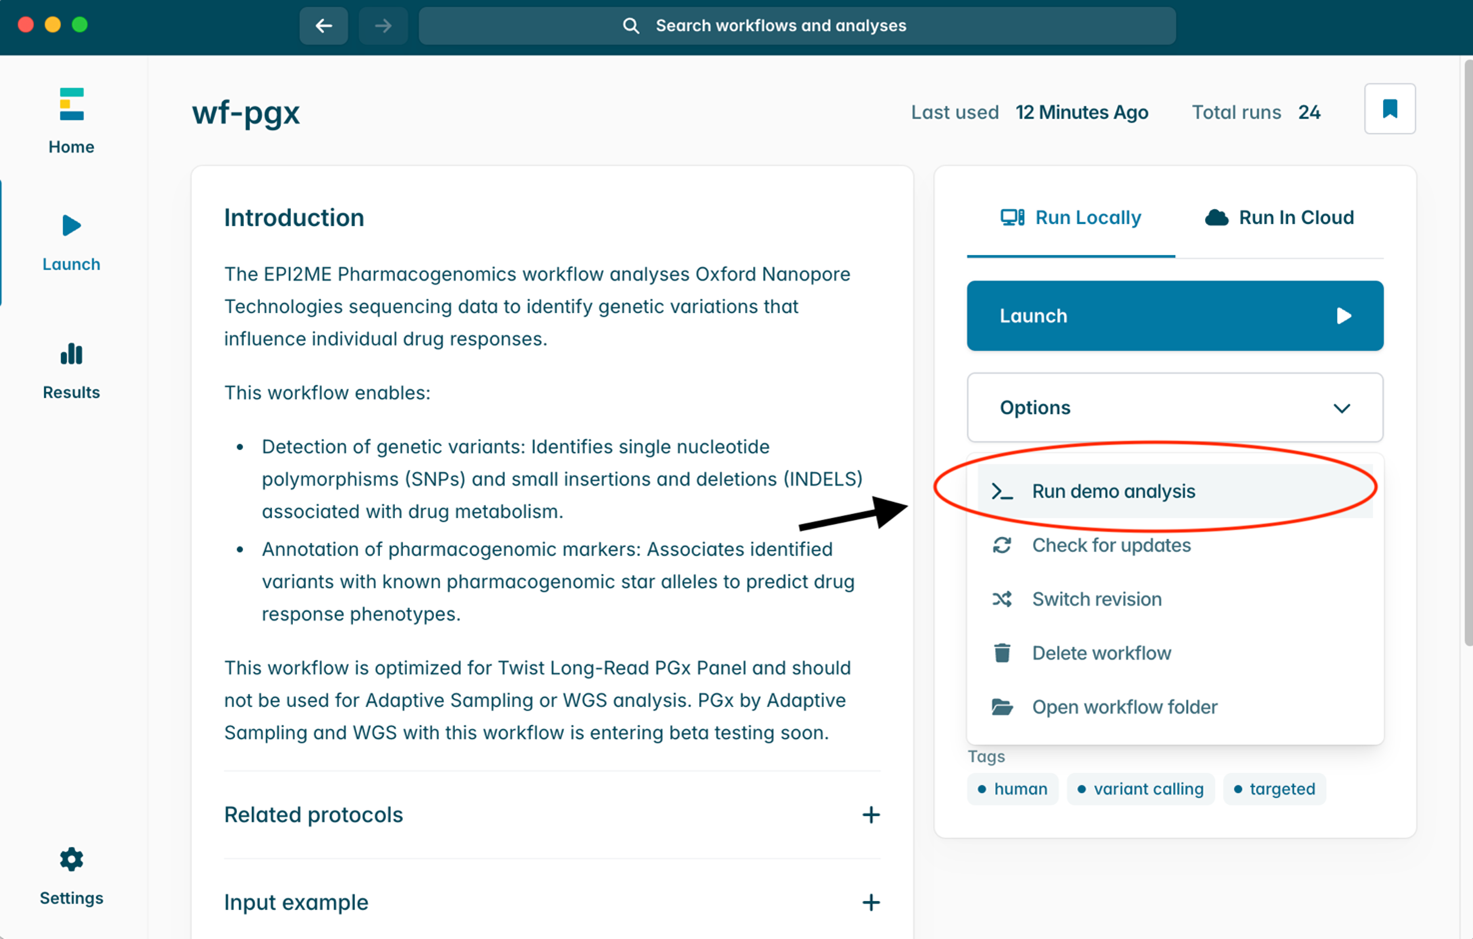
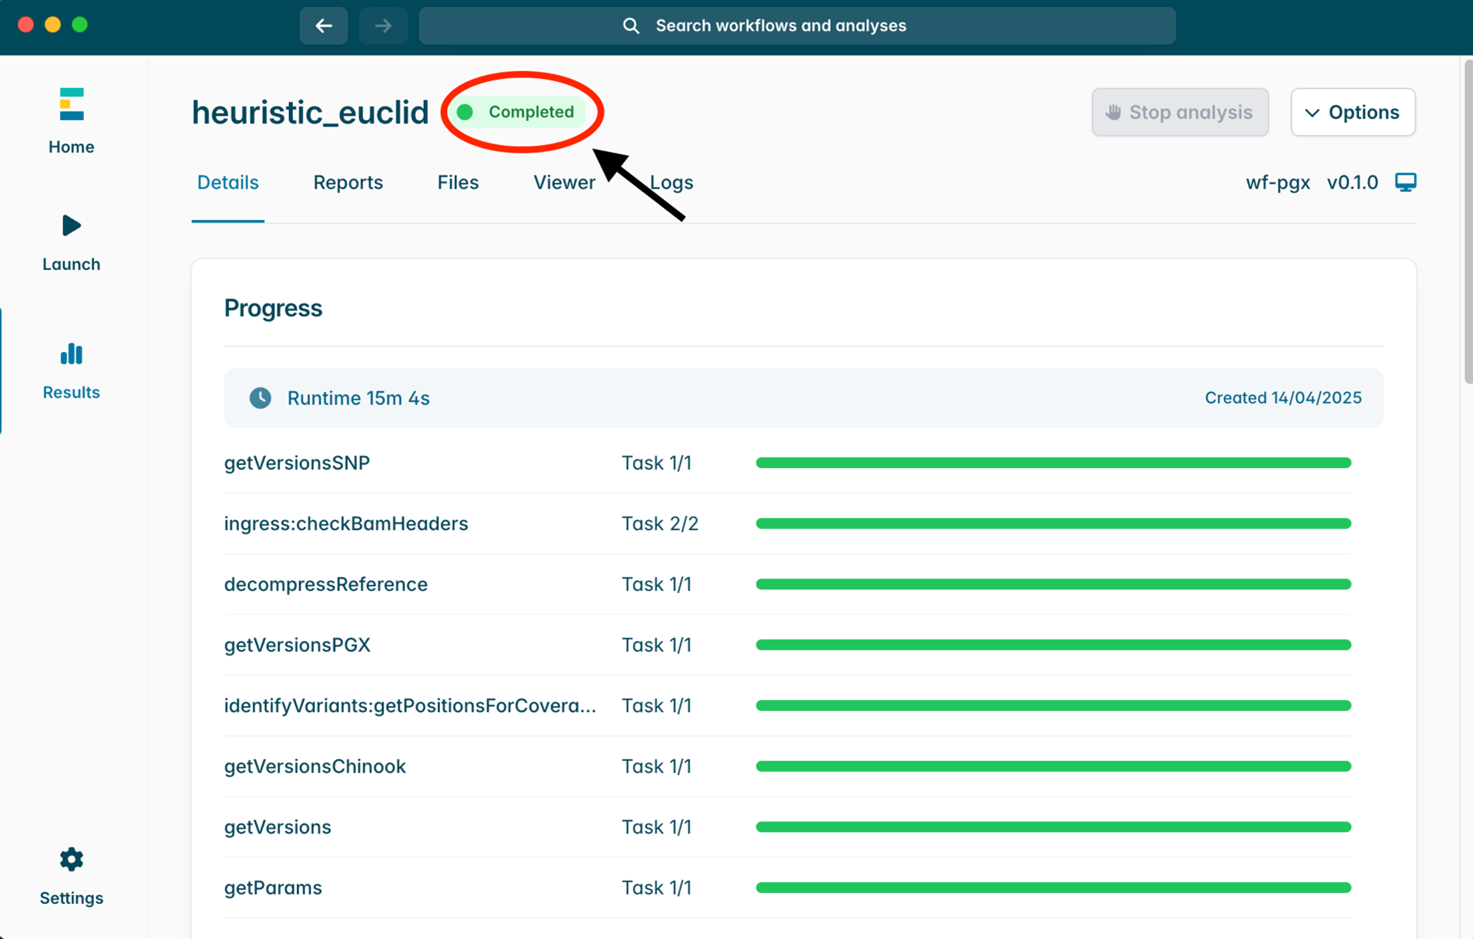
6.运行成功后,系统会显示绿色的 Completed(完成) 标识。
分析流程的输入数据准备
运行 wf-pgx 时,需提供一个按样本划分的输入目录。该目录下,每个样本应存放于独立的子目录中,子目录内包含该样本对应的 BAM 或 FASTQ 文件。默认情况下,wf-pgx 使用子目录名称作为样本名称。若提供 CSV 表格,系统会将子目录名称与表格中的样本别名(alias)进行匹配,并使用匹配后的别名作为样本名称。
BAM 文件可以是未比对文件,wf-pgx 将自动完成比对。对于已比对至其他参考基因组的 BAM 文件,wf-pgx 将依据数据包中的参考基因组重新进行比对。 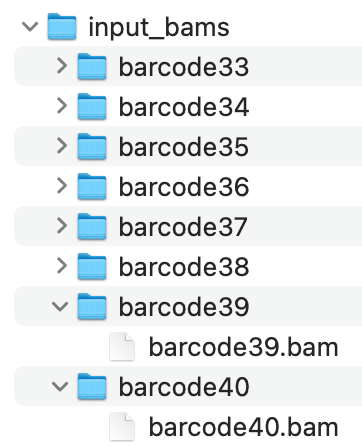
分析
1.在 Launch(启动) 菜单中选择该分析流程。 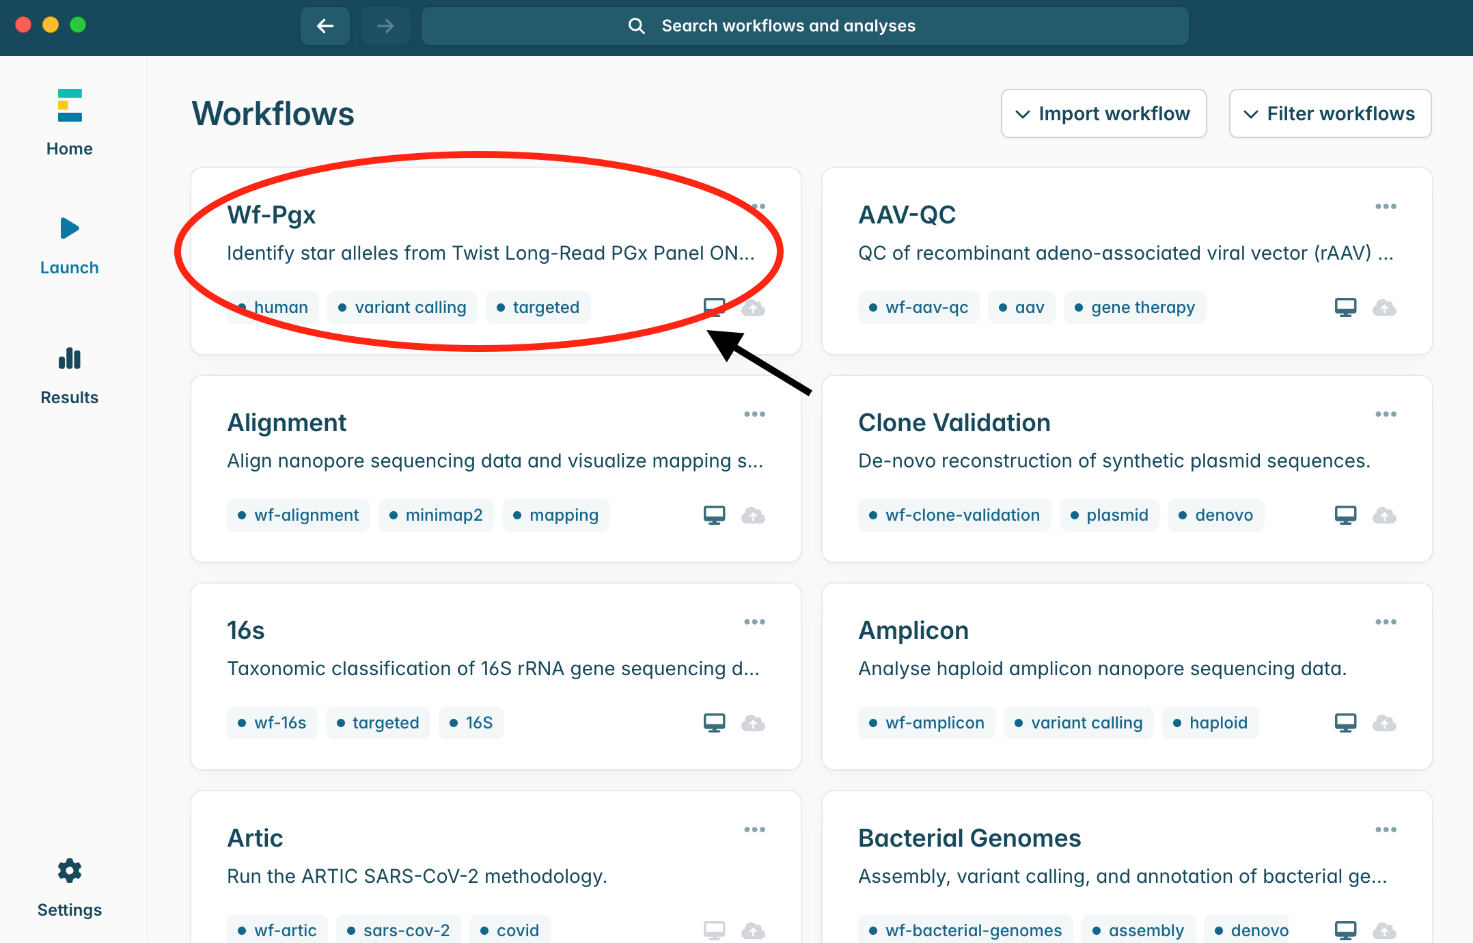
2.然后,点击蓝色的 Launch(启动) 选项卡。 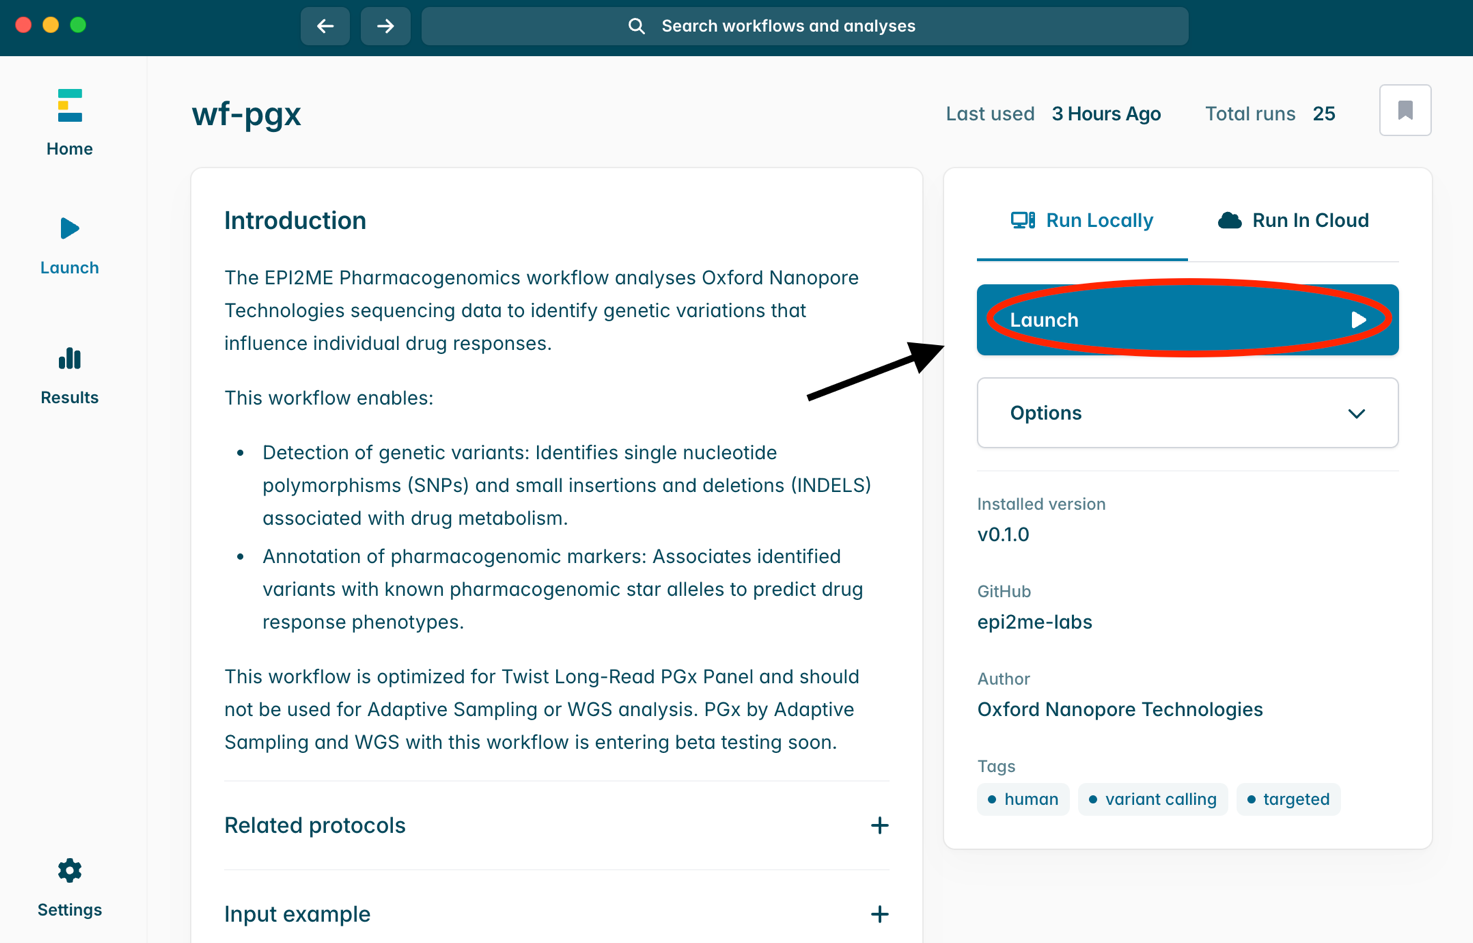
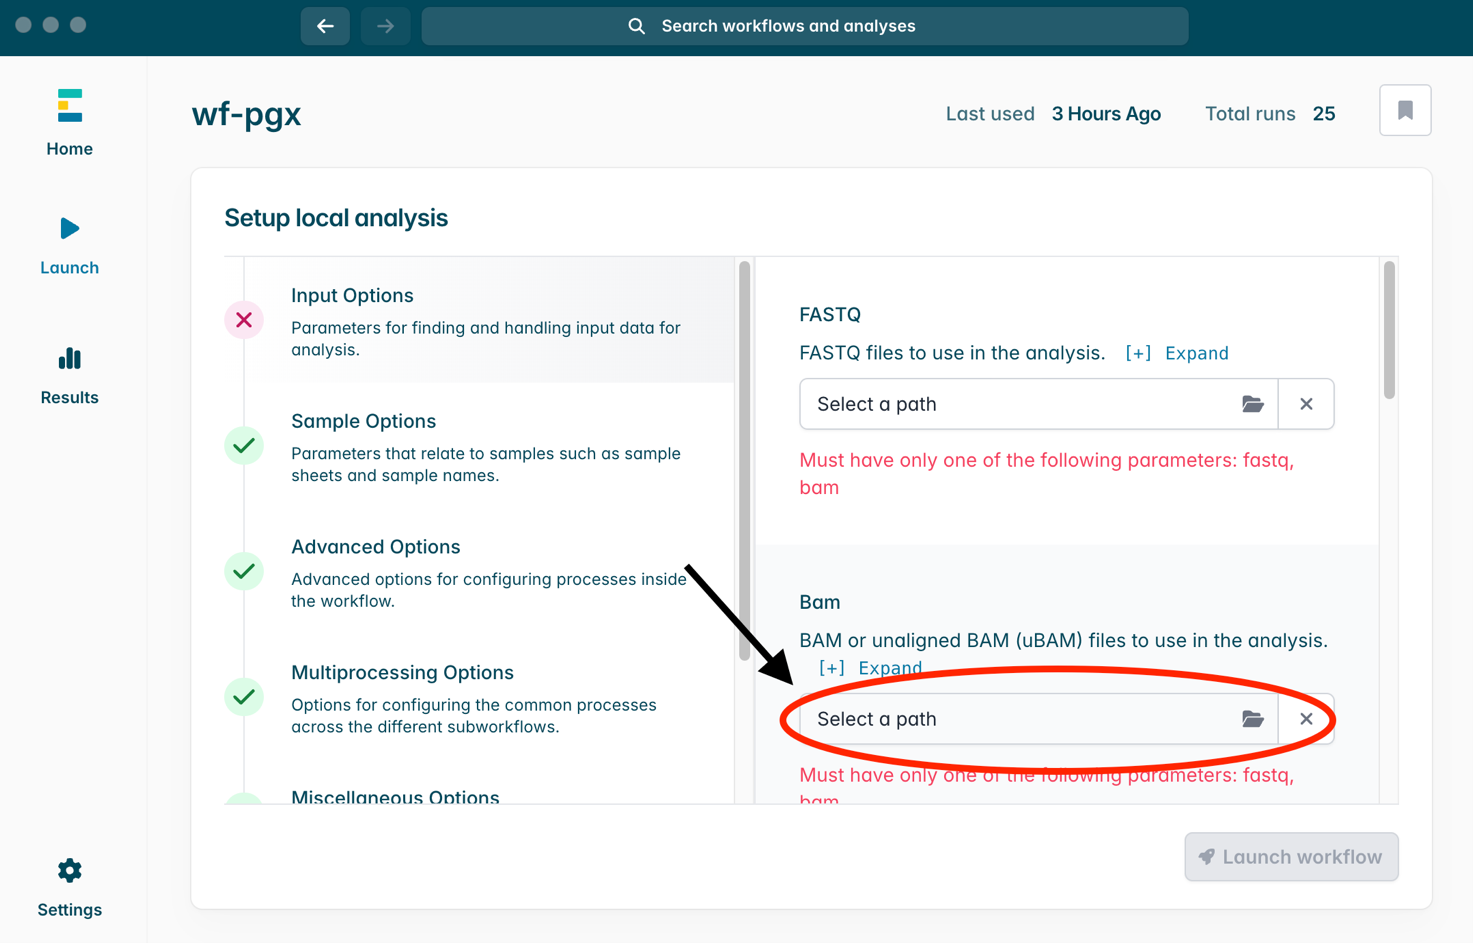
3.在 Bam 选项下,选择包含所有样本数据子目录的上级目录。
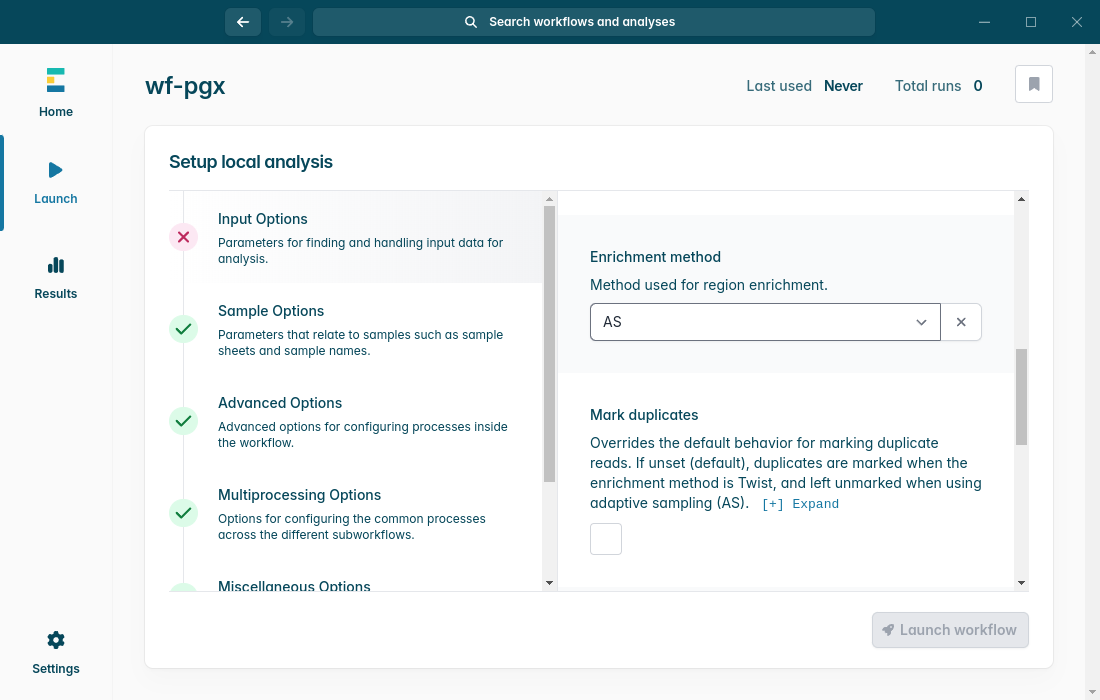
4.选择生成该数据时所采用的 Enrichment method (富集方法):适应性采样(AS)。
5.点击 Launch workflow(启动工作流程)。默认情况下,分析仅限于所提供的 PGx BED 文件中定义的目标区域。
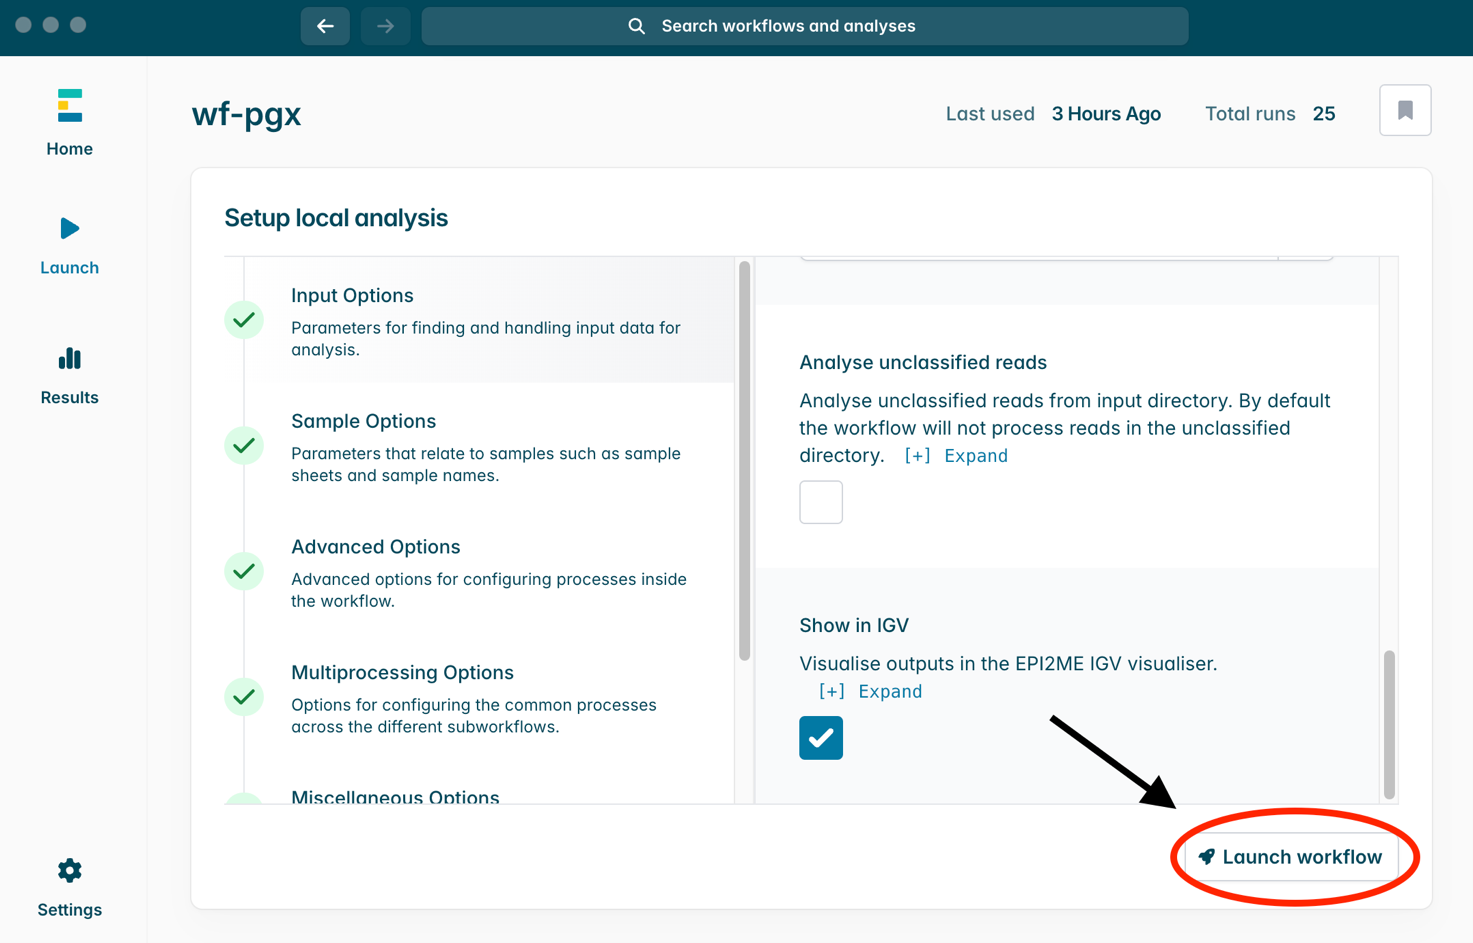
6.工作流程运行期间,系统会显示分析状态及进度。完成后,界面会以绿色的 Completed(完成) 标签显示(如下图)。
部分分析结果只有在工作流程完成后才可查看。 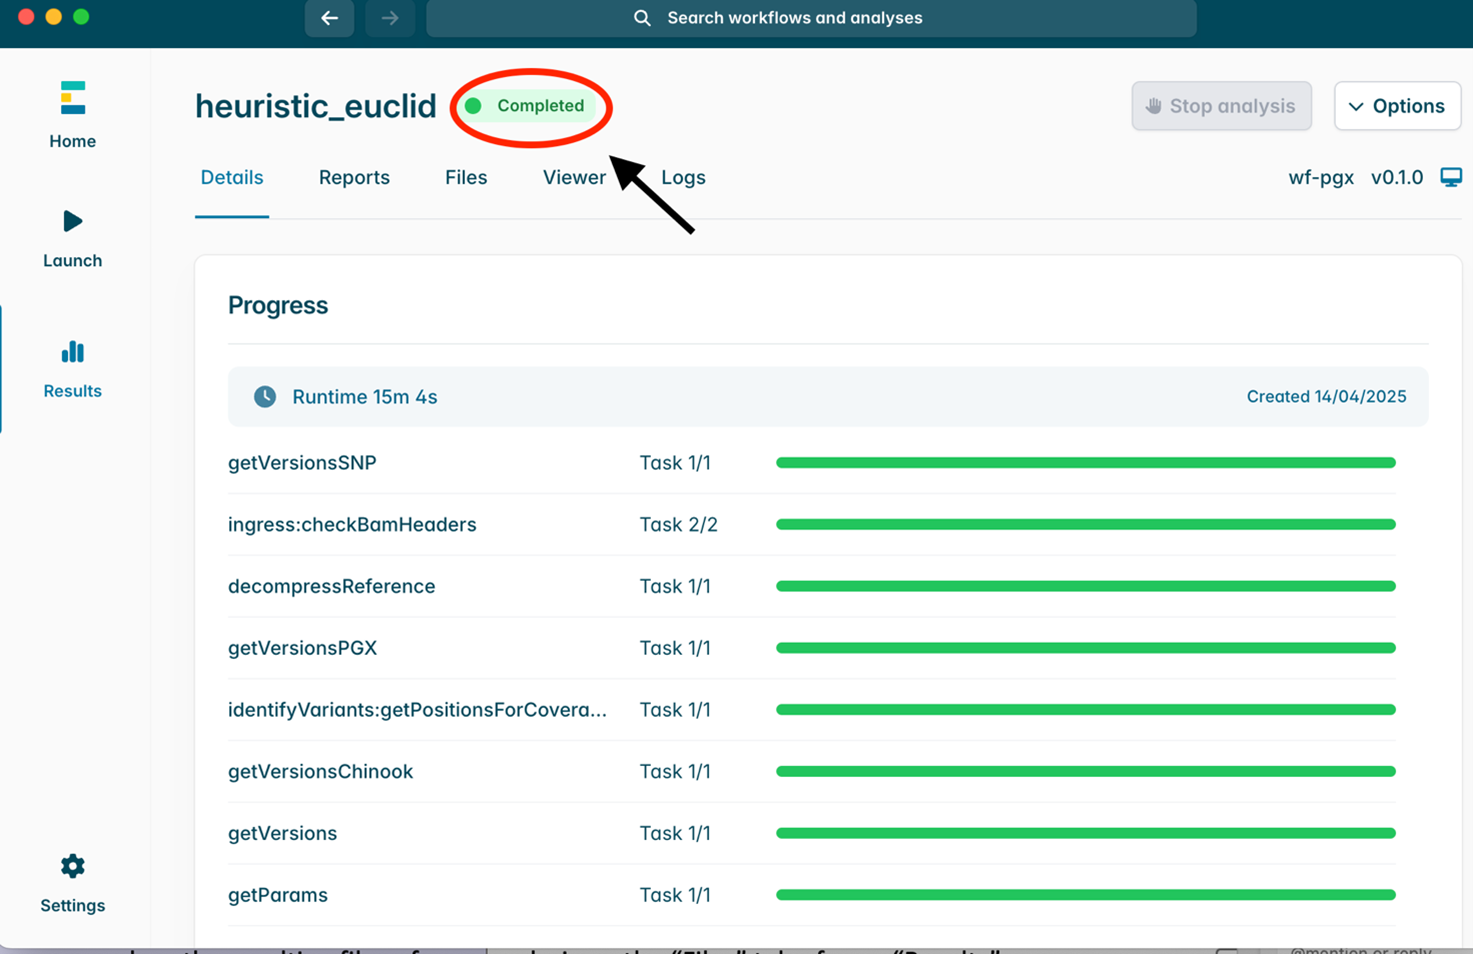
分析结果
分析完成后,请前往 Reports(报告)部分,查看本次实验的总体情况。
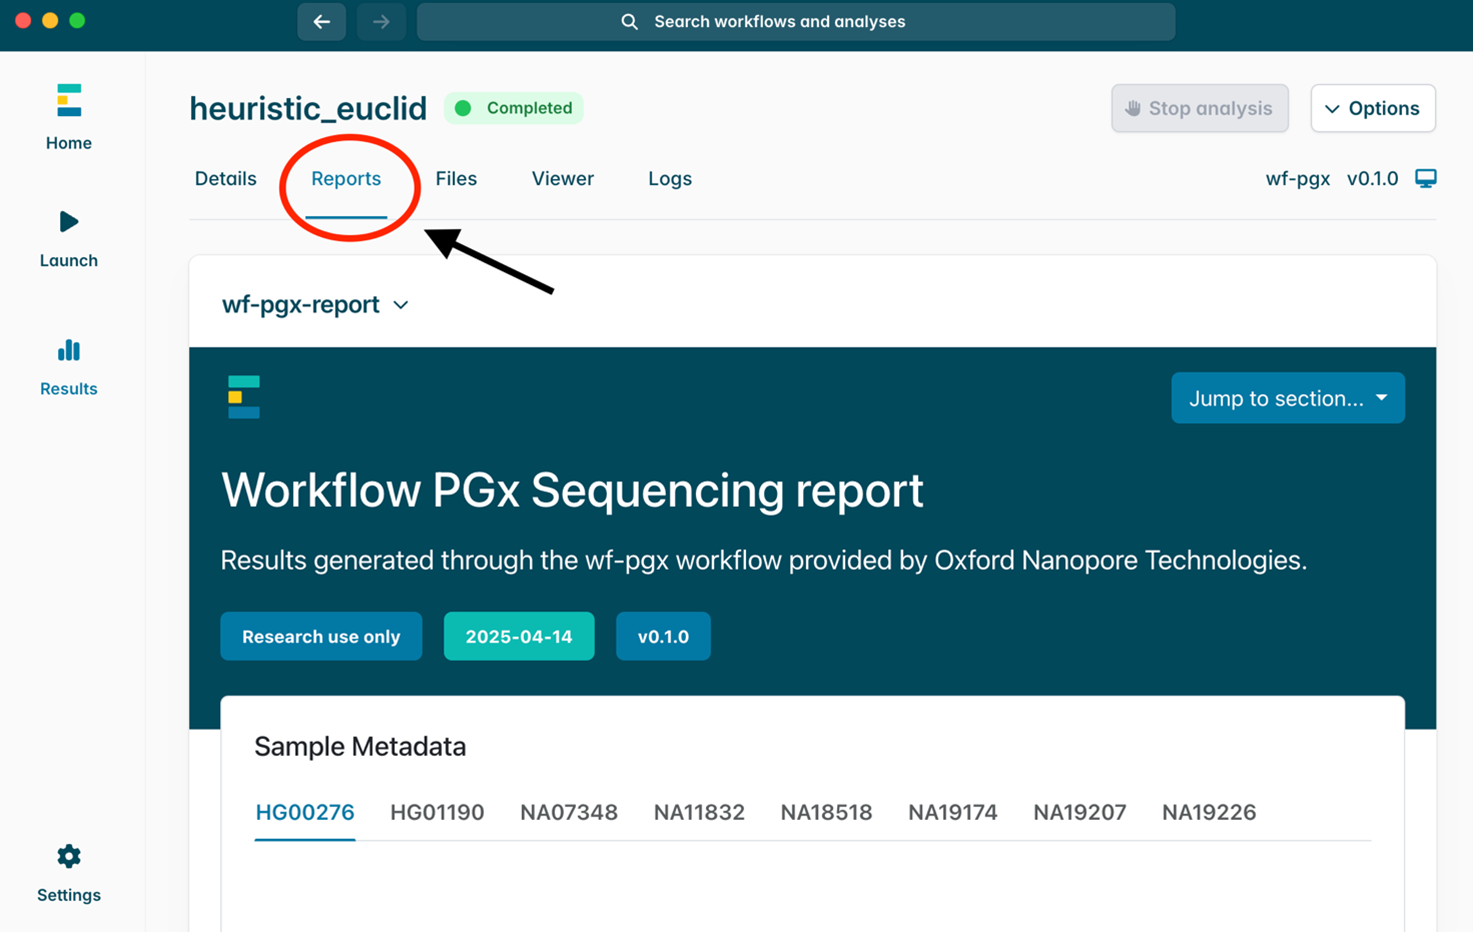
报告包含以下七个部分,各部分简介如下:
1.Sample Metadata(样本元数据)——列出样本名称及其对应的条形码;各样本的数据可在相应的选项卡中查看。 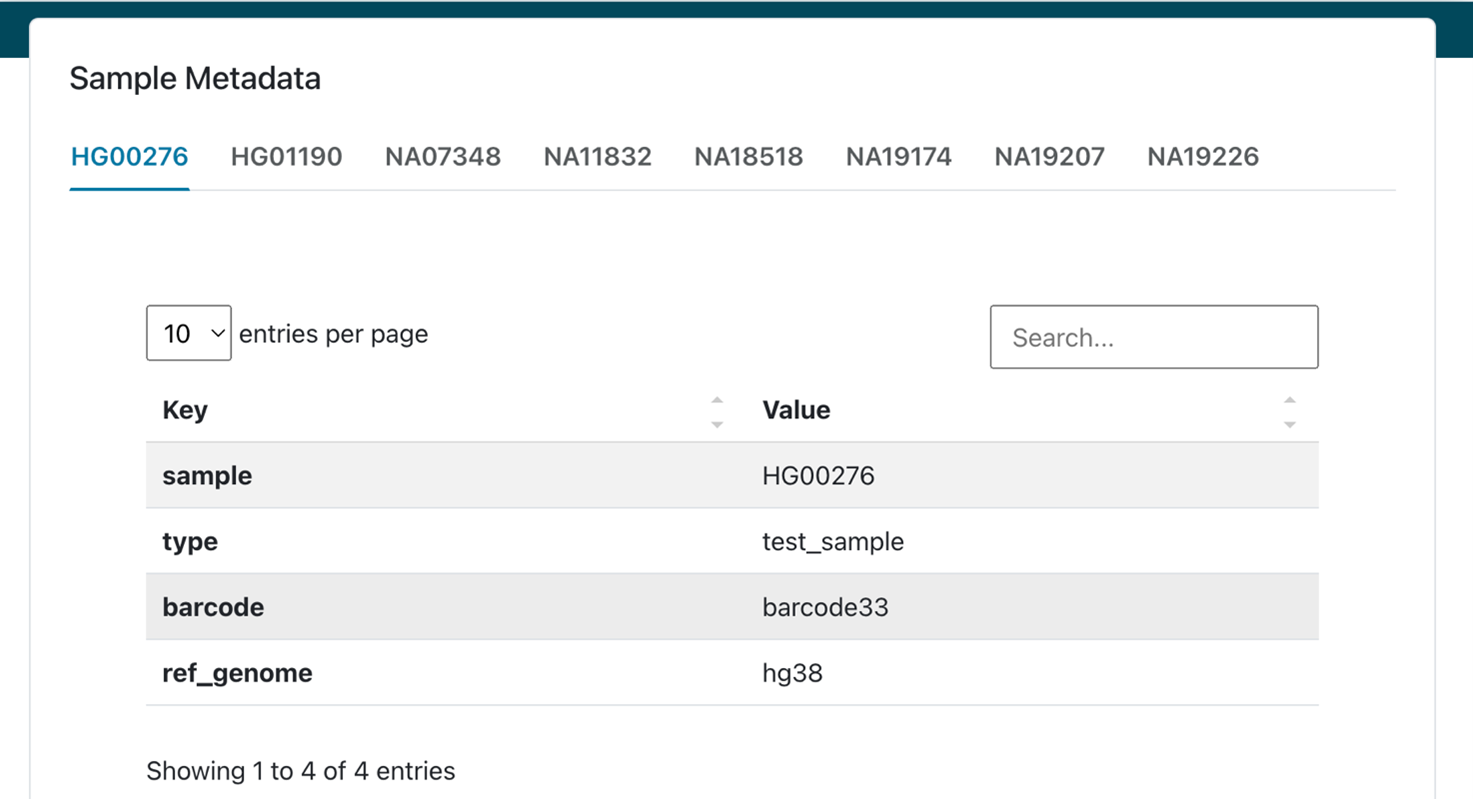
2.Genotyped positions statistics(已分型位点统计):汇总目标区域内检测到的 SNP 和 Indel 变异;records(分型碱基对数):表示已完成基因分型的碱基对总数;no-ALTs(未检测到变异的位点数):表示在已完成基因分型的位点中,未检测到变异的位点数量。
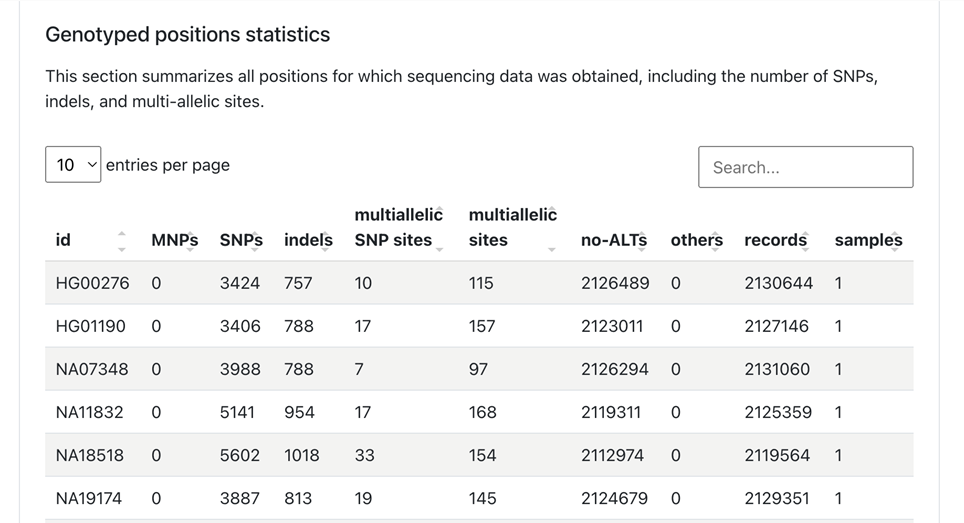
3.Chinook - 该表列出了 Chinook(Oxford Nanopore 的靶向基因分型工具)为每个样本判定的 CYP2D6 基因类型组合。 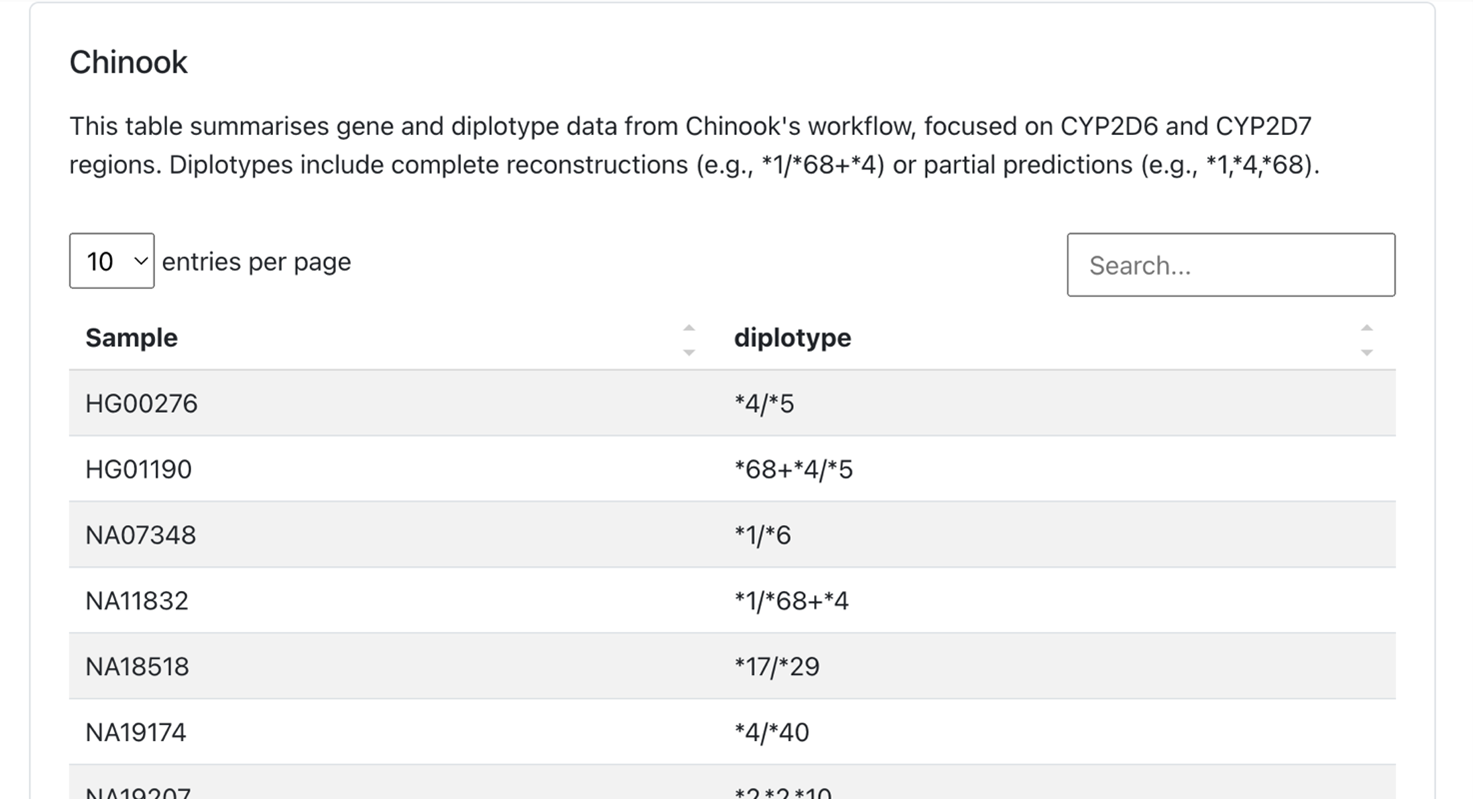
4.PharmCAT Coverage - 汇总各样本中 PharmCAT 判定星号等位基因所依据的关键位点的测序覆盖深度,并支持按样本查看位点详情。 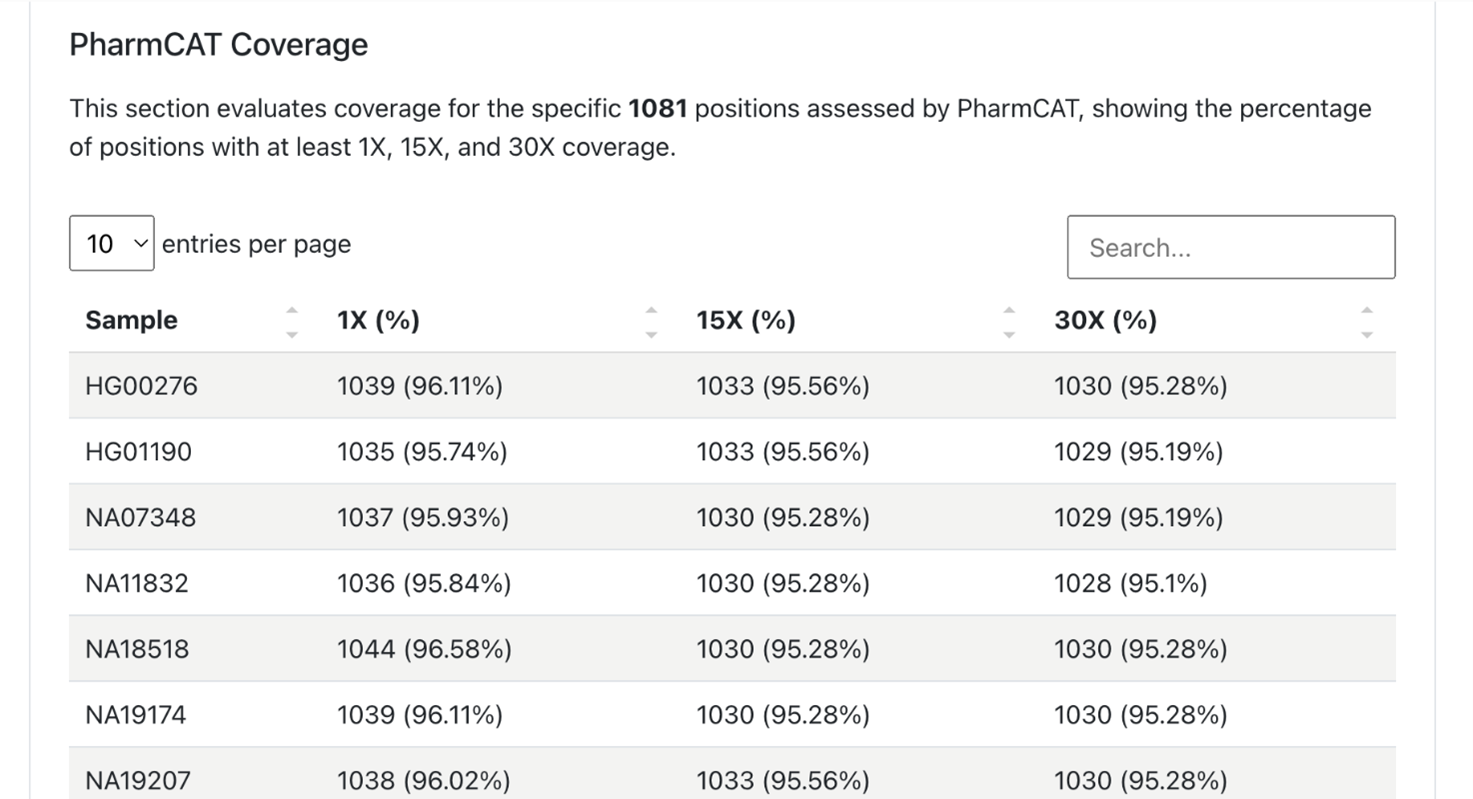
该部分还会列出覆盖深度低于 30× 的位点。 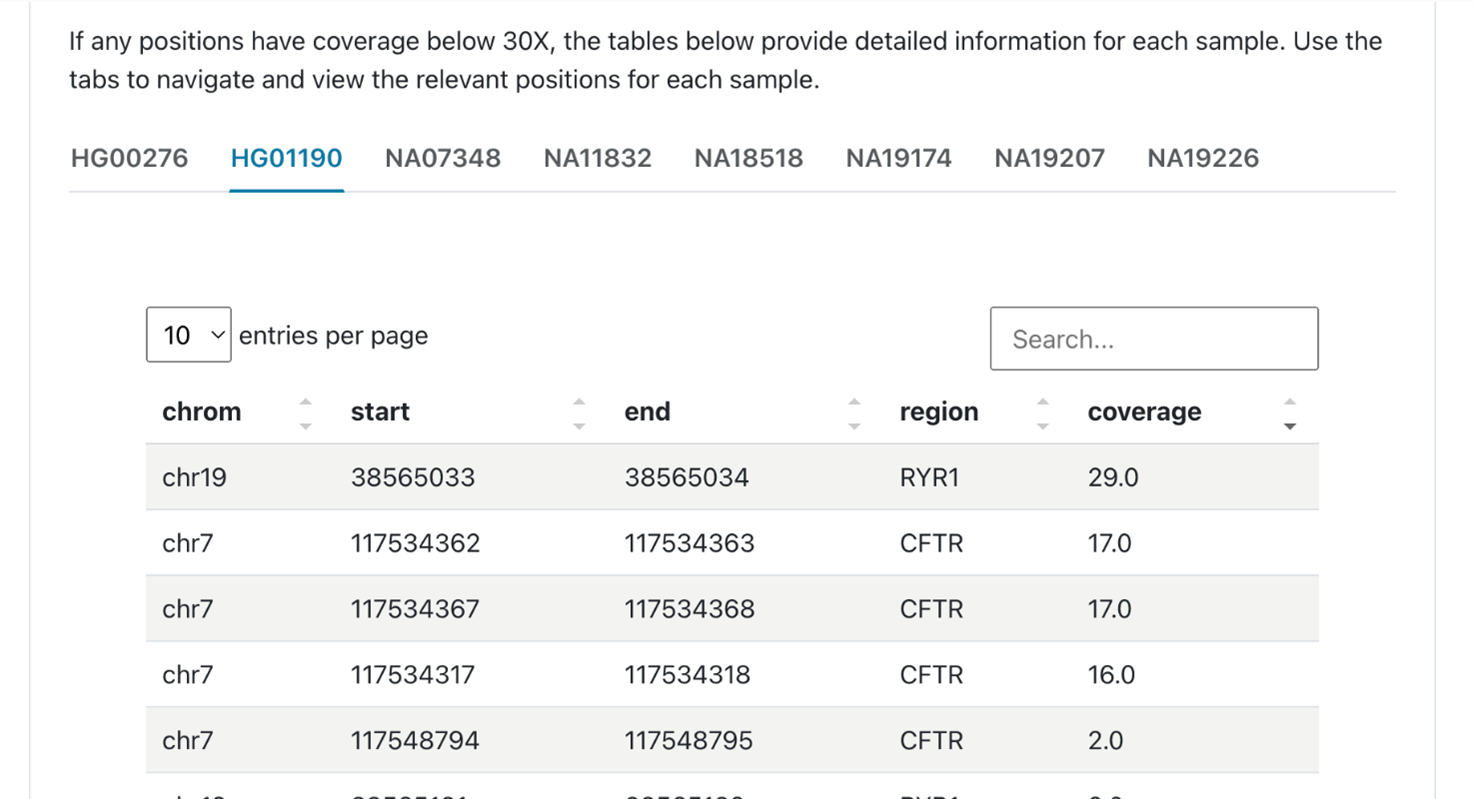
5.Software versions(软件版本) - 列出本次分析所用工具的版本。
6.Workflow parameters(工作流程参数) - 显示本次分析所使用的参数设置,包括用户自定义设置和系统默认设置。
7.About this report (关于本报告)- 提供本报告的使用声明,以及本次分析所使用的 wf-pgx 版本信息。
分析完成后,您可以在 Files (文件)选项卡中查看生成的文件。
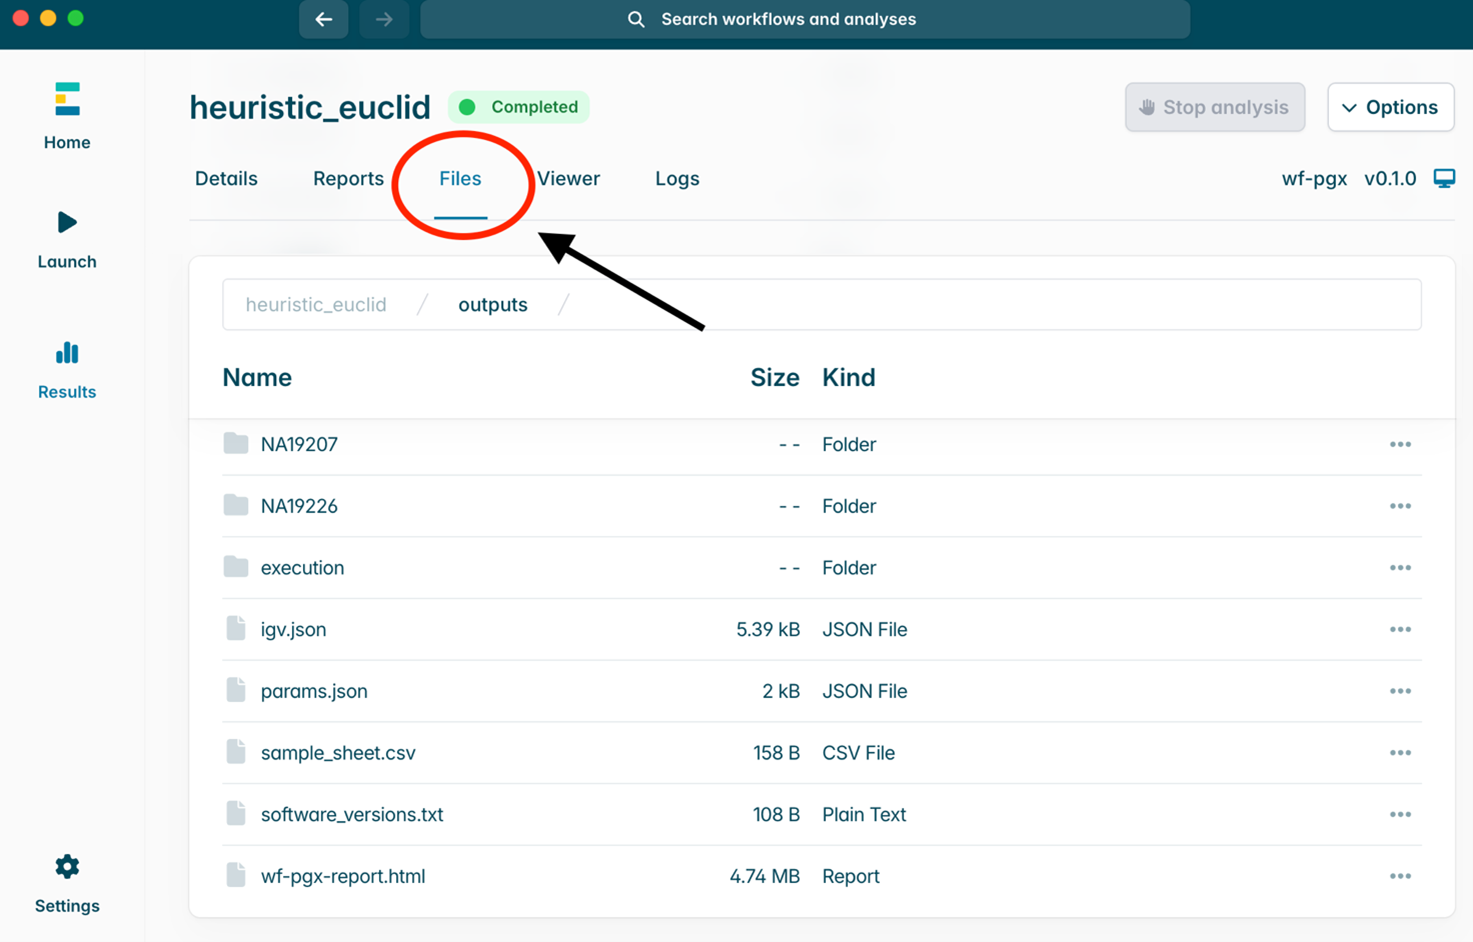
此外,您也可以在 Options(选项) 菜单中选择 Open folder(打开文件夹),直接在本地文件管理器中查看分析结果文件。 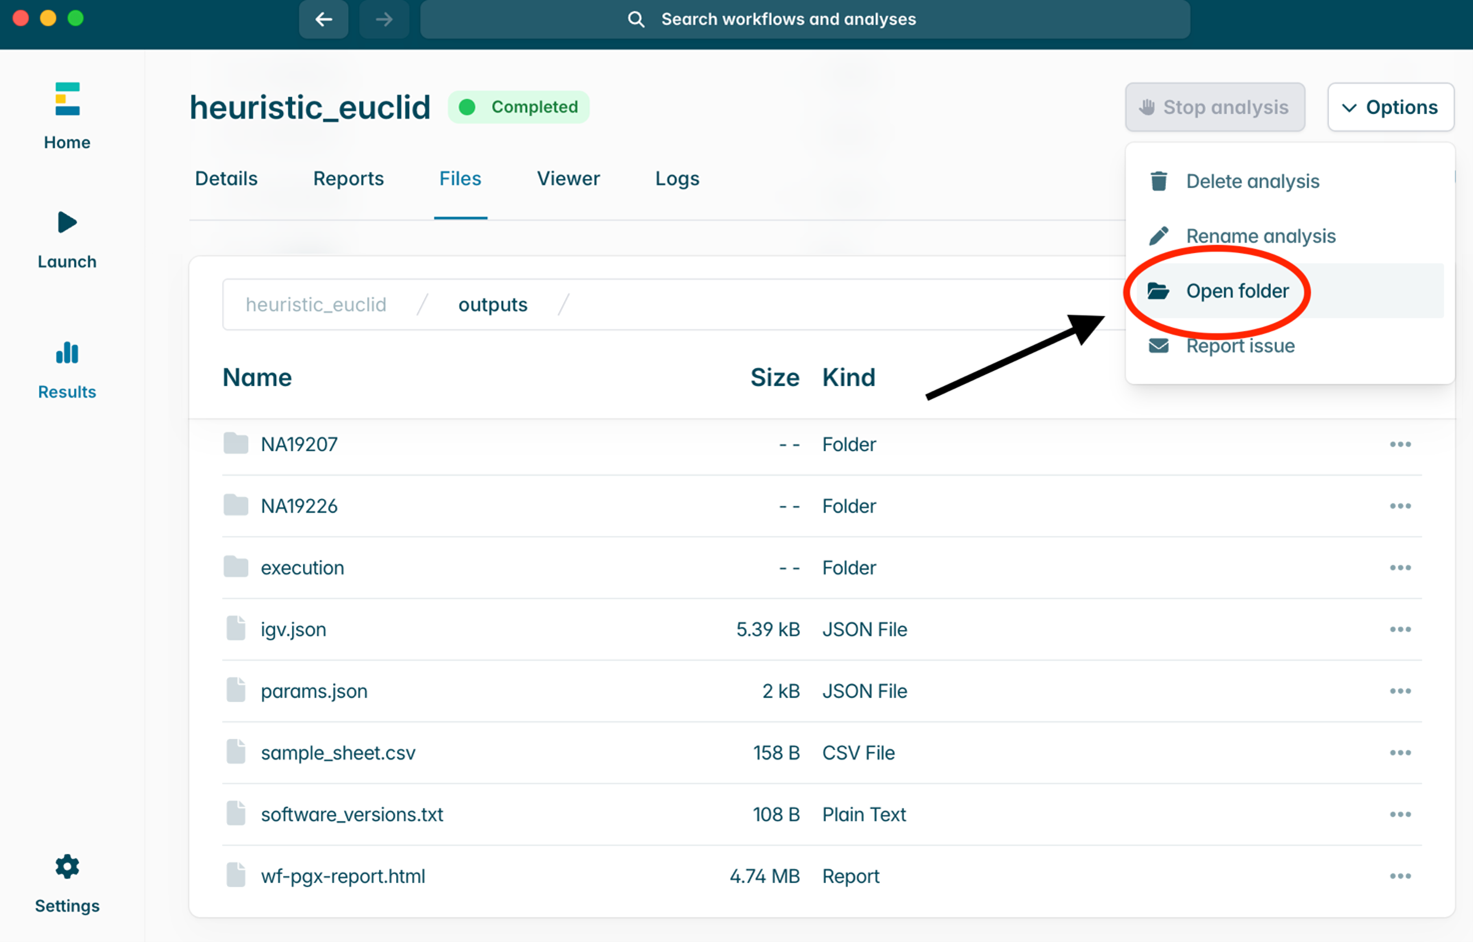
工作流程输出:
| 文件 | 说明 |
|---|---|
| software_versions.txt | 列出工作流程运行过程中使用的主要软件工具版本,可用于调试和结果复现。 |
| wf-pgx-report.html | HTML 格式的分析报告,包含测序统计信息。 |
| sample/ | 存放样本分析结果的目录,包括变异检测结果、PGx 预测结果以及分析过程中生成的中间文件。 |
| sample/sample.filtered.vcf.gz | 样本的压缩 VCF 变异结果文件,包含经测序深度和等位基因频率筛选后保留的相关变异。 |
| sample/sample.filtered.vcf.gz.tbi | sample.filtered.vcf.gz 的索引文件,用于帮助 bcftools、IGV 等工具快速定位和读取 VCF 文件中的变异信息。 |
| sample/sample.haplotagged.bam | 带有单倍型标记的 BAM 文件,其中每条测序片段均已标注其所属的单倍型。该文件除包含 Chinook 生成的 tagged.bam 文件内容外,还包括基因组其余区域的数据,可用于后续单倍型分析及结果的可视化展示。 |
| sample/sample.haplotagged.bam.bai | sample.haplotagged.bam 的索引文件。 |
| sample/sample.match.json | 包含 PharmCAT 样本等位基因匹配结果的 JSON 文件。 |
| sample/sample.pharmcat.tsv | 按制表符分隔的文件,用于汇总 PharmCAT 对样本的分析结果,包括双倍型、单倍型和相关变异信息,但不包括表型或用药建议。 |
| sample/pharmcat.log | PharmCAT 日志,记录 wf-pgx 工作流程运行过程中的执行信息。 |
| CYP2D6/ | 存放 Chinook 对 CYP2D6 基因进行分析后生成的详细结果文件。 |
| CYP2D6/chinook.log | Chinook 的运行日志。 |
| CYP2D6/consensus.fasta | 包含 Chinook 根据测序数据重建的 CYP2D6 和 CYP2D7 基因序列。 |
| CYP2D6/diplotype_structure.out | 记录根据 consensus.fasta 中的重建序列推断出的 CYP2D6 双倍型结构;串联重复以“+”表示。 |
| CYP2D6/report.tsv | 以制表符分隔的 CYP2D6 双单倍型报告文件。 |
| CYP2D6/summary.out | 记录按照 PharmVar 标准以星号等位基因格式表示的 CYP2D6 双倍型,例如 *1/*68+*4。 |
| CYP2D6/tagged.bam | 包含 CYP2D6/CYP2D7 区域相关测序片段的 BAM 文件。文件包含用于判断序列片段所属等位基因的标签;若分析表明该区域可能存在串联重复的基因拷贝,相关序列片段将标记为 “XA” 和 “sv”。 |
| CYP2D6/tagged.bam.bai | tagged.bam 的索引文件。 |
| execution/ | 由 Nextflow 生成的目录,包含工作流程执行报告和运行元数据。 |
| execution/report.html | Nextflow 执行报告,汇总各个流程(process)的执行时间、资源使用情况及缓存信息。 |
| execution/timeline.html | 工作流程执行时间线,显示各个流程的运行时间,可用于分析运行瓶颈。 |
| execution/trace.txt | 记录所有 Nextflow 进程的详细执行信息,包括开始和结束时间、资源使用情况以及工作目录。 |
| igv.json | 用于配置 IGV 的 JSON 文件,可在 IGV 中查看样本的比对结果和变异信息。 |
| params.json | 记录工作流程运行时使用的参数,以便复现分析过程。 |
17. 测序芯片的重复利用及回收
采用本指南完成实验后,不建议清洗并重复使用测序芯片。
由于本实验测序时间较长,且需多次清洗测序芯片并重新上样,因此不建议在实验完成后重复使用该测序芯片,以免数据产出不足,无法满足后续分析需求。
请按照回收程序将测序芯片返还至 Oxford Nanopore。
您可在 此处找到回收测序芯片的说明。
如果您遇到问题或对测序实验有疑问,请参阅本实验指南中“疑难解答指南”一节。
18. DNA提取和文库制备过程中可能出现的问题
以下表格列出了提取和文库制备过程中的常见问题,以及可能的原因和解决方法。
我们还在 Nanopore 社区的Support板块提供了常见问题解答(FAQ)。
如果以下方案仍无法解决您的问题,请通过电邮(support@nanoporetech.com)或 纳米孔社区的在线支持(LiveChat)联系我们。
低质量样本
经AMPure磁珠纯化后的DNA回收率低
| 现象 | 可能原因 | 措施及备注 |
|---|---|---|
| 低回收率 | AMPure磁珠量与样本量的比例低于预期,导致DNA因未被捕获而丢失。 | 1.AMPure 磁珠沉降速度较快,因此在将磁珠加入样品前,请务必充分重悬混匀。 2.当AMPure磁珠量与样品量的比值低于0.4:1时,所有的DNA片段都会在纯化过程中丢失。 |
| 低回收率 | DNA 片段短于预期。 | AMPure磁珠量与样本量的比值越低,针对短片段的筛选就越严格。每次实验时,请先使用琼脂糖凝胶(或其他凝胶电泳方法)确定起始DNA的长度,据此计算出合适的AMPure磁珠用量。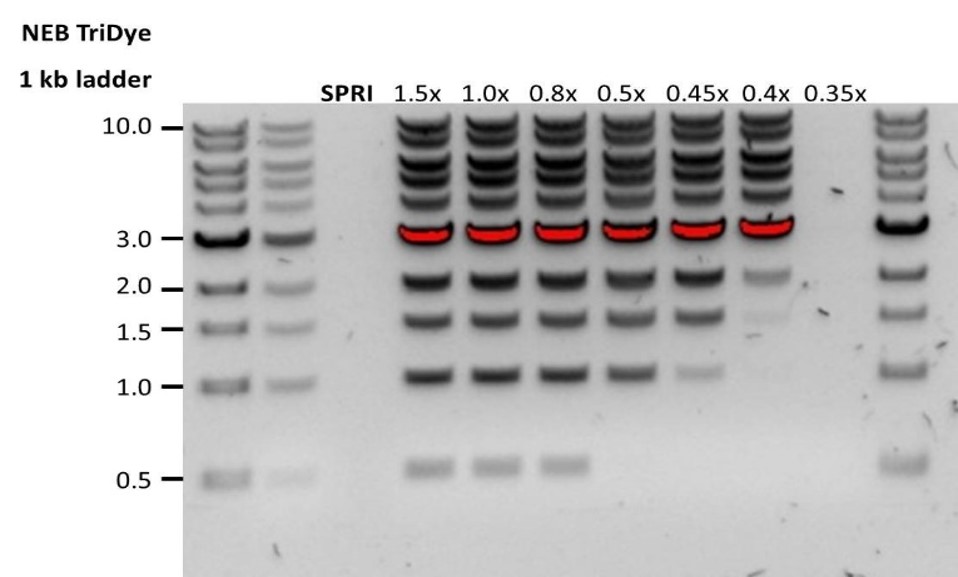 |
| 末端修复后的 DNA 回收率低 | 清洗步骤所用乙醇的浓度低于70% 。 | 当乙醇浓度低于70%时,DNA会从磁珠上洗脱下来。请确保使用正确浓度的乙醇。 |
19. 测序过程中可能出现的问题
以下表格列出了提取和文库制备过程中的常见问题,以及可能的原因和解决方法。
我们还在 Nanopore 社区的Support板块提供了常见问题解答(FAQ)。
如果以下方案仍无法解决您的问题,请通过电邮(support@nanoporetech.com)或 纳米孔社区的在线支持(LiveChat)联系我们。
MinKNOW Mux 扫描在测序起始时报告的活性孔数少于芯片质检时报告的活性孔数
| 现象 | 可能原因 | 措施及备注 |
|---|---|---|
| MinKNOW Mux 扫描在测序起始时报告的活性孔数少于芯片质检时报告的活性孔数 | 纳米孔阵列中引入了气泡。 | 在对通过质检的芯片进行预处理之前,请务必排出预处理孔附近的气泡。否则,气泡会进入纳米孔阵列对其造成不可逆转地损害。如何为 PromethION 测序芯片上样视频中演示了避免引入气泡的最佳操作方法。 |
| MinKNOW Mux 扫描在测序起始时报告的活性孔数少于芯片质检时报告的活性孔数 | 测序芯片未正确插入测序仪。 | 停止运行测序,将芯片从测序仪中取出,再重新插入测序仪内。请确保测序芯片被牢固地嵌入测序仪中,且达到目标温度。您也可尝试将芯片插入仪器的其它芯片槽进行测序(如适用)。 |
| MinKNOW Mux 扫描在测序起始时报告的活性孔数少于芯片质检时报告的活性孔数 | 文库中残留的污染物对纳米孔造成损害或堵塞。 | 在测序芯片质检阶段,我们用芯片储存缓冲液中的质控DNA分子来评估活性纳米孔的数量。而在测序开始时,我们使用DNA文库本身来评估活性纳米孔的数量。因此,活性纳米孔的数量在这两次评估中会有约10%的浮动。如测序开始时报告的孔数明显降低,则可能是由于文库中的污染物对膜结构造成了损坏或将纳米孔堵塞。用户可能需要使用其它的 DNA 提取或纯化方法,以提高起始核酸的纯度。您可在 污染物专题技术文档中查看污染物对测序实验的影响。请尝试其它不会导致污染物残留的 提取方法。 |
MinKNOW脚本失败
| 现象 | 可能原因 | 措施及备注 |
|---|---|---|
| MinKNOW 显示 "Script failed”(脚本失败)。 | 重启计算机及 MinKNOW。如问题仍未得到解决,请收集 MinKNOW日志文件并联系我们的技术支持。如您没有其他可用的测序设备,我们建议您先将装有文库的测序芯片置于4°C 储存,并联系我们的技术支持团队获取进一步储存上的建议。 |
纳米孔利用率低于40%
| 现象 | 可能原因 | 措施及备注 |
|---|---|---|
| 纳米孔利用率<40% | 测序芯片中的文库量不够。 | 请确保您按照相应实验指南,向测序芯片中加入正确浓度和体积的测序文库。请在上样前对文库进行定量。 |
| 纳米孔利用率接近0 | 在接头连接后的纯化步骤中并未使用 LFB 或 SFB 洗涤,而是使用了酒精。 | 酒精可导致测序接头上的马达蛋白变性。请确保在测序接头连接后使用洗涤缓冲液(LFB或SFB)。 |
| 纳米孔利用率接近0 | 测序芯片中无系绳。 | 测序系绳(FCT)是随着预处理液加至芯片的。请确保在制备预处理液时,将测序芯片系绳(FCT)加入测序芯片冲洗液(FCF)中。 |
读长短于预期
| 现象 | 可能原因 | 措施及备注 |
|---|---|---|
| 读长短于预期 | DNA样本降解 | 读长反映了起始DNA片段的长度。起始DNA在提取和文库制备过程中均有可能被打断。 1.请查阅纳米孔社区中的 提取方法 以获得最佳DNA提取方案. 2.在进行文库制备之前,请先跑电泳,查看起始DNA片段的长度分布。 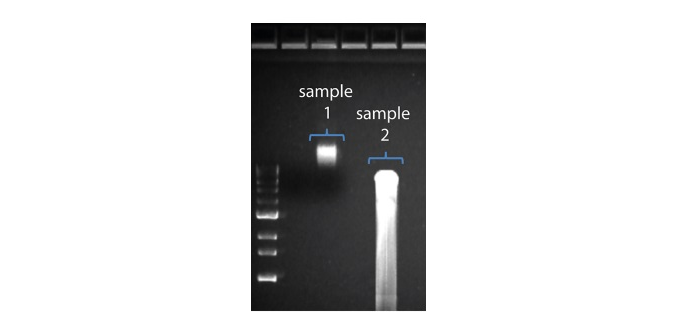 在上图中,样本 1 为高分子量 DNA,而样本 2 为降解样本。 在上图中,样本 1 为高分子量 DNA,而样本 2 为降解样本。3.在制备文库的过程中,请避免使用吹打或/和涡旋振荡的方式来混合试剂。轻弹或上下颠倒离心管即可。 |
大量纳米孔处于不可用状态
| 现象 | 可能原因 | 措施及备注 |
|---|---|---|
大量纳米孔处于失活状态(在通道面板和纳米孔活动状态图上以蓝色表示。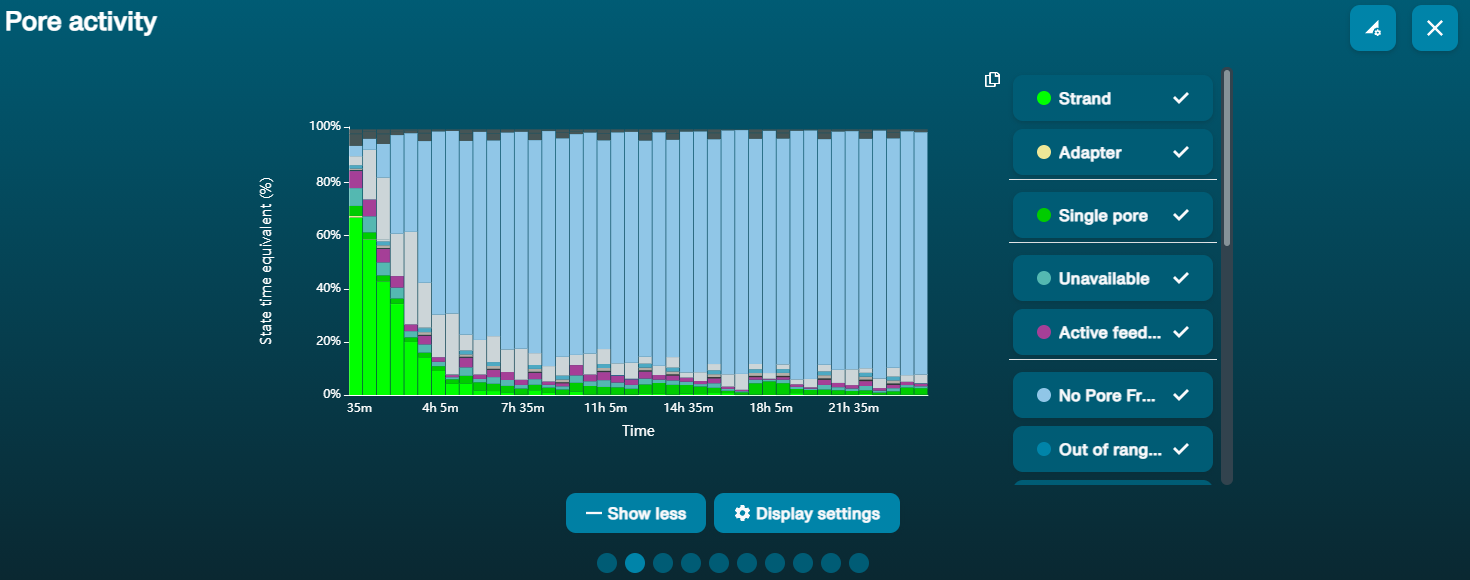 上方的纳米孔活动状态图显示:状态为不可用的纳米孔的比例随着测序进程而不断增加。 上方的纳米孔活动状态图显示:状态为不可用的纳米孔的比例随着测序进程而不断增加。 | 样本中含有污染物。 | 使用MinKNOW中的“Unblocking”(疏通)功能,可对一些污染物进行清除。如疏通成功,纳米孔的状态会变为"测序孔"(sequencing pore)。若疏通后,状态为不可用的纳米孔的比例仍然很高甚至增加: 用户可使用 测序芯片冲洗试剂盒 (EXP-WSH004)进行核酸酶冲洗 操作。 |
大量纳米孔处于“失活”(Inactive)状态
| 现象 | 可能原因 | 措施及备注 |
|---|---|---|
| 大量纳米孔处于失活状态(在通道面板和纳米孔活动状态图上以浅蓝色表示。膜结构或纳米孔遭受不可逆转地损伤)。 | 测序芯片中引入了气泡。 | 在芯片预处理和文库上样过程中引入的气泡会对纳米孔带来不可逆转地损害。请观看如何为 PromethION 测序芯片上样了解最佳操作方法。 |
| 大量纳米孔处于失活/不可用状态 | 存在与DNA共纯化的化合物 | 已知的化合物包括多糖等。 1. 1.使用 QIAGEN PowerClean Pro 试剂盒进行纯化。 2.利用QIAGEN REPLI-g 试剂盒对原始 gDNA 样本进行全基因组扩增。 |
| 大量纳米孔处于失活/不可用状态 | 样本中含有污染物。 | 您可在污染物专题技术文档中查看污染物对测序实验的影响。请尝试其它不会导致污染物残留的提取方法。 |
温度波动
| 现象 | 可能原因 | 措施及备注 |
|---|---|---|
| 温度波动 | 测序芯片和仪器接触不良 | 检查芯片背面的金属板是否有热垫覆盖。重新插入测序芯片,用力向下按压,以确保芯片的连接器引脚与测序仪牢固接触。如问题仍未得到解决,请联系我们的技术支持。 |
未能达到目标温度
| 现象 | 可能原因 | 措施及备注 |
|---|---|---|
| MinKNOW显示“未能达到目标温度”. | 测序仪所处环境低于标准室温,或通风不良(以致芯片过热)。 | MinKNOW 会限定测序芯片达到目标温度的时间。当超过限定时间后,系统会显示出错信息,但测序实验仍会继续。值得注意的是,在错误温度下测序可能会导致通量和数据质量(Q值)的降低。请调整测序仪的摆放位置,确保将其置于室温下、通风良好的环境中,再在MinKNOW中重启进程。 |
Last updated: 9/18/2026
文档选项