Device operating system update (DOS_9133_v1_revR_23Sep2025)
GridION: Protocol
V DOS_9133_v1_revR_23Sep2025
FOR RESEARCH USE ONLY
Contents
Operating system update on GridION
Operating system update on PromethION 24/48
Operating system update on PromethION 2i
1. (Advanced) Downloading the ISO image and burning it to a USB drive
Overview
The instructions below can be used to create a bootable USB drive that can be used to rebuild the OS on your device.
These instructions are for users who did not receive a USB drive with the ISO image. If you have received a USB drive, proceed to the next step: "How to boot from USB".
We strongly recommend transferring your data to backup storage even if you select an option that keeps the data. This is because ISO rebuilds can be corrupted halfway through (e.g. due to a USB disconnection, power cut etc.).
To download the latest ISO image, please contact 'support@nanoporetech.com'.
Burning the ISO image to a USB drive
Appropriate software for burning the ISO image is:
- Rufus on Windows
Note: The alternate ISO burning tool balenaEtcher does not work for our ISO image. You will need access to a computer running Windows and may need Administrator rights to install the Rufus software.

When burning the ISO image, use the settings below (it must use an EFI/GPT boot):
- Partition scheme: GPT
- Target system: UEFI
The USB drive should have the specification below:
- Must be 64 GB or larger
- USB 3.0 recommended
- UEFI boot option must be used
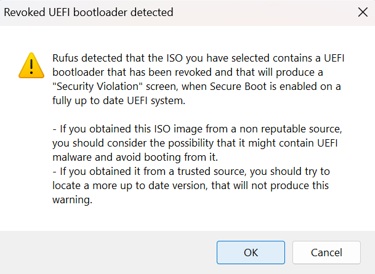
After clicking START, you may see the warning below pop up. Click OK to proceed.

Note: We recommend flashing two USB drives with a different vendor as a backup. Common USB drives can fail to reimage devices with no obvious root cause.
2. How to boot from USB
Power off the GridION.
Insert the bootable USB into the blue USB port (USB 3.0) on the back of the device.
Before powering on the device, prepare to press Delete on the keyboard.
Power on the GridION.
a. Repeatedly press Delete on the keyboard to enter the BIOS.

b. Using the mouse, under Boot Override click UEFI: [USB name] [USB information].

On the "Platform Rescue & Recovery" screen, highlight “Customer Factory Reset image XX.YY” (XX.YY specifies the image version). Then click "Enter".

This does the following:
- Keeps network configuration
- Keeps hostname
- Keeps data
- Does not clear the metadata or format all the disks
Note: The Standard Installation may take several minutes to load. Only use the other options if instructed to do so by Oxford Nanopore Technologies Technical Support.
Click "Standard Installation".

Note: in some instances, you may see the following screen. If this happens, please contact Support.

You will see an install page with progress bars. The device will reboot several times during the installation, and you may be presented with system messages showing errors. This is expected behaviour, and you can leave the device to complete the installation. The entire process will take ~1 hour to complete.

e.g. first boot screen:

second boot screen:

Once the rebuild process has completed, the standard login screen will be displayed. Log in using the password: grid

Power cycle the device. Once powered down, wait for 60 seconds, then remove the USB.
Power on the device.
Log into the device using the password: grid

Double-click the MinKNOW icon located on the desktop to open the MinKNOW UI.

Log into MinKNOW using your Community credentials.
You will be prompted to enter your email address and Nanopore password:
Check that all flow cell positions are recognised and that the device serial number is correct.
Insert the Configuration Test Cells into the device and perform a hardware check.
Please refer to the hardware check instructions for the GridION.


