Device operating system update

Overview

For Research Use Only.

Document version: DOS_9133_v1_revL_25Nov2021

1. Downloading the ISO image and burning it to a USB drive

Overview

The below instructions can be used to create a bootable USB drive that can be used to rebuild the OS on your device.

These instructions are for users who did not receive a USB drive with the ISO image. If you have received a USB drive, proceed to the next step: "How to boot from USB".

IMPORTANT

We strongly recommend transferring your data to backup storage even if you select an option that keeps the data. This is because ISO rebuilds can be corrupted halfway through (e.g. due to a USB disconnection, power cut etc.).

Download the ISO image from the link below:

Burning the ISO image to a USB drive

Appropriate software for burning the ISO image is:

Note: The alternate ISO burning tool balenaEtcher does not work for our ISO image. You will need access to a computer running Windows and may need Administrator rights to install the Rufus software.

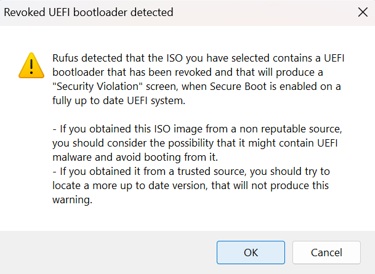
Rufus

When burning the ISO image, use the below settings (it must use an EFI/GPT boot):

  • Partition scheme: GPT
  • Target system: UEFI

The USB drive should have the below specification:

  • Must be 32 GB or larger
  • USB 3.0 recommended
  • UEFI boot option must be used

Note: We recommend flashing two USB drives with a different vendor as a backup. Common USB drives can fail to reimage devices with no obvious root cause.

2. How to boot from USB

Power off the GridION.

Insert the bootable USB into the USB port with the blue interior on the back of the device.

For serial numbers GXB01xxx or GXB02xxx, follow instructions a. for step 3. For serial numbers GXB03xxx, follow instructions b. for step 3.

Power on the GridION.

a. When the ASRock screen appears, press F11 to enter the Boot Menu. Choose the UEFI USB boot option using the cursor keys. Press Enter Setup.

Initialising

b. When the ASUS screen appears, press Del to enter the Boot Menu. Using the mouse, under Boot Override click UEFI: [USB name] [USB information]. This will trigger the next menu to appear.

GridION 3b new image

On the following screen, ensure that “Customer Factory Reset image” is highlighted. This option will detect your installation and try to keep network configurations, hostname and /data partition. Press "Enter". We recommend backing up data before proceeding with this step wherever possible.

Option What it does When to use option
Customer Factory Reset - Keeps network configuration
- Keeps hostname (i.e. PCA1XXX)
- Keeps data
- Does not clear the metadata or format all the disks
- To reset the device to a MinKNOW version reflected on the image name (e.g. 22.10 ISO = MinKNOW 22.10)
- To reset the device to a known state whilst attempting to keep existing data
Reset Install and keep /data - Keeps network configuration
- Keeps hostname (i.e. PCA1XXX)
- Keeps data
- Does not clear the metadata or format all the disks
Functionally identical to the Customer Factory Reset option
Format Disks and lose /data - Does not keep network configuration
- Does not keep hostname (i.e. PCA1XXX)
- Does not keep data
- Clears the metadata and formats all the disks
- Issue with data storage or a new unformatted drive (e.g. faulty drive or drive replaced)
- If the keep /data option does not resolve the issue
SECURE WIPE - can take hours - Does not keep network configuration
- Does not keep hostname (i.e. PCA1XXX)
- Does not keep data
Use only if requested by a member of Technical Services - this option completely wipes the disks by writing all data to 0

Reset options (2)

You will see the screen below. Select “Standard Installation". A confirmation prompt will appear; select “Okay”.

Note: The blue desktop may fill the entire screen. You can press Esc to view the menu in the default browser.

Installation options (3)

Standard installation confirmation (4)

The following screen will appear and the progress will be shown on the progress bar. The entire process may take ~1 hour to complete.

Note: It is normal for the system to restart multiple times.

GridION-build-screen

You may also see the screen below more than once following some reboots of the device; the GridION may appear stuck here but should proceed after a maximum of 30 minutes. You do not need to interact with the device while the rebuild is taking place even if this screen appears.

Picture7

Once the rebuild process has completed, the standard login screen will be displayed. After logging in, you will see the MinKNOW icon on the desktop. If the MinKNOW icon is not present, carry out one final power cycle.

Any previous changes to the device password will have defaulted back to grid. If you need to update the default password, follow the instructions here.

Open MinKNOW and check that all flow cell positions are detected. If not, carry out one final power cycle.

3. Completing the restore

Eject the bootable USB by going to the File Explorer and selecting the Eject icon next to the USB device.

The keyboard and mouse may take several minutes to be recognised by the device during the first time booting up.

Press Ctrl+Alt+T to open a terminal window.

If your hostname has not been maintained through the restore process (it should be visible on the command line), type:

ont-gridion-serial set GXBXXXX

where GXBXXXX is the serial ID as included on the label on the back of your device.

Press Enter.

Type "bash", then press Enter to confirm that the hostname has been set.

Configure your network.

A script has been written to help you to configure your network. Open a Terminal window and enter:

ont-network-settings

The options for this script are:

--dhcp (optional) - Use DCHP and removes need for all other features except for the interfaces, bond and overwrite --address ip_address (required) - IP address of the device --subnet subnet_mask (required) - Subnet mask for the device --gateway gateway_address (required) - Default gateway for the device --dns DNS_server1,DNS_server2 (required) - DNS servers for the device --search your_domain (required) - Your domain suffix (e.g. yourcompany.local) --overwrite (optional) --help - Details the options above

To update the settings, run the suitable command from the above options with the --overwrite flag and reboot your device.

Open MinKNOW and check for software updates, or check for updates in the terminal:

sudo apt update
sudo apt install ont-gridion-release

ont-system-test (not available on some ISO images)
ont-validate-install
You should see the following message if the installation was successful:

All Packages installed and nvidia is happy, so resetting ont-restore-apt

If the installation was unsuccessful, run the following commands:
sudo apt update
sudo apt dist-upgrade
sudo ont-validate-install
sudo reboot

If the issue has not been resolved after a reboot, contact Technical Support at support@nanoporetech.com.

4. If problems are encountered

If the build process does not restore your machine correctly, go back to "How to boot from USB" and proceed from step 4 with the alternative instructions below.

Press Enter once the UEFI option is chosen, then ensure Format disks and lose /data is highlighted. This option will reset all disks and rebuild your whole system, and will require you to manually set the hostname once building is complete.

Reset options (2)

The rebuild process will now blank all of the system’s disks and then reboot. Proceed with the installation as described from step 4 selecting “Customer factory reset”.

If the screen in step 5 in "How to boot from USB" does not appear, and instead you see a black screen with white text, reboot the GridION (hold the power button for a few seconds) then proceed from step 3.

During the process to blank all of the system’s disks, the following screen will be visible showing either ASRock or ASUS with a scrolling circle. This process may take time to complete and be following by a reboot.

OS update ASUS

If you chose one of the standard reset options (i.e. anything except secure wipe) and the GridION crashes or produces an error during the reset process, perform a "secure wipe".

The final "secure wipe" option will lose data and wipe the hard drives completely to a known state. If your GridION is unable to boot up even after "secure wipe" and a subsequent customer factory reset, contact Support (support@nanoporetech.com) as this may indicate a hardware failure.

Last updated: 10/28/2023

Document options

GridION